SHARE Knowledge Hub
Abrasive Wheels
Abrasive wheels cut and grind by rapidly removing material. A damaged, mismatched or poorly mounted wheel can break or throw fragments, while cutting and grinding may generate dust, sparks, noise and vibration. Safe use depends on matching the wheel to the machine and material, effective guarding and source controls, and stopping when markings or conditions are uncertain.
Understanding Abrasive Wheels
The governing principle is that abrasive wheels fail dangerously when they are wrong for the machine or material, damaged, poorly stored, incorrectly mounted, over-speeded, inadequately guarded or used by people who have not been trained and assessed as competent. A safe system must therefore control the entire life cycle, from purchase to disposal.
Why this matters at work
Abrasive wheels store energy and rotate at high speed. If a wheel bursts, fragments can cause fatal or life-changing injuries. Contact with the wheel can cause severe cuts, amputation or burns. Sparks and hot particles can ignite combustible material. Grinding and cutting may generate respirable dust, metal fume or other hazardous substances. Noise and vibration can create chronic health risks. These hazards often occur together, so single-control thinking is weak.
Management failures sit underneath these visible failures. They include poor procurement, no issue control, no competence matrix, production pressure, weak supervision, generic risk assessments, no maintenance system, poor incident learning and tolerance of unsafe modifications. A strong investigation asks why the immediate failure made sense to the worker at the time.
How organisations manage this in practice
Residual risk must be judged after controls are selected, not before. If the remaining risk is still significant, the duty holder should revisit elimination, substitution, engineering controls, isolation, procedural controls and PPE in that order. The record should show why the selected controls are reasonably practicable and how their effectiveness will be checked.
The assessment should distinguish between task hazards, workplace hazards and management failures. Task hazards are the direct sources of injury or ill health. Workplace hazards include access, lighting, housekeeping, weather, traffic, noise, dust, vibration, confined space, electricity or poor layout. Management failures include unclear ownership, inadequate training, missing inspections, poor purchasing decisions, weak supervision and failure to learn from previous events. NEBOSH-style answers usually gain depth by linking all three layers.
Inspection and assurance are the bridge between written controls and real control of abrasive wheels. A well-written document has little value if the organisation never checks whether equipment is suitable, guards are fitted, first aid is available, reporting is happening, or workers understand what to do. Assurance should combine planned inspections, supervisor observations, maintenance records, training checks, incident review, worker consultation and management review.


Abrasive Wheels in a working scene
Practise abrasive-wheel decisions by exploring the working scene, identifying harm routes and comparing controls before choosing what to do.
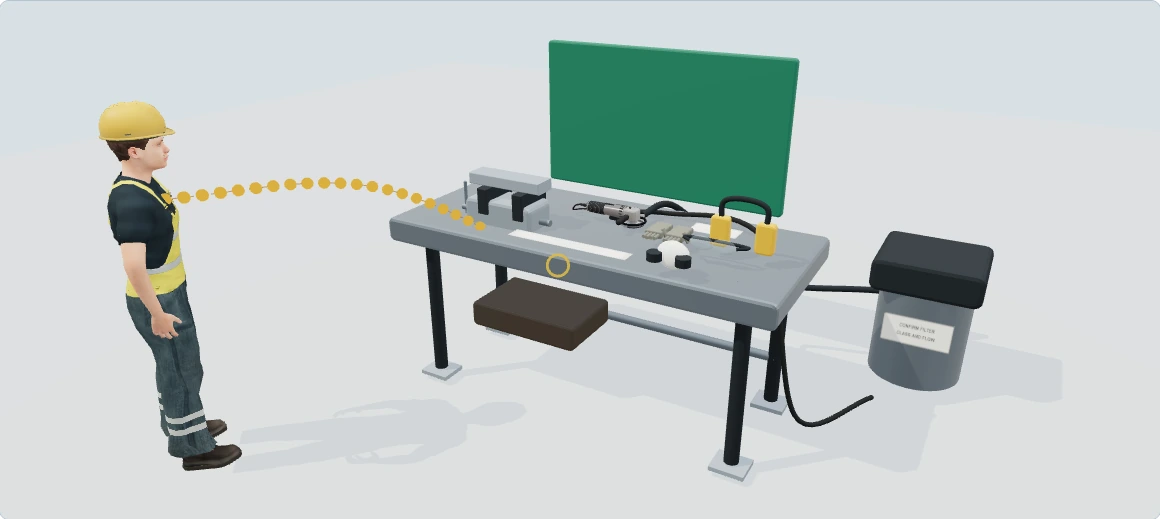
Abrasive wheels: energy, kickback and the line of fire
Explore how this equipment can harm its users and other people, then follow the practical measures that interrupt each pathway. This is a hazards and good-practice lesson; the separate checklist remains the pre-use/safety-check activity.
Hazards and good practice: learn what can hurt people during use, change and maintenance. Pre-use and safety checks stay in the separate checklist.
Checksheets and risk assessments
Equipment checksheets
Risk assessment forms
Risk assessment examples
Full written walkthrough — all 8 steps
1. Choose a safer process first
What is happening: The grinder acts on a secured workpiece; the stored rotational energy is the starting point for the lesson.
How harm can occur: Contact, a failed wheel or a displaced workpiece can cause severe cuts and impact injuries.
Best practice to apply: Consider a process that removes grinding or cutting, then choose the machine, wheel and support for the actual task.
Why this works: Removing the operation removes its wheel-contact and fragment pathways; training alone leaves them present.
Abrasive Wheels · What is the scope and authority of this abrasive-wheels guide?2. Match the wheel to the operation
What is happening: A grinding disc and a thin cutting disc have different intended uses; the pictured grinding setup does not approve a cutting task.
How harm can occur: Wrong speed, size, material, side loading or damage can cause wheel failure and fragments.
Best practice to apply: Use the actual machine and wheel information; match type, dimensions, maximum speed, material and permitted contact.
Why this works: Compatibility controls the energy-bearing component before the operator is exposed to it.
Abrasive Wheels · Which tools and abrasive-wheel types are commonly used?3. Understand kickback and pinch
What is happening: The work support determines what happens as material separates or the wheel encounters an edge.
How harm can occur: A snag or closing cut can throw the tool towards the user or eject the workpiece.
Best practice to apply: Secure and support the work without closing the cut; plan the offcut, tool direction and people in the line of fire.
Why this works: Stable support reduces unexpected relative movement that can pinch or deflect the wheel.
Abrasive Wheels · How should you match an abrasive wheel to the task before work starts?4. Keep guarding effective during use
What is happening: The disc guard and side handle are part of the working arrangement, not optional accessories.
How harm can occur: Reach to the rotating wheel, fragments and loss of tool control can injure the operator or an assistant.
Best practice to apply: Retain the correct guard and required handle; position the work so the task can be completed without removing protection.
Why this works: Protection must work in the actual operating position, rather than only while the tool is parked.
Abrasive Wheels · How can the hierarchy of controls reduce abrasive-wheel risks during cutting and grinding?5. Follow sparks and combustible material
What is happening: Particles leave the contact point and can travel to material beyond the operator's immediate view.
How harm can occur: Hot particles can ignite residues, packaging or material on the other side of an opening.
Best practice to apply: Assess the hot-work implications; remove or protect combustibles and control adjacent work, openings and exposed people.
Why this works: Controlling the full spark route prevents an apparently small task creating a remote fire.
Abrasive Wheels · When does abrasive wheel work become hot work?6. Control dust, noise and vibration
What is happening: The operation creates health exposures as well as an immediate wheel hazard.
How harm can occur: Inhaled dust, excessive noise and hand-transmitted vibration can cause lasting harm.
Best practice to apply: Reduce the source; use task-suitable extraction or suppression and the assessed residual protection and exposure arrangements.
Why this works: Source controls protect the operator and nearby people; PPE alone leaves release into the workplace.
Abrasive Wheels · Cut a concrete kerb while controlling silica dust7. Manage abnormal behaviour and run-down
What is happening: The wheel may still move after a stop command and defects can appear during use.
How harm can occur: Trying to catch a moving tool, touching a running-down disc or continuing with abnormal vibration can cause contact or failure.
Best practice to apply: Stop the affected task, keep clear during run-down and follow isolation arrangements before intervention; report defects.
Why this works: A control stop and a verified isolation have different functions; neither should be assumed from appearance.
Abrasive Wheels · Cut a steel bracket and leave the area safe8. Plan clearing, changing and hand-back
What is happening: Changing a disc, clearing a jam and cleaning create a different exposure from normal grinding.
How harm can occur: Unexpected start, sharp residue or unsafe refitting can injure the maintainer or next user.
Best practice to apply: Use competent, machine-specific isolated maintenance and mounting arrangements; verify the repaired configuration before return.
Why this works: Safe hand-back prevents a defect being transferred to the next person or shift.
Abrasive Wheels · What is the scope and authority of this abrasive-wheels guide?
Illustrative awareness learning. Geometry, colours and movement do not establish safe distances, capacity, exposure, isolation or work permission. Use the actual assessment, equipment information and competent arrangements.
The wider workplace has its own account and subscription access. Exploring this lesson does not grant access, record course completion or authorise work.
UK guidance for further reading
HSE: Abrasive wheelsWhat is the scope and authority of this abrasive-wheels guide?
The selection, guarding, mounting, use and maintenance principles apply across the UK, while Great Britain and Northern Ireland have separate workplace and product-supply routes. This is an educational reference; the actual wheel, machine and material instructions govern compatibility and limits.
Use HSG17 within its scope. HSE publishes it as technical abrasive-wheel guidance from 2000. Apply its wheel selection, mounting, guarding and use principles alongside current PUWER, COSHH, noise and vibration duties and the current manufacturer instructions; an older guide must not override a newer legal requirement or product limit.
Great Britain
For England, Scotland and Wales, the main work-equipment route is the Provision and Use of Work Equipment Regulations 1998 (PUWER), supported by HSE guidance and other GB regulations for substances, noise, vibration and personal protective equipment.
Northern Ireland
Northern Ireland has its own legislation, including the Provision and Use of Work Equipment Regulations (Northern Ireland) 1999, with guidance and enforcement led by HSENI. Do not use a GB citation as though it were the NI legal text.
When to recheck
Reassess wheel compatibility and controls after a changed tool, wheel, material, work method, damage or near miss. Check current law, guidance and manufacturer instructions before the task.
When markings, speed, material, guard condition or jurisdiction conflict, hold the task and obtain competent advice before use.
The guide distinguishes operator decisions from wheel mounting, supervision, procurement and specialist exposure control. A product mark, training certificate or completed form alone does not prove the combination is safe for the task.
How should you match an abrasive wheel to the task before work starts?
Match the abrasive wheel to the task, material and machine, then verify its markings, mounting, guarding and exposure controls before releasing the work.
Match wheel, machine and task before fitting
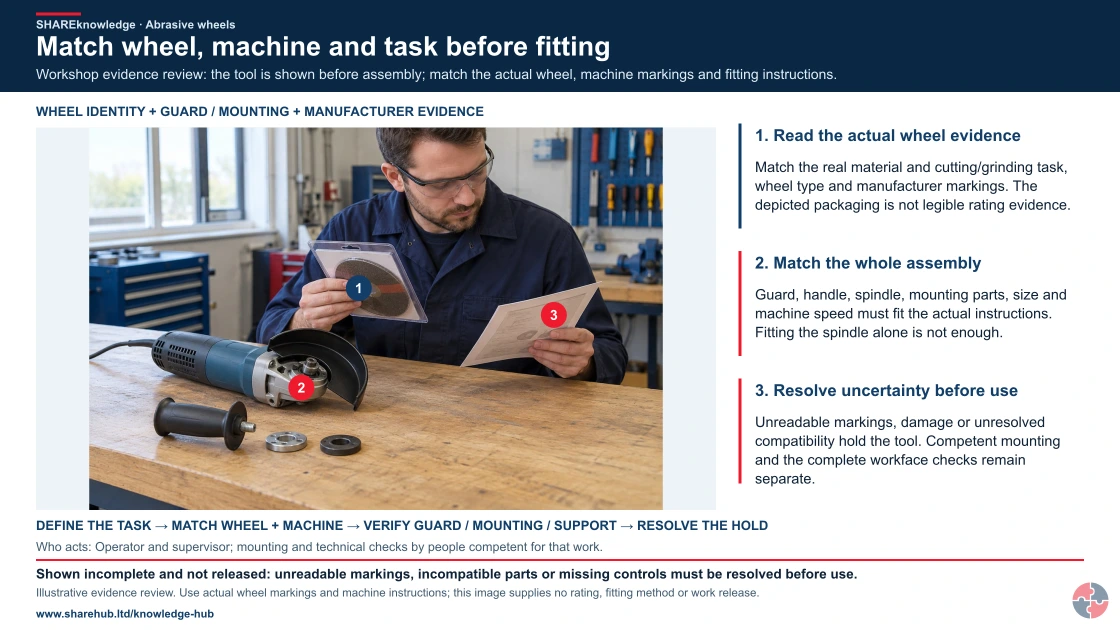
Full written explanation
A retained unmodified high-definition workshop photograph component shows a worker comparing a packaged abrasive wheel with inert manufacturer information. The stationary tool has no fitted wheel and its handle and mounting pieces are separate, making the assembly explicitly incomplete and not released for use. Three native annotations identify the actual wheel/task evidence, the full machine/guard/mounting compatibility question and the hold for uncertainty. The picture gives no readable numerical rating, correct mounted arrangement or approved fitting sequence. Existing energy, fragment, spark and dust explanations remain in the full topic and accessible text.
Workshop evidence review: the tool is shown before assembly; match the actual wheel, machine markings and fitting instructions.
- Read the actual wheel evidence. Match the real material and cutting/grinding task, wheel type and manufacturer markings. The depicted packaging is not legible rating evidence.
- Match the whole assembly. Guard, handle, spindle, mounting parts, size and machine speed must fit the actual instructions. Fitting the spindle alone is not enough.
- Resolve uncertainty before use. Unreadable markings, damage or unresolved compatibility hold the tool. Competent mounting and the complete workface checks remain separate.
Change the pathway
- Choose the task. Avoid the cut or use a suitable lower-risk method where practicable.
- Match the whole assembly. Check the wheel, speed, dimensions, mounting and specified guard together.
- Control the work area. Secure the work, manage sparks and dust, and protect nearby people.
Evidence check: A training record does not replace the equipment and workface checks.
Read the distinct steel, masonry and non-routine cutting workflows
Primary references: HSE abrasive-wheel guidance overview · HSE kerb/paving dust-control task · HSE actual maintenance boundaries
Open the complete HD image (new tab)Download image
Read the distinct steel, masonry and non-routine cutting workflows
Primary references: HSE abrasive-wheel guidance overview · HSE kerb/paving dust-control task · HSE actual maintenance boundaries
Start with the cut or grinding operation and the material, then select the machine and compatible wheel. Read the markings together with the machine instructions; an unreadable wheel or unknown material leaves a compatibility question open. Separate the operator check from mounting and specialist inspection.
How can you plan safer abrasive-wheel work?
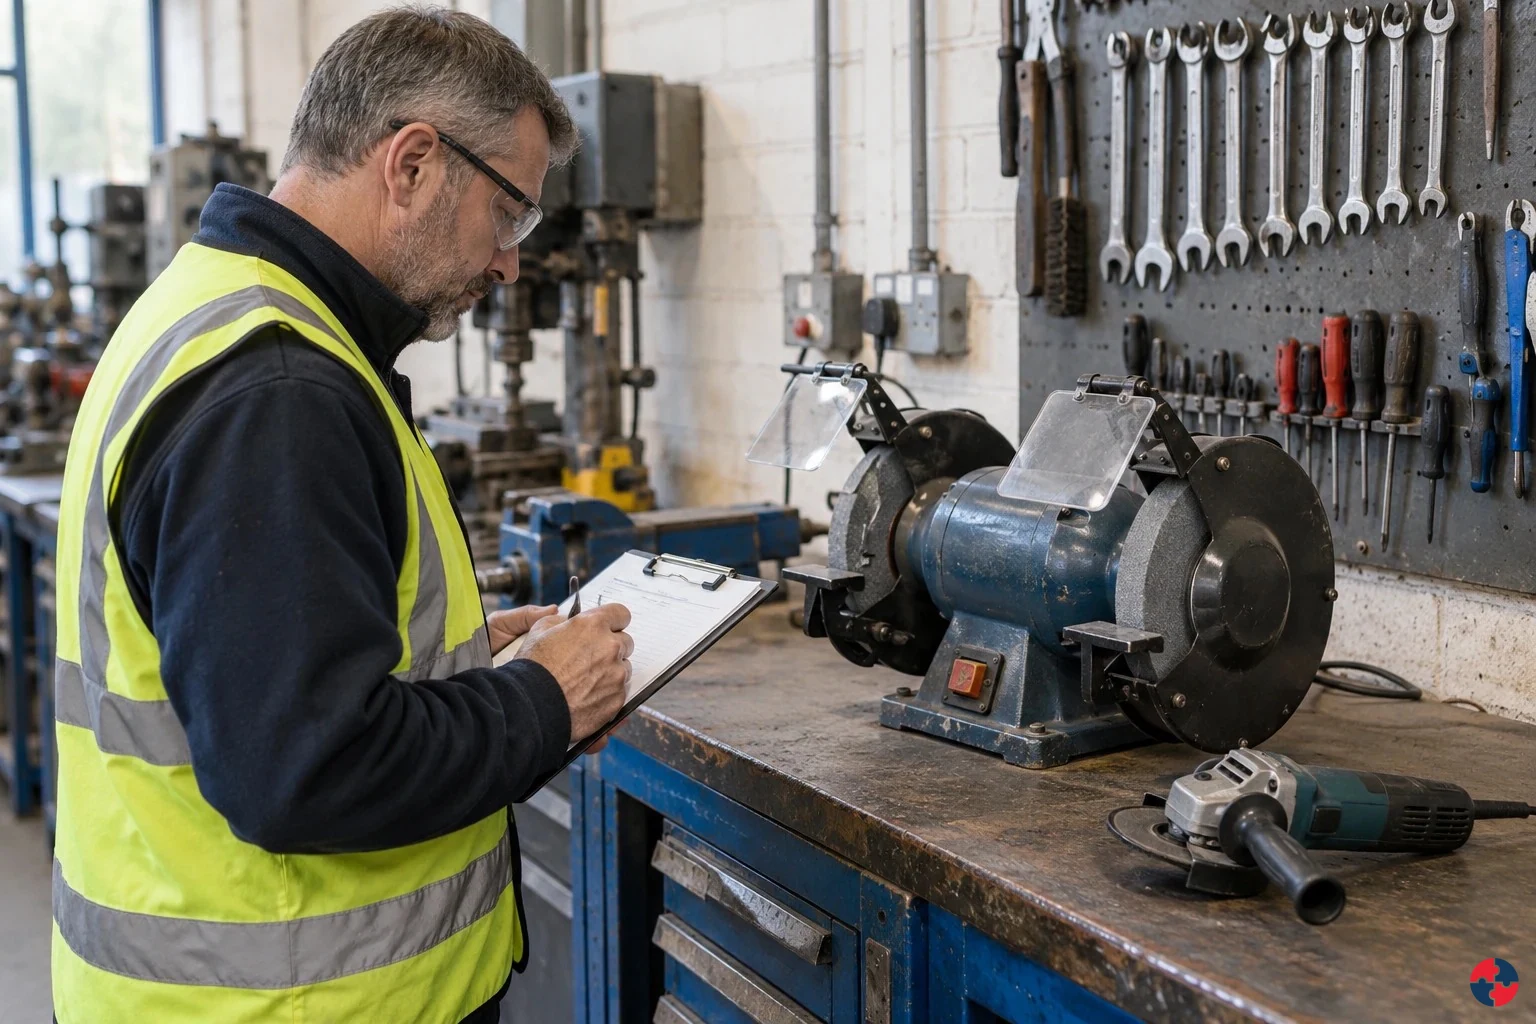
Match the wheel, machine and job before use
Plan the task before fitting a wheel. Check the machine, wheel specification, condition, mounting arrangement, guard and workpiece support against the instructions and local assessment. The photographed tool is disconnected for inspection; the guard must be correctly refitted before operation.
A short check can prevent an unsuitable set-up
A meaningful pre-use decision can identify an unsuitable disc or missing control before work starts. It also reduces avoidable stoppages and rework. A tick or training certificate does not resolve an unreadable wheel marking or a defective guard.
Stop a steel-bracket cut when the marking is unclear
The team keeps the tool isolated and obtains a known suitable disc through its competent mounting arrangements. It checks the guard, workpiece support, spark path and people nearby before release. HSE's published plastic-kerb case also illustrates how changing the product can remove cutting from a different task.
Think beyond contact with the wheel
A wheel failure can project fragments; a snag or kickback can bring the tool towards the user. Cutting some materials also creates harmful dust. The work area and people nearby belong in the assessment, even when the cut is brief.
Avoid the kerb cut before relying on RPE
Check whether a suitable alternative removes the cut. Where cutting remains, use effective source controls and the required RPE together; water suppression does not remove every dust risk. Confirm the method and protection against the task-specific guidance and instructions.
Use the right guidance for the actual cut
Use the full page for competence, mounting limits, pre-use checks and emergency arrangements. Ring testing is not suitable for every wheel type and must follow the applicable instructions. These slides simplify decisions; they do not authorise a task or replace competent training.
Read all six steps as text
1. Match the wheel, machine and job before use
A disc that fits is not necessarily a disc that is suitable.
- SELECT: Confirm the material and operation.
- MATCH: Check specification and speed compatibility.
- PREPARE: Inspect, guard and control the work area.
Plan the task before fitting a wheel. Check the machine, wheel specification, condition, mounting arrangement, guard and workpiece support against the instructions and local assessment. The photographed tool is disconnected for inspection; the guard must be correctly refitted before operation.
Apply it: If the marking, suitability or condition is uncertain, hold the task and obtain a known suitable wheel.
2. A short check can prevent an unsuitable set-up
Deal with the mismatch before energy is applied.
- LOOK BEYOND FIT: Diameter alone does not establish compatibility.
- MAKE THE DECISION: Use readable markings and instructions.
- REVIEW THE TASK: Control dust, sparks and nearby people.
A meaningful pre-use decision can identify an unsuitable disc or missing control before work starts. It also reduces avoidable stoppages and rework. A tick or training certificate does not resolve an unreadable wheel marking or a defective guard.
Apply it: State the evidence that makes this particular wheel suitable for this particular operation.
3. Stop a steel-bracket cut when the marking is unclear
Example: a refurbishment supervisor checks the proposed set-up.
- FIND: The disc specification cannot be read.
- HOLD: Do not infer suitability from appearance.
- RESOLVE: Obtain a compatible disc and restore controls.
The team keeps the tool isolated and obtains a known suitable disc through its competent mounting arrangements. It checks the guard, workpiece support, spark path and people nearby before release. HSE's published plastic-kerb case also illustrates how changing the product can remove cutting from a different task.
Apply it: Separate the operator's pre-use check from work that needs a competent, authorised mounter.
4. Think beyond contact with the wheel
The machine can create several exposure routes at once.
- MECHANICAL: Contact, kickback or fragments can injure.
- AIRBORNE: Silica dust can reach deep into the lungs.
- SURROUNDINGS: Sparks, noise and vibration need control.
A wheel failure can project fragments; a snag or kickback can bring the tool towards the user. Cutting some materials also creates harmful dust. The work area and people nearby belong in the assessment, even when the cut is brief.
Apply it: Identify the material, the line of fire, the dust route and the people who could be exposed.
5. Avoid the kerb cut before relying on RPE
A concrete-kerb example: choose controls in a stronger order.
- ELIMINATE: Design out cuts or order pieces to size.
- SUBSTITUTE: Consider a suitable lower-dust method.
- ENGINEERING: Use suitable water suppression or extraction.
- ADMINISTRATIVE: Plan the cutting area, checks and supervision.
- PPE / RPE: Select suitable protection, including fit testing.
Check whether a suitable alternative removes the cut. Where cutting remains, use effective source controls and the required RPE together; water suppression does not remove every dust risk. Confirm the method and protection against the task-specific guidance and instructions.
Apply it: What can be changed in design or procurement before the cutting equipment arrives?
6. Use the right guidance for the actual cut
Keep machinery compatibility and exposure control together.
- WHEEL SAFETY: Read HSG17 and the machine instructions.
- DUST CONTROL: Use the task-specific HSE guidance.
- BETTER DESIGN: Review the published alternative-product example.
Use the full page for competence, mounting limits, pre-use checks and emergency arrangements. Ring testing is not suitable for every wheel type and must follow the applicable instructions. These slides simplify decisions; they do not authorise a task or replace competent training.
Apply it: Bring the machine instructions, wheel specification and task plan together before release.
The wheel is only one control. Check support of the workpiece, guarding, adjacent people, the spark path and any generated dust before authorising use. Any ring-test requirement must stay qualified by wheel type and the applicable instructions; it is not a universal test for every disc.
A steel bracket with an unidentified disc
Illustrative example. A worker has a guarded grinder for a known mild-steel bracket, but the disc markings cannot be read.
Decision. Hold the cut and obtain a known compatible disc through the mounting arrangement; do not infer suitability from colour or appearance.
Evidence to check. Record machine identity and maximum speed, readable wheel specification, intended operation, guard and material evidence.
Hold or escalation point. Missing markings, uncertain speed compatibility, damage or ineffective dust/spark control prevent start.
Follow-up. Observe the first approved cut and review wear, workpiece support and the surrounding area.
What are abrasive wheels?
Abrasive wheels are rotating tools that cut, grind or finish by wearing material away with abrasive grains rather than teeth.
Abrasive grains are held in a bond or fixed to a wheel, disc, cup, point or blade. As the tool rotates, each grain acts like a tiny cutting edge. The wheel gradually wears, fresh grains are exposed and the material is removed by friction, cutting and fracture. This is why abrasive wheels are so useful on hard materials, but also why they create dust, sparks, heat, vibration and high stored energy.
In simple terms, the safe question is not only "is the worker trained?" It is whether the whole cutting or grinding system is right: the wheel, machine, speed, material, guard, mounting, surface, operator position, environment, dust control, fire risk and supervision. A competent person should be able to explain why a particular disc is suitable and what would make the job unsafe.
Which tools and abrasive-wheel types are commonly used?
Abrasive wheels appear on both portable and fixed equipment, and each tool changes the hazards and controls.
A speed match is only one compatibility gate

Read this visual as text
- TASK MATCH: The wheel must suit the cutting or grinding task and the actual material.
- MECHANICAL FIT: Check diameter, thickness, bore, flanges, guard and handle against the machine instructions.
- SPEED AND CONDITION: Check the wheel maximum against machine speed, damage, storage and any stated use-by date.
Bonded wheels may be vitrified, resinoid, rubber or shellac bonded. Vitrified wheels are hard and accurate but brittle, often used for precision grinding. Organic bonded wheels are tougher and more shock resistant, making them common in cutting-off and portable grinding work. Reinforced resin-bonded cutting discs are common on angle grinders and cut-off saws, while diamond blades are common on stone, concrete, masonry and tile.
Wheel markings matter because they tell the user what the product can safely do. A wheel or its label should show information such as dimensions, maximum operating speed in revolutions per minute (RPM) or metres per second, restrictions of use, manufacturer details, traceability, expiry or use-by information where relevant, and the wheel type. If markings are missing or unreadable, the wheel should not be treated as suitable.
| Tool or wheel type | Typical use | Main control points |
|---|---|---|
| Angle grinder with cutting disc | Cutting metal, bolts, brackets, tiles or small masonry items where the tool and disc are designed for that use. | Use the correct disc, keep the guard and side handle fitted, avoid twisting in the cut, support the workpiece and keep the body out of the kickback line. |
| Angle grinder with grinding disc | Grinding welds, preparing edges, dressing metal and removing surface defects. | Do not fit a thin cutting disc for grinding. Control sparks, eye and face exposure, vibration time, noise and hot work risk. |
| Petrol or electric cut-off saw | Cutting slabs, kerbs, concrete, brickwork, pipes, asphalt or structural materials. | Use the correct blade, continuous water suppression where suitable, respiratory protective equipment (RPE), exclusion zones, stable stance and fuel or electrical safety controls. |
| Bench or pedestal grinder | Sharpening tools, dressing small components and controlled fixed grinding work. | Adjust the work rest close to the wheel, keep the tongue guard close to the wheel, dress uneven wheels, use eye protection and stop if vibration or wheel damage appears. |
| Chop saw or abrasive cut-off machine | Repeated cutting of tube, channel, bar, cable tray or similar materials in workshop settings. | Clamp the workpiece, use the designed guard, wait for full stop before reaching in, control sparks and check the wheel rating against machine speed. |
| Diamond blade | Cutting stone, concrete, masonry, tiles and other hard mineral materials. | Confirm wet or dry rating, direction of rotation, segment condition, material suitability, dust control and blade speed compatibility. |
| Mounted points, plugs and cones | Internal grinding, deburring and detailed shaping on die grinders or flexible-shaft tools. | Control overhang, speed, mounting security and guarding or shielding because small wheels can still fail at high rotational speed. |
Worked example: speed and marking check
This example shows the logic, not approval of a particular product. The actual machine plate, wheel label and manufacturer instructions must all be checked.
| Decision point | Example evidence | Decision |
|---|---|---|
| Machine speed | The grinder plate states a no-load speed of 11,000 RPM. | Use 11,000 RPM as the machine value unless the manufacturer specifies another comparison method. A speed control or lower normal running speed does not justify fitting an underrated wheel. |
| Wheel maximum speed | The 115 mm cutting disc is clearly marked with a maximum of 13,300 RPM. | The wheel rating exceeds the machine speed. If the wheel were marked below 11,000 RPM, it would be rejected for this machine. |
| Dimensions and mounting | Diameter, thickness and bore match the grinder, guard and manufacturer-specified flange arrangement. | Do not enlarge the bore, improvise a bush, use the wrong flange or remove the guard to make a wheel fit. |
| Purpose and material | The label identifies a cutting disc suitable for the stated steel task and does not permit side grinding. | Use it only for the stated material and edge-cutting operation. Diameter and speed compatibility alone are not enough. |
| Condition and traceability | The disc is dry, undamaged and within any stated use-by period; manufacturer and batch details remain legible. | Proceed to mounting and the controlled trial run only when every check passes. Any doubt means quarantine and replacement. |
Product marking: product-supply rules are not the same as workplace-use controls. Current GOV.UK UKCA and CE regime guidance signposts separate Great Britain and Northern Ireland market routes. Purchasers should verify the product-specific rules, the relevant market guide and the declaration rather than treating a conformity mark as proof that a wheel is suitable for a particular task.
Which three pieces of evidence should you check before fitting an abrasive wheel?
Before fitting an abrasive wheel, compare the actual wheel information, machine plate and manufacturer instructions while the equipment is safely isolated.
Read the actual wheel information, machine plate and instructions while the equipment is safely isolated. This enlarged evidence guide shows which fields to compare; it is not a universal wheel label or a mounting instruction.
| Information source | Find and compare | Hold the task if |
|---|---|---|
| Wheel label and supplier information | Intended material and operation; wheel type and dimensions; maximum operating speed; mounting requirements; storage or expiry requirements where applicable. | The marking is unreadable, the wheel is damaged or its suitability cannot be established. |
| Machine plate and manufacturer’s instructions | Rated speed and any adjustable-speed limits; permitted wheel types and dimensions; spindle, flanges and guard specified for that machine. Compare using consistent units. | The machine can exceed the wheel rating, the required guard or mounting is incompatible, or information conflicts. |
| Task and work area | What is being cut or ground, how it is supported, cutting direction and foreseeable dust, sparks, kickback, noise and nearby people. | Compatibility is established but the task controls are absent, unsuitable or unverified. |
Agreement on speed alone does not release the work. A competent person must establish the full wheel–machine–task match and follow the manufacturer’s fitting and use instructions.
How do abrasive-wheel controls change for common activities?
Start with the task, material, people and environment, then select the equipment and controls; never start with an available grinder and try to make the job fit it.
Masonry cutting needs its own control package
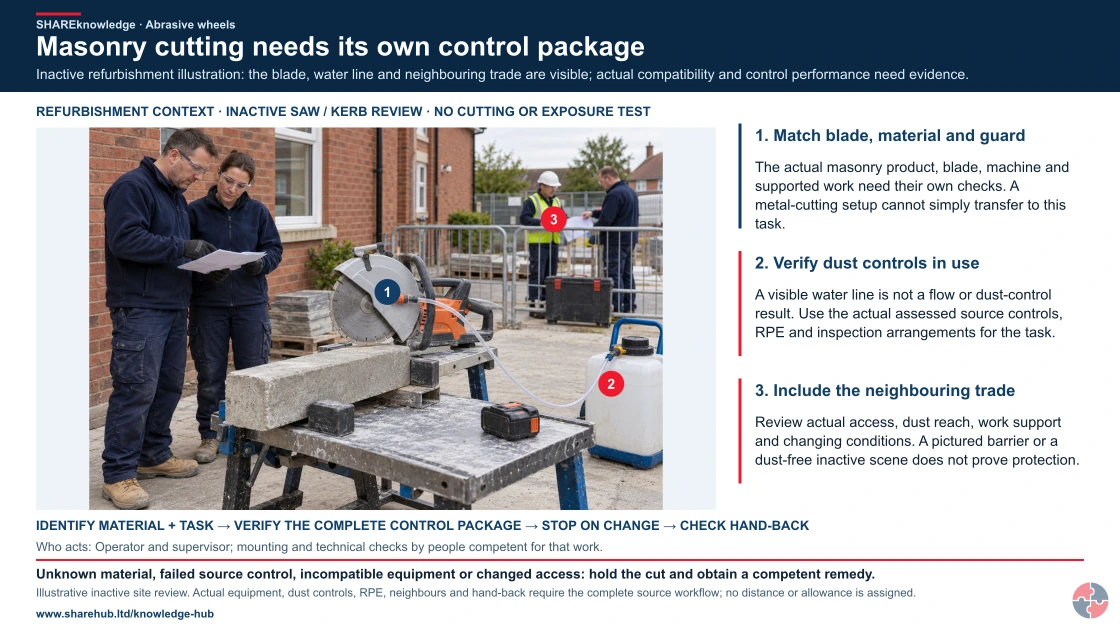
Full written explanation
A new realistic HD outdoor British refurbishment scene shows an inactive masonry cut-off saw, a supported kerb, a fitted blade guard, a visible water line/container and a separate battery. Two planners review papers while another trade remains behind a barrier. Native annotations connect the physical blade/material/guard, source dust-control hardware and real neighbouring work interface. No cutting, dose, dust-control test, proved isolation, rated compatibility or safe separation distance is depicted. A water hose or clean-looking scene is not evidence that the complete controls work; the actual task-specific RPE, source control, machine instructions and stop/restart requirements in the full source remain authoritative. No mounting, testing or operating recipe is added.
Inactive refurbishment illustration: the blade, water line and neighbouring trade are visible; actual compatibility and control performance need evidence.
- Define the work. Identify the material, cut or grind, machine and people who may be exposed.
- Check compatibility. Use the wheel markings and machine instructions; fitting the spindle is only one check.
- Prepare the controls. Check condition, mounting, guarding, work support and dust/spark controls.
- Verify before use. The competent operator checks the actual assembly and work area; resolve uncertainty first.
When the evidence does not fit: Unreadable markings, damage, incompatible parts or missing controls: keep the affected tool out of use and resolve the defect.
Who acts: Operator and supervisor; mounting and technical checks by people competent for that work.
Changed workplace
Fabrication workshop: Match the wheel to the actual metal and operation; control ejected particles and sparks.
Masonry refurbishment: Reassess the material, dust control and nearby trades; a metal-cutting setup does not transfer automatically.
Evidence check: A training record does not replace the equipment and workface checks.
Read the distinct steel, masonry and non-routine cutting workflows
Primary references: HSE abrasive-wheel guidance overview · HSE kerb/paving dust-control task · HSE actual maintenance boundaries
Open the complete HD image (new tab)Download image
Read the distinct steel, masonry and non-routine cutting workflows
Primary references: HSE abrasive-wheel guidance overview · HSE kerb/paving dust-control task · HSE actual maintenance boundaries
Wheel selection happens before fitting

Read this visual as text
- The tool is disconnected and the wheel is not released for use. Compare the machine, wheel, mounting parts and instructions; the auxiliary handle and specified guard must be correctly fitted before operation.
- TASK AND MATERIAL
- SIZE AND MOUNTING
- SPEED AND CONDITION
Illustrative isolated-bench check. Use the enlarged evidence fields above to read the actual wheel and machine information. This photograph does not establish wheel compatibility, correct mounting or permission to cut.
These are SHARE planning examples. The roles and release points illustrate a local system; they are not fixed statutory job titles or a substitute for the actual machine instructions. The equipment controls follow HSG17; the concrete task also follows HSE paving and kerb guidance. Apply the GB or NI legal route for the work location.
Cut a steel bracket and leave the area safe
Task material and setting: Cut a known, non-load-bearing mild-steel bracket to an approved line with a 115 mm guarded angle grinder and compatible metal-cutting disc. Work in a segregated workshop or site bay with stable footing, clear access and a controlled spark path. The desired result is a stable component with the required edge finish and no uncontrolled heat, debris or exposure.
People and prerequisites: The operator has practical competence for this grinder and cutting-disc family; the supervisor confirms the bracket is not structural and checks for services and people on the far side. Nearby trades and anyone beyond the work face are protected. Consider a cold-cutting or pre-cut option first. Confirm any site hot-work permission and the actual machine and disc instructions.
Before: Isolate the tool. Match operation, material, diameter, thickness, bore, flange arrangement and speed rating; inspect the wheel, guard, handle, spindle and power source. Secure the work so the cut cannot close on the disc and control the offcut. Remove or protect combustibles, check hidden spaces, set segregation and agree exposure controls and compatible PPE. A competent mounter completes the specified mounting and trial-run checks.
During: Use the intended cutting edge, both handles and a stable stance outside the likely kickback path. Feed without twisting or side-loading. Maintain the exclusion zone and spark controls and keep to the assessed noise and vibration plan. Do not change to grinding with the cutting disc.
Hold or stop: The supervisor holds the start until support, spark control and any permit conditions are confirmed. Stop for movement, binding, a damaged guard, abnormal running or a changed spark path. Isolate and quarantine defective equipment; an authorised maintainer or mounter resolves the cause. The designated supervisor releases the revised set-up under the local system.
Completion and hand back: Let the wheel stop fully before putting down the tool. Check the edge, offcut, hot material and concealed spark path; complete the locally assessed fire-watch and hand-back arrangements without inventing a universal duration. Clean by a method suitable for the material and return serviceable equipment to storage.
Evidence: Retain the task assessment, any permit closure, relevant competence and maintenance records, defect reports and near-miss findings. Record the reason for any changed method and who accepted the hand-back.
Cut a concrete kerb while controlling silica dust
Task material and setting: Cut an identified concrete kerb to the required dimension at an outdoor, segregated cutting station. Use a compatible saw and blade with continuous water suppression or suitable on-tool extraction. Plan stable support, lifting, power or fuel supply, wind direction and slurry collection. The outcome is an accurate cut without uncontrolled silica exposure.
People and prerequisites: The planner first considers pre-cut kerbs, a splitter or another method that avoids the cut. The operator is competent for the chosen saw, blade and handling method. Protect nearby workers, contractors and the public. For this HSE task route, provide APF 20 RPE alongside source control; a tight-fitting facepiece needs a successful fit test for that model and size and a clean-shaven seal area.
Before: Check blade identity, material suitability, speed, dimensions, direction where marked, condition, mounting and guard. Confirm a continuous supply of water to the cutting point or a suitable H or M class extraction arrangement compatible with the tool and dust. Check the respirator, segregation, work support and safe waste route. The supervisor confirms the complete control package before release.
During: Maintain water or extraction throughout the cut, stable footing, controlled feed and the exclusion zone. Watch for binding, blade damage, dust drift, changing wind, people entering or water creating slip or electrical hazards. Maintain the assessed noise and vibration controls. Visible cleanliness alone does not prove that respirable dust is controlled.
Hold or stop: Stop cutting immediately if water or extraction fails, dust escapes uncontrolled, the respirator seal fails, the blade binds or someone enters the zone. Do not finish the last cut on a mask alone. The supervisor arranges repair or a revised method and confirms effective controls before restart. Unexpected material or services require competent identification first.
Completion and hand back: Isolate after the blade stops. Collect slurry or dust using a suitable wet or controlled vacuum method, protect drains and prevent residues drying into airborne dust. Leave the kerb stable and the route clean and usable. The area owner accepts the finished cut, waste controls and removal of barriers.
Evidence: Retain the task and exposure assessment, control checks, fit-test record where a tight-fitting facepiece is used, equipment defects, any control-failure investigation and the hand-back record. Identify affected people for occupational-health or medical follow-up if exposure or symptoms warrant it.
What changes for other work?
Weld dressing. Use an approved grinding or flap product and its permitted contact angle, identify the metal and coatings and agree the weld acceptance criterion. Unknown coatings, failed extraction, loading or overheating require a hold. Check the finished profile without reducing the parent metal below its specified tolerance.
Occupied refurbishment and contractors. Review surveys, asbestos information, hidden services, the opposite face and connected ventilation routes before work. Agree containment and reopening conditions with the area owner and other contractors. Stop for unexpected material, containment loss, unplanned occupancy or changed work nearby; revise the assessment before release.
Bench grinder or repeated chop-saw cuts. For a bench grinder, a competent mounter releases the wheel and the rest and guard settings follow the machine instructions, adjusted only when isolated and stationary. Do not grind on a face that is not designed for it. For a chop saw, support stock, clamp each piece and wait for a full stop before retrieval. Stop either machine for faulty guards, unstable work, wheel wander, trapping or abnormal vibration.
Existing pipework and non-routine cuts. The process owner must establish identity, contents, pressure, temperature, stored energy and contamination. Competent people prove the isolation and safe condition at the workface, support both sides and coordinate line-break and hot-work permissions. An unclear pipe or unexpected residue is a stop, not a reason to try a first cut. Preserve isolation and formal hand-back records.
Failure or emergency. After a burst, injury, abnormal running, fire or suspected exposure, stop and follow the emergency and quarantine actions. Preserve the wheel, tool and batch evidence. Restart needs competent confirmation that the cause and any wider stock concern have been resolved, followed by the release specified in the local system.
Petrol equipment: choose a non-combustion method where possible. This page adopts a conservative stop rule: do not use petrol equipment indoors or in an enclosed or partly enclosed area, including a trench. Choose electric or other non-combustion equipment. An open door or dust mask does not control carbon monoxide. If the work setting is uncertain, hold the task for competent assessment and follow the applicable HSE guidance. See HSE carbon-monoxide guidance.
How do abrasive wheels cause harm?
Abrasive wheels cause harm through high-energy failure, direct contact, ejected material, inhalation exposure, fire, noise and vibration.
The most dramatic failure is wheel burst, where a damaged, oversped or wrongly mounted wheel breaks apart and ejects fragments. The quieter failures are just as important: dry cutting concrete can expose workers to respirable crystalline silica (RCS), repeated grinder use can contribute to hand-arm vibration syndrome (HAVS), and sparks from grinding can start fires in waste, insulation, vapour or hidden cavities.
Good assessment should treat short-term safety and long-term health together. A job can look controlled because nobody is cut, while still being poorly controlled because dust is visible, masks do not fit, noise is unmanaged or workers are accumulating vibration exposure. The best pages, procedures and toolbox talks make those less visible risks easy to understand.
Warning signs must trigger a decision before injury occurs. This table links the route of harm to an observable condition and a stop or escalation point; the following table retains the fuller mechanism and control explanation.
| Task and route of harm | Injury or ill health | Early warning | Stop or escalate when |
|---|---|---|---|
| A damaged, oversped or mismounted wheel breaks and ejects fragments. | Cuts, eye injury, penetrating injury or fatal trauma. | Crack, chip, dropped wheel, unclear marking, wrong speed or unusual vibration. | Do not mount or start; isolate the tool and quarantine the wheel. Stop immediately if vibration or damage appears during use. |
| A wheel binds or the unsupported workpiece moves, causing kickback or contact. | Lacerations, fractures, amputation or eye injury. | Binding, changing cut line, unstable support or loss of a secure stance. | Release the control, wait for the wheel to stop and reassess support, technique and equipment before restarting. |
| High-speed cutting of concrete or masonry releases respirable crystalline silica into breathing air. | Silicosis and other serious long-term lung disease. | Dust plume, absent water at the cut, blocked extraction or RPE that does not seal. | Stop cutting and restore an effective source-control method; do not treat a mask alone as permission for uncontrolled dry cutting. |
| Petrol cut-off saw exhaust accumulates in an indoor, enclosed or partly enclosed area. | Carbon-monoxide poisoning, collapse or death. | Combustion equipment in a restricted area; headache, dizziness or nausea may occur, but absence of symptoms is not proof of safety. | Stop and leave the exposure area; seek urgent medical advice for suspected exposure and emergency help for collapse or severe symptoms. |
| Repeated loud or vibrating tool use adds to daily personal exposure. | Permanent hearing damage or hand-arm vibration syndrome. | Hard-to-hear speech, ringing ears, numbness or blanching fingers, or use beyond the assessed trigger time. | Report symptoms and reassess actual exposure, equipment and work duration; do not rely on a generic tool rating as personal exposure. |
| Sparks or hot particles reach combustibles, vapours or hidden fire loads. | Burns, smoke inhalation, fire or explosion injury. | Uncontrolled spark path, combustible waste, vapour or uninspected hidden void. | Do not start or continue until ignition sources and the area are controlled under the applicable local hot-work system. |
The existing mechanism table below explains the wider prevention package; the stop points above are prompts for a competent task-specific decision, not a complete safe system.
| How harm occurs | What can happen | What should be controlled |
|---|---|---|
| Wheel burst or fragmentation | Fragments can be ejected at very high speed, causing penetrating injuries, facial trauma, eye injury, fractures, amputations or fatal injury. | Wheel selection, storage, expiry dates, visual checks, ring testing where relevant, speed matching, flanges, guards, test running and defect quarantine. |
| Kickback and loss of control | The tool can be thrown towards the user when the disc binds, snags or twists in the cut. | Cut planning, support of the workpiece, two-handed grip, correct body position, avoiding side load, suitable disc depth and no forcing of the tool. |
| Contact with rotating wheel | Lacerations, amputations, burns and serious soft-tissue injury can occur before the operator has time to react. | Guarding, work rests, safe hand position, isolation before adjustment, suitable jigs, clamps, stopping time and supervision of unsafe practices. |
| Dust and fume inhalation | Cutting concrete, stone, brick, mortar, tile or some metals can expose workers to respirable dust or fume linked to long-term lung disease. | Elimination, water suppression, on-tool extraction, local exhaust ventilation (LEV), respiratory protective equipment (RPE), health surveillance triggers and dust-free cleaning. |
| Sparks, hot particles and hot work | Sparks can ignite combustible materials, vapours, dusts, waste, insulation, clothing or hidden materials behind the work face. | Hot-work planning, removal or protection of combustibles, fire watch, extinguishers, atmosphere checks where relevant and permit-to-work controls for higher-risk tasks. |
| Noise and hand-arm vibration | Repeated exposure can contribute to noise-induced hearing loss and hand-arm vibration syndrome (HAVS). | Lower-vibration tools, quieter methods, exposure planning, task rotation, maintenance, hearing protection, vibration exposure records and symptom reporting. |

How can abrasive-wheel hazards injure the eye and affect vision?
Interactive anatomy · Eye function and injury · Updated 2026-10-23
Read all anatomy and process explanations without the viewer
Educational illustration, not a diagnostic symptom checker or a reproduction of an individual’s vision. No acuity/brightness challenge, flashing screen, camera permission, eye-drop prescription, patching instruction, lens-removal manoeuvre or home-neutralisation exercise. Ordinary DSE comfort is separate from trauma; eyesight correction is separate from hazard protection.
Eyelids
Blinking spreads tears over the front of the eye. The eyelids pass over the exposed front of the eye when a person blinks. Their movement spreads the tear film, helping keep that surface moist and smooth. In the surface view, use the lid margins to locate the area they cover. This surface-maintenance role supports the optical pathway; the lid does not carry visual signals to the brain. Moorfields Eye Hospital NHS Foundation Trust: Dry eye: the tear film
Tear film
A thin tear layer keeps the surface moist and smooth. A thin film of tears covers the front of the eye. It lubricates the surface and contributes to a smooth boundary through which light passes. Blinking redistributes this film. Its thickness is enlarged in the teaching view so its position can be seen; it is a surface layer rather than a pool of liquid inside the eyeball. Moorfields Eye Hospital NHS Foundation Trust: Dry eye: the tear film
Cornea
The clear front surface bends incoming light. The transparent cornea forms the curved front of the eye, providing an outer protective boundary and bending incoming light. It works with the lens to focus the light towards the retina. Follow the rays through the front curve in the cutaway, then compare its location with the tear film lying over the surface. Moorfields Eye Hospital NHS Foundation Trust: What makes up your eye
Iris
The coloured ring controls the pupil opening. The iris is the coloured ring around the pupil. Its muscles change the size of the opening and so control how much light can enter the eye. Locate the ring separately from the transparent lens behind it. This light-entry role is different from the focusing work performed by the cornea and lens. Moorfields Eye Hospital NHS Foundation Trust: What makes up your eye
Pupil
An opening lets light enter the eye. The pupil is the central opening in the iris through which light passes. It looks dark when viewed from the front because it opens into the inside of the eye. It is not a solid black disc. In the cutaway, follow the route through this opening towards the transparent lens behind it. Moorfields Eye Hospital NHS Foundation Trust: What makes up your eye
Lens
The clear lens helps focus light on the retina. The transparent lens sits behind the iris and adds to the focusing action of the cornea. In a living eye its shape can change to help focus on objects at different distances. Use the cutaway to locate the lens between the pupil opening and the retina; the simplified ray diagram is not an eyesight test. Moorfields Eye Hospital NHS Foundation Trust: What makes up your eye
Retina
The light-sensitive layer lines the back of the eye. The retina is the light-sensitive tissue lining the inside of the back of the eye. Light focused by the cornea and lens reaches this layer, where specialised cells begin converting it into electrical information. Its position against the inner wall connects the whole-eye view with the separate enlarged photoreceptor inset. Moorfields Eye Hospital NHS Foundation Trust: What makes up your eye · Oxford University Hospitals NHS Foundation Trust: Tackling vision loss: normal signal pathway
Photoreceptors
Specialised retinal cells begin the light-to-signal conversion. Photoreceptors are specialised cells in the retina that respond to light and begin the conversion into electrical signals. Locate the retinal lining first, then connect it with the enlarged cell inset. That inset explains a change of process and scale; it does not represent a separate organ or every cell involved in retinal processing. Oxford University Hospitals NHS Foundation Trust: Tackling vision loss: normal signal pathway
Optic nerve
Visual signals travel from the eye towards the brain. The optic nerve carries electrical information from the retina towards the brain. In the model, the symbol changes from a light ray to a neural signal at the retina to distinguish these processes. Locate where the nerve leaves the back of the eye. Light itself does not travel along the nerve as a beam. Oxford University Hospitals NHS Foundation Trust: Tackling vision loss: normal signal pathway
Brain destination
The brain processes the incoming visual signals. The brain processes the visual information arriving from the eyes, helping us make sense of what we see. This marker shows a destination outside the eyeball rather than a structure within it. Follow the optic-nerve route to the marker after locating the retina; the detailed pathways inside the brain are not depicted here. Oxford University Hospitals NHS Foundation Trust: Tackling vision loss: normal signal pathway
Open the complete process transcript
The process, step by step
1 · Refresh the surface
A blink carries a thin layer of tears across the exposed front of the eye. This tear film keeps the surface moist and helps create a smooth first surface for incoming light. Look at the eyelids and the enlarged tear layer together: the lid spreads the film rather than pushing tears into the eyeball. The surface view separates these structures so their relationship is easier to see. This is the preparation for the optical pathway that follows; a clear view depends on the condition of the front surface as well as the structures deeper inside. Moorfields Eye Hospital NHS Foundation Trust: Dry eye: the tear film
What to watch: Locate the eyelid margins and the thin tear layer in front of the cornea, using the surface view to separate them.
Why it matters: The refreshed film lubricates the front of the eye and helps keep its surface smooth. It supports the passage of light before the cornea and lens focus that light deeper inside.
Explore this step: Select the eyelids, then the tear film, and describe which structure moves and which surface it covers.
2 · Bend incoming light
The cornea is the transparent, curved front of the eye. Incoming light changes direction as it passes through this surface, beginning the focusing process. In the whole-eye cutaway, trace the illustrative rays from outside the eye towards the lens. Their bend shows the cornea doing optical work rather than acting only as a window. The cornea also forms part of the protective outer boundary, so its clarity and shape matter to seeing. The rays simplify the route through a healthy eye; they are not a measurement of an individual person’s focus or vision. Moorfields Eye Hospital NHS Foundation Trust: What makes up your eye
What to watch: Find the clear curved front of the eye and follow where the incoming light rays change direction as they pass through it.
Why it matters: Beginning to direct the light here allows the cornea and lens to work together. A transparent front surface lets light enter while forming part of the eye’s protective boundary.
Explore this step: Trace one ray from outside the cornea to the lens and identify the first place its direction changes.
3 · Focus towards the back
After passing through the cornea, light enters through the pupil, the opening in the coloured iris. The iris changes the size of that opening to control how much light enters. Behind it, the transparent lens works with the cornea to bring light towards the retina at the back. Follow the model from front to back and distinguish the pupil opening from the solid lens. In a living eye the lens can change shape to help focus at different distances. This simplified view explains the route and the relationship between the structures, rather than testing accommodation or eyesight. Moorfields Eye Hospital NHS Foundation Trust: What makes up your eye
What to watch: Identify the iris around the pupil opening, the transparent lens behind it and the light-sensitive retina lining the back of the eye.
Why it matters: Controlling light entry and focusing it are different jobs. Together they allow light to reach the sensitive tissue at the back in a useful pattern for the next stage of vision.
Explore this step: Name the opening light passes through, then the transparent structure it reaches next; follow the route to the retina.
4 · Convert at the retina
The retina is the light-sensitive tissue lining the back of the eye. Its photoreceptor cells respond to light and begin converting it into electrical information. Locate the retinal lining, then use the enlarged cell inset to connect the whole-eye view with this smaller-scale event. The inset makes the conversion easier to discuss without suggesting that the cells are that large inside the eye. At this point the lesson changes from the path of light to the path of a nerve signal. The model does not show every retinal cell or all the processing that takes place between them. Oxford University Hospitals NHS Foundation Trust: Tackling vision loss: normal signal pathway
What to watch: Locate the retina on the inner back wall, then connect it with the enlarged photoreceptor inset outside the whole-eye cutaway.
Why it matters: This conversion connects the eye’s optical system with its nervous system. The focused light pattern can now be represented by signals that travel from the retina towards the brain.
Explore this step: Point to where the light pathway ends and explain why the enlarged cells are an inset rather than another organ.
5 · Carry and interpret the signal
Visual information leaves the retina through the optic nerve and travels towards the brain. The brain processes this incoming information so that we can recognise and make sense of what we see. Follow the model’s neural-signal symbol from the back of the eye to the external brain marker, and compare it with the earlier light rays. The symbols represent different processes: a nerve carries signals, not a beam of light or a miniature picture travelling through a tube. The brain marker identifies the destination outside the eyeball; the detailed visual pathways within the brain are beyond this simplified model. Oxford University Hospitals NHS Foundation Trust: Tackling vision loss: normal signal pathway
What to watch: Find where the optic nerve leaves the back of the eye and trace its route towards the separate brain destination marker.
Why it matters: The earlier stages deliver and convert light; this stage carries the resulting information onwards. Vision therefore depends on the retina, its nerve connection and the brain working with the eye’s optical structures.
Explore this step: Compare the light-ray and neural-signal symbols, then explain what travels through the pupil and what travels through the optic nerve.
Mechanisms and their limits
High-speed or penetrating injury A fast-moving fragment or penetrating object can cause a serious injury. Apparent outside appearance does not provide clearance to return to work. A dotted track represents a possible path, not a measured wound or an inevitable injury to every highlighted structure. Do not remove an object that has pierced the eye. Emergency assessment takes priority; do not treat this as a surface-scratch exercise. NHS: Eye injuries · University Hospital Southampton NHS Foundation Trust: Eye emergency department
Select impact protection for the task
Understand emergency eye-care indications
High-speed or penetrating injury — follow the anatomy
Look at: The entry point through the eye and the internal structures behind it.
What changes: A high-speed fragment can penetrate and injure deeper tissues.
Why it matters: A small entry mark can conceal a sight-threatening injury.
What to do: Do not remove an embedded object or press on the eye; obtain emergency help.
A high-speed fragment from a workshop task
A fragment is projected during a power-tool task and strikes the eye. This explains an acute event without replaying an impact spectacle. Emergency help must not wait for the 32-second sequence. A tiny surface mark does not exclude a deeper injury. The mechanism is not assessed by choosing a fragment size or a target in the viewer.
Control the projectile hazard Check the tool, workpiece and safeguards, plus eye/face protection suited to the impact risk. Ordinary vision correction is not hazard protection. HSE: Using the right type of PPE
A fragment strikes at speed The example uses a neutral contact marker rather than a graphic penetration. High-speed eye impact needs emergency assessment even before its depth is known. NHS: Eye injuries
Possible injury beyond the surface A separate depth annotation explains that a fragment may damage internal structures. The illustration does not determine where a real fragment travelled or the likely vision outcome. NHS: Eye injuries · University Hospital Southampton NHS Foundation Trust: Eye emergency department
Do not remove or press on it Arrange emergency assessment for a pierced eye or high-speed impact. Do not probe, remove an embedded object or rub the eye; the chemical-irrigation branch is not a generic treatment for penetration. NHS: Eye injuries · University Hospital Southampton NHS Foundation Trust: Eye emergency department
Read the practice situations and all answer explanations
EY-Q1: What should happen first?
A strong cleaning chemical splashes into an eye. Immediate help is displayed before the question.
Watch the demonstration before taking action. — Do not delay rinsing or medical help for this lesson.
Begin rinsing with plenty of clean, non-hot water and get emergency help. — Hold the eye open and use a gentle water flow for at least 20 minutes; keep rinsing while waiting for help.
Add a household chemical to neutralise it. — Use the water-rinsing route and medical help, not improvised chemical neutralisation.
NHS: Eye injuries · University Hospitals Dorset NHS Foundation Trust: Chemical injury to the eyeEY-Q2: What is the appropriate response?
A fragment strikes an eye during grinding.
Seek emergency assessment; leave any pierced object in place. — High-speed impact needs emergency assessment. Do not rub the eye or remove a pierced object.
Pull out anything that appears to be stuck. — Do not attempt removal. Get emergency help.
Return to work if vision seems unchanged. — Feeling able to see is not clearance after a high-speed injury.
NHS: Eye injuries · University Hospital Southampton NHS Foundation Trust: Eye emergency departmentEY-Q3: Which statement is correct?
A worker is close to welding without a task-specific eye-protection assessment.
No immediate pain proves the eyes are unharmed. — Arc-eye pain may start several hours later. Lack of immediate pain does not establish safety.
Ordinary spectacles protect against every welding hazard. — Corrective spectacles are not a complete hazard assessment. Impact, splash and radiation protection require suitable selection.
Protection must match the radiation hazard, and pain may be delayed. — Correct. Control exposure and select appropriate protection for the task and nearby people. The lesson provides no safe viewing time.
HSE: Health risks from welding: arc-eye · HSE: Using the right type of PPESources and how the model is made
The opening images are AI-generated anatomical illustrations. The interactive 3D models and labelled SVG diagrams use original procedural artwork. These teaching images are not medical scans or diagnostic tools. Source references support the learner explanations and do not grant artwork rights.
- Moorfields Eye Hospital NHS Foundation Trust: What makes up your eye — Normal cornea, iris, pupil, lens and posterior eye layout; use anatomy text selectively. No image copied.
- Moorfields Eye Hospital NHS Foundation Trust: Dry eye: the tear film — Blinking spreads the tear film, which lubricates the eye and supports a smooth surface. No treatment instructions copied.
- Guy’s and St Thomas’ NHS Foundation Trust: Corneal abrasion — A scratch/graze of the cornea and the distinction between a superficial injury and complications; no healing-time promise or eye treatment prescribed.
- NHS: Eye injuries — March 2026 guidance: immediate chemical irrigation and emergency help; high-speed/penetrating injury; severe pain or sight changes. Minimum rinsing time is not a clearance test.
- University Hospitals Dorset NHS Foundation Trust: Chemical injury to the eye — Possible surface/anterior-segment damage only. Printed review date November 2023 is overdue; current emergency actions rely on EY-S4, not this leaflet alone.
- HSE: Health risks from welding: arc-eye — Welding radiation can injure the cornea, cause delayed pain and harm other eye structures; no safe viewing time.
- HSE: Using the right type of PPE — Eye protection must match impact, splash, dust or radiation hazards and fit the task/user.
- Oxford University Hospitals NHS Foundation Trust: Tackling vision loss: normal signal pathway — Photoreceptors convert light to electrical signals, carried through the optic nerve to the brain. Research treatment content is not reused.
- NHS Organ Donation: About cornea donation — Injury or disease can leave the cornea cloudy/distorted and affect vision. Source is factual context, not donation advice in this lesson.
- University Hospital Southampton NHS Foundation Trust: Eye emergency department — Chemical injury, penetrating trauma and severe visual symptoms require emergency eye care. Local opening hours/contact instructions are not generalised.
How can the hierarchy of controls reduce abrasive-wheel risks during cutting and grinding?
Reduce abrasive-wheel risk by choosing a safer method first, then matching equipment and physical safeguards to the task before relying on procedures and PPE.
Choose the activity first, compare ERICPD with IOSH / ISO 45001 hierarchy of controls, then select a control level. The two examples address different tasks: steel cutting emphasises wheel failure, kickback, sparks and fire; concrete kerb cutting adds silica-dust, water and slurry controls.
May the concrete-kerb cut start?
Two linked parts · 8 questions. Open Part 2 to complete the route.

Continue to questions 5–8 · Part 2 of 2

Read this visual as text
- Start: A concrete kerb needs resizing and a saw is proposed.
- Question 1: Can the cut be avoided using a suitable alternative? Decision owner: Competent wheel mounter / task supervisor.
- Yes: Use the verified alternative and assess its own hazards. OUTCOME → RECORD AND HAND OVER.
- No: Continue the cutting-method checks. CONTINUE → QUESTION 2.
- Unknown: Planner compares practical alternatives before releasing the cut. HOLD → OWNER RESOLVES BEFORE RESUMING.
- Question 2: Are material, location, services and affected people confirmed? Decision owner: Competent wheel mounter / task supervisor.
- YES: The required evidence or condition is confirmed. CONTINUE → QUESTION 3.
- NO / UNKNOWN — HOLD: Hold for survey, material or service information; unknown material is not assumed to be ordinary silica. HOLD → REPEAT QUESTION 2 AFTER CORRECTION.
- Question 3: Are tool, blade and stable support compatible? Decision owner: Competent wheel mounter / task supervisor.
- YES: The required evidence or condition is confirmed. CONTINUE → QUESTION 4.
- NO / UNKNOWN — HOLD: Use the wheel-selection route and correct the setup before returning here. HOLD → REPEAT QUESTION 3 AFTER CORRECTION.
- Question 4: Will suitable source control work throughout the cut? Decision owner: Competent wheel mounter / task supervisor.
- YES: The required evidence or condition is confirmed. CONTINUE → QUESTION 5.
- NO / UNKNOWN — HOLD: Provide continuous water suppression or suitable extraction for the actual task. HOLD → REPEAT QUESTION 4 AFTER CORRECTION.
- Question 5: Is the task-selected RPE suitable, available and usable? Decision owner: Competent wheel mounter / task supervisor.
- YES: The required evidence or condition is confirmed. CONTINUE → QUESTION 6.
- NO / UNKNOWN — HOLD: Provide the protection selected by the assessment, including face-fit testing for a tight-fitting facepiece. HOLD → REPEAT QUESTION 5 AFTER CORRECTION.
- Question 6: Are exclusion, noise, vibration and slurry or dust controls ready? Decision owner: Competent wheel mounter / task supervisor.
- YES: The required evidence or condition is confirmed. CONTINUE → QUESTION 7.
- NO / UNKNOWN — HOLD: Resolve bystander, exposure, waste and housekeeping gaps with the supervisor. HOLD → REPEAT QUESTION 6 AFTER CORRECTION.
- Question 7: Has any control failed or have conditions changed? Decision owner: Competent wheel mounter / task supervisor.
- YES — STOP / REFER: Stop cutting and return to the location, material and control checks before restarting. STOP / REFER → APPROPRIATE RESPONSE.
- NO: No such warning is identified; continue the remaining checks. CONTINUE → QUESTION 8.
- UNKNOWN — PROTECT FIRST: Protect people and hold the affected work. Obtain the responsible specialist’s assessment; do not assume the warning is absent. HOLD → OWNER RESOLVES BEFORE RESUMING.
- Question 8: Complete and hand back Decision owner: Competent wheel mounter / task supervisor.
- ACTION: Isolate the tool, control remaining slurry or dust and leave the area in its agreed condition. OUTCOME → RECORD AND HAND OVER.
- Outcome: Record the decision, evidence, responsible person and review trigger.
- Stop and escalation boundary: Unknown material is a hold, not automatic permission to treat it as ordinary silica. If petrol equipment is proposed in an enclosed area, stop for a safer method or expert ventilation assessment before this flow can be released. Kerb cutting; NI silica; CO prevention.
Concrete-kerb route: confirm the material, wheel and machine, work support, boundary and assessed dust controls before proceeding. Part 2 continues part 1; failed required suppression or extraction returns the cut to hold.
Concrete-kerb route: confirm the material, wheel and machine, work support, boundary and assessed dust controls before proceeding. Part 2 continues part 1; failed required suppression or extraction returns the cut to hold.
Each task below has its own overview diagrams and checks. The full workflows remain in the activity examples above; choose the task that matches the material and equipment.
Choose the activity
How can the ERICPD hierarchy of controls reduce wheel failure, kickback and fire risks when cutting a steel bracket?

| Control level | Control for this activity | Owner and verification | Stop / restart decision |
|---|---|---|---|
| Eliminate | Order the bracket to its finished size, or redesign the fixing so no on-site abrasive cut is needed. Confirm that the part is non-load-bearing and that the specified dimensions and edge finish still meet the design. | The designer or supervisor accepts the revised component and confirms that no follow-up grinder cut is required. | Keep the cutting assessment open if the supplied component still needs abrasive trimming. |
| Reduce / substitute | For the known steel and required cut, compare a suitable cold-cutting method, such as an assessed metal saw, with the proposed angle grinder. Check cut quality, access, workholding and the new pinch or handling hazards before changing methods. | The planner trials the suitable alternative and confirms that it reduces the relevant spark, wheel or exposure hazard for this bracket. | Hold the change if the alternative cannot safely support the work or achieve the specified cut. |
| Isolate | Move the cut to a segregated work bay where practicable. Position suitable screens and barriers to protect nearby people from sparks and fragments, and control access to the cutting and offcut area. | The supervisor checks both sides of the work, the spark path, nearby trades and whether the physical protection remains effective during the cut. | Stop for someone entering the zone or sparks passing beyond the protected area. |
| Control: equipment and workholding | Use the compatible metal-cutting disc, correctly fitted cutting guard and handle. Check the tool/wheel speed and dimensional compatibility. Clamp the bracket and support the offcut so the kerf cannot close on the disc; feed without twisting or side-loading. | A competent mounter follows the tool/disc instructions. The operator checks guard condition, work stability and normal running before release. | Stop for binding, movement, abnormal running, a damaged disc or guard. Isolate before adjustment and quarantine defective equipment. |
| Control: sparks, fire and the work method | Inspect for combustibles and concealed spark paths before cutting. Remove or protect affected materials and meet any site hot-work conditions. Plan noise and vibration exposure, safe access and the person responsible for post-work checks. | The supervisor confirms the spark controls and any permit conditions at the worksite, including the locally assessed fire-watch and hand-back arrangements. | Hold the start if hidden spaces or combustible exposure are unresolved; stop if the spark path or work conditions change. |
| PPE | Select compatible eye and face protection, hearing protection, footwear and other task-assessed protection. Identify the steel, coating and contamination before selecting RPE for any remaining dust or fume exposure. | The operator and supervisor check protection is suitable, serviceable and compatible. Identify coatings or contamination before the work starts. | Do not cut unknown coated or contaminated material, or continue with missing required protection. PPE does not remedy a failed guard or unsafe workholding. |
| Discipline / sustain | Use the agreed method, inspect and report defects, and investigate binding or kickback. After stopping, allow the wheel to stop fully; check hot edges, the offcut and concealed spark paths before the area is handed back. | The designated supervisor accepts the work area and any permit closure, records defects and verifies the revised set-up before restart. | Keep defective equipment isolated and the job on hold until the cause is resolved; do not resume merely because a new disc has been fitted. |
How can the ISO 45001 hierarchy of controls reduce wheel failure, kickback and fire risks when cutting a steel bracket?

| Control level | Control for this activity | Owner and verification | Stop / restart decision |
|---|---|---|---|
| Elimination | Order the bracket to its finished size, or redesign the fixing so no on-site abrasive cut is needed. Confirm that the part is non-load-bearing and that the specified dimensions and edge finish still meet the design. | The designer or supervisor accepts the revised component and confirms that no follow-up grinder cut is required. | Keep the cutting assessment open if the supplied component still needs abrasive trimming. |
| Substitution | For the known steel and required cut, compare a suitable cold-cutting method, such as an assessed metal saw, with the proposed angle grinder. Check cut quality, access, workholding and the new pinch or handling hazards before changing methods. | The planner trials the suitable alternative and confirms that it reduces the relevant spark, wheel or exposure hazard for this bracket. | Hold the change if the alternative cannot safely support the work or achieve the specified cut. |
| Engineering controls | Move the cut to a segregated work bay where practicable. Position suitable screens and barriers to protect nearby people from sparks and fragments, and control access to the cutting and offcut area. | The supervisor checks both sides of the work, the spark path, nearby trades and whether the physical protection remains effective during the cut. | Stop for someone entering the zone or sparks passing beyond the protected area. |
| Engineering controls | Use the compatible metal-cutting disc, correctly fitted cutting guard and handle. Check the tool/wheel speed and dimensional compatibility. Clamp the bracket and support the offcut so the kerf cannot close on the disc; feed without twisting or side-loading. | A competent mounter follows the tool/disc instructions. The operator checks guard condition, work stability and normal running before release. | Stop for binding, movement, abnormal running, a damaged disc or guard. Isolate before adjustment and quarantine defective equipment. |
| Administrative controls | Inspect for combustibles and concealed spark paths before cutting. Remove or protect affected materials and meet any site hot-work conditions. Plan noise and vibration exposure, safe access and the person responsible for post-work checks. | The supervisor confirms the spark controls and any permit conditions at the worksite, including the locally assessed fire-watch and hand-back arrangements. | Hold the start if hidden spaces or combustible exposure are unresolved; stop if the spark path or work conditions change. |
| PPE | Select compatible eye and face protection, hearing protection, footwear and other task-assessed protection. Identify the steel, coating and contamination before selecting RPE for any remaining dust or fume exposure. | The operator and supervisor check protection is suitable, serviceable and compatible. Identify coatings or contamination before the work starts. | Do not cut unknown coated or contaminated material, or continue with missing required protection. PPE does not remedy a failed guard or unsafe workholding. |
| Administrative controls | Use the agreed method, inspect and report defects, and investigate binding or kickback. After stopping, allow the wheel to stop fully; check hot edges, the offcut and concealed spark paths before the area is handed back. | The designated supervisor accepts the work area and any permit closure, records defects and verifies the revised set-up before restart. | Keep defective equipment isolated and the job on hold until the cause is resolved; do not resume merely because a new disc has been fitted. |
How can the ERICPD hierarchy of controls reduce silica exposure and cutting risks when cutting a concrete kerb?

| Control level | Control for this activity | Owner and verification | Stop / restart decision |
|---|---|---|---|
| Eliminate | Specify kerbs supplied to the required size or change the laying pattern so this on-site cut is avoided. Check the line, levels and final fit before ordering. | The planner and laying supervisor verify the dimensions and confirm that the delivered kerb can be installed without the saw cut. | Reassess if the kerb still requires on-site trimming; do not describe a postponed cut as eliminated. |
| Reduce / substitute | Where the kerb and finish permit it, assess a suitable block splitter or another lower-dust method instead of abrasive cutting. Check the resulting edge, stability, crushing and manual-handling risks. Also reduce unnecessary cuts through layout planning. | The supervisor confirms the alternative works for this concrete unit and the required finish, with appropriate handling arrangements. | Do not force an unsuitable unit into a splitter or trade silica exposure for an uncontrolled crushing or handling risk. |
| Isolate | Set up a segregated outdoor cutting station with controlled access. Position the work and protection to keep other trades and the public away from the blade, fragments, dust and slurry; review wind and nearby occupied areas. | The supervisor checks the worksite boundary, bystander exposure and a safe route for moving the heavy kerb and finished offcut. | Stop if people enter, dust drifts towards occupied areas or conditions defeat the planned segregation. |
| Control: source suppression and equipment | If sawing remains necessary, use a compatible saw and blade with effective continuous water delivery to the cutting point, or suitable specially adapted on-tool extraction. Match the method to the tool, electrical conditions and material; do not improvise water on unsuitable equipment. Support the kerb to prevent binding. | The operator checks the blade/guard, support and actual water delivery or extraction. For the extraction route, use the assessed H or M class arrangement and check connections and flow. | Stop cutting for failed water or extraction, binding, blade damage or uncontrolled dust. Do not finish the cut on a respirator alone. |
| Control: planning, access and clean-up | Identify the concrete and any unexpected material or services. Plan kerb handling, water/power or fuel supply, noise and vibration exposure, and slurry collection. Prevent slurry creating slip or electrical hazards, entering an unsuitable drain or drying into airborne dust. | The supervisor checks the complete set-up and waste route before work. The area owner confirms that residues and offcuts are controlled at hand-back. | Hold the job for unidentified material, uncertain services, unsafe support, an unsuitable power/fuel arrangement or an uncontrolled waste route. |
| PPE / RPE | For this HSE kerb-cutting task route, use RPE with an assigned protection factor of 20 alongside source control, plus compatible eye/face and hearing protection and other assessed PPE. A tight-fitting facepiece needs a successful fit test for its model/size and a clean-shaven seal area. | The supervisor checks selection, fit-test evidence, seal, condition and compatibility; the wearer completes the required pre-use checks. | Stop for a failed seal or missing required protection. RPE is additional protection and does not authorise dry cutting after the source control fails. |
| Discipline / sustain | Maintain the water jets, supply, extraction and saw, and supervise use of the full control package. Stop for source-control failures, arrange repair and verify effectiveness before restart. Clean using the assessed wet or controlled-vacuum method. | The supervisor records defects and corrective action; the area owner accepts stable kerbs, removed waste and a clean, usable route. | Keep the cut on hold until the fault is resolved and controls work at the cutting point; avoid dry sweeping or dispersing settled silica dust. |
How can the ISO 45001 hierarchy of controls reduce silica exposure and cutting risks when cutting a concrete kerb?

| Control level | Control for this activity | Owner and verification | Stop / restart decision |
|---|---|---|---|
| Elimination | Specify kerbs supplied to the required size or change the laying pattern so this on-site cut is avoided. Check the line, levels and final fit before ordering. | The planner and laying supervisor verify the dimensions and confirm that the delivered kerb can be installed without the saw cut. | Reassess if the kerb still requires on-site trimming; do not describe a postponed cut as eliminated. |
| Substitution | Where the kerb and finish permit it, assess a suitable block splitter or another lower-dust method instead of abrasive cutting. Check the resulting edge, stability, crushing and manual-handling risks. Also reduce unnecessary cuts through layout planning. | The supervisor confirms the alternative works for this concrete unit and the required finish, with appropriate handling arrangements. | Do not force an unsuitable unit into a splitter or trade silica exposure for an uncontrolled crushing or handling risk. |
| Engineering controls | Set up a segregated outdoor cutting station with controlled access. Position the work and protection to keep other trades and the public away from the blade, fragments, dust and slurry; review wind and nearby occupied areas. | The supervisor checks the worksite boundary, bystander exposure and a safe route for moving the heavy kerb and finished offcut. | Stop if people enter, dust drifts towards occupied areas or conditions defeat the planned segregation. |
| Engineering controls | If sawing remains necessary, use a compatible saw and blade with effective continuous water delivery to the cutting point, or suitable specially adapted on-tool extraction. Match the method to the tool, electrical conditions and material; do not improvise water on unsuitable equipment. Support the kerb to prevent binding. | The operator checks the blade/guard, support and actual water delivery or extraction. For the extraction route, use the assessed H or M class arrangement and check connections and flow. | Stop cutting for failed water or extraction, binding, blade damage or uncontrolled dust. Do not finish the cut on a respirator alone. |
| Administrative controls | Identify the concrete and any unexpected material or services. Plan kerb handling, water/power or fuel supply, noise and vibration exposure, and slurry collection. Prevent slurry creating slip or electrical hazards, entering an unsuitable drain or drying into airborne dust. | The supervisor checks the complete set-up and waste route before work. The area owner confirms that residues and offcuts are controlled at hand-back. | Hold the job for unidentified material, uncertain services, unsafe support, an unsuitable power/fuel arrangement or an uncontrolled waste route. |
| PPE | For this HSE kerb-cutting task route, use RPE with an assigned protection factor of 20 alongside source control, plus compatible eye/face and hearing protection and other assessed PPE. A tight-fitting facepiece needs a successful fit test for its model/size and a clean-shaven seal area. | The supervisor checks selection, fit-test evidence, seal, condition and compatibility; the wearer completes the required pre-use checks. | Stop for a failed seal or missing required protection. RPE is additional protection and does not authorise dry cutting after the source control fails. |
| Administrative controls | Maintain the water jets, supply, extraction and saw, and supervise use of the full control package. Stop for source-control failures, arrange repair and verify effectiveness before restart. Clean using the assessed wet or controlled-vacuum method. | The supervisor records defects and corrective action; the area owner accepts stable kerbs, removed waste and a clean, usable route. | Keep the cut on hold until the fault is resolved and controls work at the cutting point; avoid dry sweeping or dispersing settled silica dust. |
Exposure values that change the decision
| Exposure | Authoritative value or warning | Operational meaning | UK jurisdiction note |
|---|---|---|---|
| Respirable crystalline silica (RCS) | Workplace exposure limit: 0.1 mg/m3 as an 8-hour time-weighted average. HSE's paving and kerb task guidance specifies water suppression or suitable H/M class on-tool extraction plus APF 20 RPE, such as FFP3 or P3. | The limit is not a target. Prevent or reduce exposure as far below it as reasonably practicable; maintain source control throughout the cut, face-fit tight-fitting RPE and require a clean-shaven seal area. | HSE task guidance applies in GB; HSENI confirms the same RCS WEL and suppression principles for NI. |
| Carbon monoxide from petrol equipment | HSE warns that petrol cut-off saws can create lethal carbon monoxide levels indoors, in enclosed areas and in trenches or excavations within minutes. | Choose an electric or other non-combustion method first. Do not rely on an open door or a dust mask; enclosed use needs competent ventilation assessment and usually specially selected mechanical extraction to outside. | HSE carbon-monoxide guidance supports the GB control position; NI users should apply their COSHH (NI) assessment and HSENI advice. |
| Noise | Daily exposure (normalised to an 8-hour working day), or weekly exposure where legally permitted: lower action value 80 dB(A), upper action value 85 dB(A), limit 87 dB(A). Hearing-protection attenuation is counted for the limit, not the action values. Peak sound pressure has separate C-weighted values and must also be assessed. | Assess and reduce noise at source. At the lower action value, provide information and training and make hearing protection available; at the upper value, ensure its use and designate zones where required. These are exposure values, not a single tool reading or permission to work up to the limit. | HSE sets these GB values; HSENI confirms the parallel 80 and 85 dB(A) action values under NI regulations. |
| Hand-arm vibration | Daily exposure action value: 2.5 m/s2 A(8); daily exposure limit value: 5.0 m/s2 A(8). | Use manufacturer or measured vibration data with realistic trigger time across all tools. Reaching the action value requires technical and organisational controls; the limit must not be exceeded. | HSE states the GB values; HSENI states the same NI values. |
Unknown materials and coatings: stop until asbestos information, lead content, hazardous coatings, metal composition and contamination are understood. Grinding aluminium or magnesium and collecting mixed combustible metal dust can introduce serious fire or explosion hazards; the extraction and cleaning method must be designed for the actual dust, not assumed suitable because it is already available.
How do the same controls transfer between sectors?
The sector examples show what changes with the task and who may be exposed. They are planning examples, not approved methods; the two worked activities above remain the detailed task routes.
| Sector, task and people | Mechanism and outcome | Strongest feasible control and residual safeguard | Check or stop point |
|---|---|---|---|
| Manufacturing: trim a steel bracket in a fabrication bay; operator and adjacent workers. | Disc failure, kickback, fragments or sparks can cause cuts, eye injury or fire. | Order pre-cut stock where practicable; otherwise use a suitable guarded fixed cutting station or matched guarded tool, supported workpiece and controlled spark path. Add residual eye, face and hearing protection. | Confirm wheel rating, condition, guard, support and segregation. Stop for binding, damaged disc or changing spark path. |
| Construction: cut concrete kerbs; saw user, nearby trades and others downwind. | Respirable silica reaches lungs and can cause serious long-term disease; saw contact and fragments can injure immediately. | Design out cuts or use a block splitter where suitable. If sawing remains, use effective water suppression or suitable on-tool extraction, segregation and the task-specific RPE required by HSE. | Confirm water reaches the cut or extraction works and RPE fits. Stop for visible uncontrolled dust or failed source control. |
| Logistics: repair a metal rack or vehicle bracket in a depot; maintenance worker and passing drivers. | Wheel fragments, sparks and moving-vehicle interfaces can cause trauma, burns or fire. | Use a pre-made replacement or off-site repair if feasible. Otherwise isolate the bay from traffic, use matched guarded equipment and control the spark path and combustible materials. | Supervisor confirms traffic exclusion, material identity and fire controls. Stop if vehicles enter or hot-work conditions change. |
| Hospitality: contractor cuts a tile or metal fitting during occupied-property maintenance; contractor, staff and guests. | Fragments or dust can reach people outside the work area; sparks can ignite concealed or stored combustibles. | Order pre-cut components or work in an isolated area outside occupied hours. If cutting remains, match the wheel and source control to the material, segregate others and provide residual protection. | Facilities lead confirms isolation, material, dust and spark controls before release. Stop if the public can enter or controls cannot be maintained. |
How should you follow the abrasive-wheel fitting and kerb-cutting decision routes?
Follow both parts of the abrasive-wheel fitting or kerb-cutting route in sequence and resolve every hold point before the work can proceed.
The second part of a route continues a decision; it does not replace the entry checks in part one. A missing or uncertain prerequisite returns the task to hold.
Wheel fitting
First establish the material and operation, wheel identity, machine compatibility, safe isolation and the required competent person. Continue to mounting and final checks only when those conditions are evidenced.
Concrete kerb cutting
First confirm the material, suitable wheel and machine, stable work support, access boundary and the assessed dust-control method. A failed water supply or extraction arrangement returns the cut to hold; PPE does not authorise continuing with a failed required control.
Follow wheel fitting, part 1 then part 2. For the kerb-cut route read part 1 then part 2 beside the task controls. Each route still requires the full task assessment and manufacturer’s instructions.
What should be checked before abrasive wheel work starts?
Before energising the tool, check the person, task, machine, wheel or disc, mounting, guard, work area and exposure controls as one complete system.
May this wheel be fitted?
Two linked parts · 7 questions. Open Part 2 to complete the route.

Continue to questions 5–7 · Part 2 of 2

Read this visual as text
- Start: An operator or wheel mounter has selected a disc for a known job.
- Question 1: Are the task and material known? Decision owner: Competent wheel mounter / task supervisor.
- YES: The required evidence or condition is confirmed. CONTINUE → QUESTION 2.
- NO / UNKNOWN — HOLD: Hold selection while the planner identifies the material and intended cut or grind. HOLD → REPEAT QUESTION 1 AFTER CORRECTION.
- Question 2: Are the exact product and manufacturer instructions identified? Decision owner: Competent wheel mounter / task supervisor.
- YES: The required evidence or condition is confirmed. CONTINUE → QUESTION 3.
- NO / UNKNOWN — HOLD: Quarantine an uncertain wheel; do not infer suitability from appearance. HOLD → REPEAT QUESTION 2 AFTER CORRECTION.
- Question 3: Do purpose, dimensions, mounting and guard all match? Decision owner: Competent wheel mounter / task supervisor.
- YES: The required evidence or condition is confirmed. CONTINUE → QUESTION 4.
- NO / UNKNOWN — HOLD: Do not fit. Select a compatible product, then repeat the product check. HOLD → REPEAT QUESTION 2 AFTER CORRECTION.
- Question 4: Is the wheel speed rating at least the machine speed, in comparable units? Decision owner: Competent wheel mounter / task supervisor.
- YES: The required evidence or condition is confirmed. CONTINUE → QUESTION 5.
- NO / UNKNOWN — HOLD: Do not fit. Resolve speed or unit uncertainty with competent or manufacturer advice. HOLD → REPEAT QUESTION 4 AFTER CORRECTION.
- Question 5: Are condition, storage history and any use-by date acceptable? Decision owner: Competent wheel mounter / task supervisor.
- YES: The required evidence or condition is confirmed. CONTINUE → QUESTION 6.
- NO / UNKNOWN — HOLD: Quarantine damage or doubtful history. Do not trial a suspect wheel. HOLD → REPEAT QUESTION 5 AFTER CORRECTION.
- Question 6: Are the mounter and task controls ready, with the machine isolated? Decision owner: Competent wheel mounter / task supervisor.
- YES: The required evidence or condition is confirmed. CONTINUE → QUESTION 7.
- NO / UNKNOWN — HOLD: Arrange competence, isolation, guarding, support and assessed work controls. HOLD → REPEAT QUESTION 6 AFTER CORRECTION.
- Question 7: Is the specified mounting check and trial run normal? Decision owner: Competent wheel mounter / task supervisor.
- YES: The required evidence or condition is confirmed. OUTCOME → RECORD AND HAND OVER.
- NO / UNKNOWN — HOLD: Stop, isolate and quarantine the setup. Investigate before replacement or reuse; recheck the replacement product. HOLD → REPEAT QUESTION 2 AFTER CORRECTION.
- Outcome: Record the decision, evidence, responsible person and review trigger.
- Stop and escalation boundary: Readiness is for the stated task and conditions only. A changed material, tool or environment sends the user back to the relevant check. No universal torque, gap or trial-run time is shown. HSG17; PUWER GB and PUWER NI.
Wheel-fitting route: start with the material and operation, readable product information, wheel–machine compatibility and safe isolation. Part 2 continues part 1; an unresolved prerequisite keeps fitting on hold.
Wheel-fitting route: start with the material and operation, readable product information, wheel–machine compatibility and safe isolation. Part 2 continues part 1; an unresolved prerequisite keeps fitting on hold.
Check the isolated tool before use

Read this visual as text
- The tablet shows an uncompleted abrasive-wheels checklist with questions about material suitability, speed compatibility and the correct guard. Check the actual equipment and record findings before use. The tool is disconnected for inspection; the removed guard must be correctly refitted before any operation.
- The form is an illustrative example. Use the actual task, criteria and evidence to record any finding.
A pre-use check is a deliberate start-work decision, not a glance at a sticker. The operator should be able to identify the material and operation, read the wheel marking, prove that the machine cannot overspeed the wheel, inspect both tool and disc, confirm that guards and handles are fitted, secure the workpiece and control dust, sparks, noise, vibration and nearby people. The manufacturer's instructions and the local risk assessment or method statement set the minimum for the particular tool.
Use a simple sequence: plan the cut or grind; isolate and inspect the tool; select and inspect the correct wheel; mount it using the specified components; restore the guard and controls; prepare the work area; carry out a controlled trial run; then start work only if the set-up remains stable. Any uncertainty about identity, damage, speed, fit, mounting or control is a stop-work reason.
Tool and machine pre-use checks
| Tool check | What to inspect | Stop work when |
|---|---|---|
| Identity, rating and instructions | Confirm the tool is the approved type for the task, its identification and speed plate are legible, and the correct manufacturer instructions are available. Check that any inspection or maintenance status remains valid. | The tool is unidentifiable, modified, outside its inspection regime or being used for a purpose the manufacturer does not allow. |
| Body, spindle and bearings | Look for cracks, loose parts, damaged threads, excessive spindle play, abnormal noise, overheating, blocked ventilation slots or evidence that the tool has been dropped. | The spindle is bent or loose, threads are damaged, the body is cracked, parts are missing, or rotation is rough or noisy. |
| Guard and auxiliary handle | Use the guard specified for the machine and wheel. Secure and position it between the operator and the wheel as intended. Fit the side handle and make sure both can resist normal working forces. | The guard or handle is missing, loose, damaged, altered, the wrong size, tied back or prevents the task from being done safely. |
| Switches and controls | Check the on/off, hold-to-run, trigger lock, emergency stop and braking arrangements provided for the machine. The control should operate freely and return as designed. | A switch sticks, a safety control is defeated, the machine can start unexpectedly or the wheel does not stop in the expected manner. |
| Power source | For electric tools, inspect the plug, cable, battery and charger. For pneumatic tools, inspect hoses, couplings and pressure controls. For petrol saws, check fuel, leaks, caps, controls and exhaust condition. | There are exposed conductors, damaged batteries, leaking fuel, insecure hoses, unsuitable pressure, makeshift repairs or an incompatible power supply. |
| Dust and water controls | Check that extraction shrouds, hoses, filters, vacuums, water feeds, flow controls and electrical protection are compatible, connected and able to control the material being cut. | Controls are missing, blocked, leaking, incompatible, have no adequate water flow or extraction, or would introduce electrical, slip or contamination risk. |
| Fixed grinders and cutting machines | Check secure anchoring, guard enclosure, transparent screens, work rests, clamps and interlocks. Keep work rests close to the wheel and adjust them only while isolated and stationary. | The machine moves, the work rest or clamp is loose, the gap can trap the workpiece, an interlock is defeated or the wheel fouls the guard. |
Wheel, cutting disc and mounting checks
| Check area | What good looks like | Why it matters |
|---|---|---|
| Wheel and disc selection | The wheel matches the material, machine, bore size, dimensions, task, wet or dry use, and maximum rotational speed. | Wrong selection can lead to overheating, binding, excessive dust, wheel loading, burst or loss of control. |
| Markings and condition | Markings are legible, expiry or use-by dates are checked where relevant, and the wheel is free from cracks, chips, damp, warping or contamination. | A damaged or aged wheel may fail even if the machine and operator are otherwise suitable. |
| Ring test where appropriate | A suitable dry vitrified wheel is gently tapped with a non-metallic implement and its sound is compared with other sound wheels of the same lot and specification; a dull or suspicious response means rejection. | The test can reveal internal cracking in some wheel types, but it is not suitable for thin resin cutting discs or many small mounted wheels. |
| Flanges, blotters and bushes | Correct flanges, blotters and bushes are used only where required by the wheel and machine manufacturer, and the wheel is secured without over-tightening. | Poor mounting concentrates stress around the bore and can crack the wheel before work starts. |
| Guards, handles and rests | Guards and side handles are fitted. Bench grinder rests and tongue guards are adjusted as the wheel wears. | Guarding reduces contact and fragment exposure; poor rest adjustment can pull the workpiece into the wheel. |
| Test run and work area | Newly mounted wheels are run in a safe direction with people clear, then the work area is checked for dust control, sparks, cables, combustibles and bystanders. | Test running and work-area planning reveal defects before full cutting or grinding load is applied. |
Ring-test limitation: only use a ring test where the wheel type and manufacturer permit it and the person is trained in the method. HSG17 lists several products for which it is not practicable, including small wheels, plugs, cones, mounted wheels, segments and plate-mounted wheels. A ring test never overrides visible damage, doubtful history or the manufacturer's rejection criteria.
Start-up, work area and stop-work checks
| Stage | Required check | Operational decision |
|---|---|---|
| Workpiece and line of cut | Support and clamp the work so it cannot move, close on the wheel or release stored energy. Check both sides of the cut for services, fixings, voids and people. | Re-plan if the cut can trap the wheel, destabilise the material or direct fragments towards anyone. |
| Dust, fume and debris | Identify what the material and any coating contain. Start source control before cutting, verify water flow or extraction capture, and use suitable face-fitted RPE where residual exposure remains. | Do not start if the material is unknown, control is ineffective, visible dust escapes or contaminated dust would spread to others. |
| Sparks, heat and fire | Trace the spark path and check above, below and behind the work. Remove or protect combustibles, control flammable substances and arrange permits, extinguishers and a fire watch where required. | Stop if sparks can enter a void, reach fuel, vapour, dust or insulation, or fall into an uncontrolled area. |
| People and access | Create an exclusion zone for the wheel plane, kickback path, sparks, dust and ejected material. Protect people on adjacent work faces and prevent unplanned entry. | Delay work where the area cannot be segregated or the operator cannot maintain stable footing and two-handed control. |
| PPE and compatibility | Use impact-rated eye protection and any required face, hearing, respiratory, foot and body protection. Select gloves only where they help without creating an entanglement or loss-of-grip risk. | Do not proceed if the required items do not fit, are damaged or interfere with each other, the respirator seal or safe tool control. |
| Trial run after fitting | With the guard secured, hold or stand out of the wheel plane, keep others clear and run the wheel without load for the manufacturer-specified period. Listen and watch for wobble, vibration, rubbing or abnormal noise. | Isolate immediately if the wheel runs untrue, vibrates, contacts the guard, sounds abnormal or the machine cannot reach stable speed. |
| During use and after stopping | Let the wheel do the work; avoid forcing, twisting or side-loading a cutting disc. Maintain controls until the wheel stops and place the tool so the wheel cannot contact anything. | Stop for binding, slowing, unusual heat, smell, change in sound, damaged control equipment, movement of the workpiece or changed site conditions. |
Quarantine rule: a dropped, cracked, chipped, warped, contaminated, water-damaged, overheated, unmarked or out-of-date wheel should not be tried “just once”. Isolate the tool, label the defect, prevent reuse and follow the organisation's competent-person and disposal process.
What training and competence are needed for abrasive wheels?
Abrasive wheel competence should be practical, role-specific and refreshed when equipment, work methods or performance evidence changes.
PUWER requires adequate training, but it does not automatically require every operator to hold an external course certificate. HSE explains that competent in-house training can be adequate where it is delivered to the necessary standard by a competent person. The required depth depends on the task, equipment, risk, existing knowledge and supervision.
General awareness can be delivered through short briefings or computer-based learning for people who work near abrasive wheel activity. That alone is not enough for a person who uses or mounts wheels. Operators need task-specific instruction and supervised practice with the actual tool types they use. People who mount wheels should be practically assessed because speed matching, wheel inspection, guard adjustment, mounting and test running cannot be proved by attendance alone.
Supervisors and managers need a different layer of competence. They should understand the legal duties, what good control looks like on site, how to review contractor method statements, how to challenge unsafe set-ups, and how to respond when an audit finds repeated defects. Training should be supported by supervision, not left as a certificate in a file.
| Role and level | Learning and practice | Competence evidence and record | Assessor and reassessment trigger |
|---|---|---|---|
| General awareness: People who work near abrasive wheel activity, raise permits, supervise areas or may be exposed to sparks, debris or dust. | Basic hazards, exclusion zones, dust and spark awareness, reporting defects, keeping clear of cutting lines, and why guards, extraction and respiratory protective equipment (RPE) matter. | Identify a damaged wheel, unsafe setup or dust/spark exclusion breach and report it; induction or briefing record. | Area supervisor checks at induction and when the work area or activity changes; awareness does not authorise wheel use. |
| Task-specific user training: Operators using angle grinders, cut-off saws, bench grinders, chop saws, die grinders or similar tools. | Wheel markings, tool selection, safe stance, kickback, guarding, pre-use checks, mounting limits, dust controls, hot work, personal protective equipment (PPE), and stopping work when conditions change. | Select the actual wheel/tool/material combination, inspect markings and guard, demonstrate use and stop on mismatch; practical assessment and scoped authorisation. | Competent operator assessor or supervisor checks before independent use and after new equipment, material, method or poor performance. |
| Wheel mounting competence: People who fit, change or dress abrasive wheels on portable or fixed machines. | Wheel type, bore and speed compatibility, inspection, ring testing where suitable, flanges, blotters, bushes, torque, balance, work-rest adjustment, test running and quarantine of damaged wheels. | Demonstrate identity, speed/bore fit, condition, guard/rest setting, maker mounting sequence and test run; practical mounting record. | Competent mounter assessor checks before authorisation and after new wheel type, machine, instructions or mounting defect. |
| Supervisor and manager training: Supervisors, site managers, workshop managers, facilities managers and contract managers. | Planning work, authorising users, checking risk assessments and method statements, controlling contractors, reviewing dust and vibration exposure, auditing stores and acting on repeated defects. | Observe a live task, challenge unsafe methods, contractor interfaces and exposure controls, and hold/release work; field-verification record. | Competent manager or safety adviser checks after repeat defects, incidents, method changes or weak supervision evidence. |
| Specialist or high-risk training: Workers involved in high-volume cutting, silica-generating work, petrol saw use, confined or hot-work areas, or unusual fixed grinding machinery. | Detailed method controls, respiratory protective equipment (RPE) face-fit, local exhaust ventilation (LEV), health surveillance triggers, permit-to-work interfaces and emergency arrangements. | Demonstrate the specific high-risk method, LEV/RPE checks, permit boundaries and emergency response; assessment and exposure-control record. | Relevant technical specialist checks before specialist work and when substance, process, control or health-surveillance findings change. |
| Purchasers, engineers and safety auditors | Specify the actual wheel, machine, guard and extraction combination; audit storage, use and defect learning. | Approved product/machine specification, supplier data and sampled workface evidence. | Competent engineering or safety lead checks at procurement, modification and after a mismatch or repeated defect. |
Keep the record proportionate: identify the actual task, the demonstrated skill, who assessed it and the scope of authorisation. Reassess when the equipment, material, method or observed performance changes; no universal external certificate or fixed renewal period is implied.
Which Great Britain and Northern Ireland legal duties apply to abrasive-wheel work?
Abrasive wheel work is controlled through work-equipment law, supported by separate duties for risk assessment, hazardous substances, personal protection, noise, vibration, dangerous substances and construction work.
In Great Britain there is no modern standalone abrasive wheels regulation in the way many people still describe it. The older abrasive wheels regime was replaced by the broader PUWER approach. Northern Ireland has its own PUWER 1999 regulations and related NI legislation. In both jurisdictions, the duty is wider than sending someone on a course: equipment must be suitable and safe, risks must be controlled, and people must receive adequate information, instruction, training and supervision.
In practice, a dutyholder should be able to show how abrasive wheel controls are embedded in procurement, stores, risk assessment, contractor management, training, inspection, maintenance, health surveillance decisions and incident learning. The official links section below provides the HSE guidance and legislation pages used to verify these duties.
Jurisdiction key: each duty area is shown as a Great Britain row followed by its Northern Ireland equivalent. Use the instrument for the location of the work, then use the linked regulator guidance and manufacturer instructions to turn that legal baseline into task controls.
| Jurisdiction | Legal instrument | Operational effect | Evidence a business should hold |
|---|---|---|---|
| Great Britain | Health and Safety at Work etc. Act 1974 | Broad employer and dutyholder duties for safe plant, safe systems, information, instruction, training, supervision and protection of others. | Governance, safe-system, maintenance, training, supervision, consultation and learning records. |
| Northern Ireland | Health and Safety at Work (Northern Ireland) Order 1978 | NI foundation for employer, employee and dutyholder duties concerning safe plant, systems, information, training, supervision and protection of others. | NI legal register plus governance, safe-system, maintenance, training, supervision and learning records. |
| Great Britain | Management of Health and Safety at Work Regulations 1999 | Requires suitable and sufficient assessment, preventive arrangements, competent assistance, emergency planning and cooperation where workplaces are shared. | Task assessment, coordination, emergency arrangements, review triggers and competent-assistance records. |
| Northern Ireland | Management of Health and Safety at Work Regulations (Northern Ireland) 2000 | NI route for risk assessment, preventive arrangements, competent assistance, emergency planning and cooperation. | NI task assessment, coordination, emergency arrangements, review triggers and competent-assistance records. |
| Great Britain | Provision and Use of Work Equipment Regulations 1998 | Requires suitable, maintained and, where required, inspected work equipment, effective guarding and adequate information, instruction and training. | Inventory, suitability decision, pre-use and inspection records, maintenance, guard checks and user or mounter authorisation. |
| Northern Ireland | Provision and Use of Work Equipment Regulations (Northern Ireland) 1999 | NI work-equipment route for suitability, maintenance, inspection, guarding, information, instruction and training. | NI equipment inventory, suitability decision, checks, maintenance, guards and competence evidence. |
| Great Britain | Control of Substances Hazardous to Health Regulations 2002 | Applies to hazardous dust and fume, including respirable crystalline silica, and requires prevention or adequate control of exposure. | COSHH assessment, source-control checks, RPE selection and face fit, maintenance, monitoring and health-surveillance decisions. |
| Northern Ireland | Control of Substances Hazardous to Health Regulations (Northern Ireland) 2003 | NI route for assessing and preventing or adequately controlling exposure to hazardous dust, fume and other substances. | NI COSHH assessment, source-control checks, RPE and face fit, maintenance, monitoring and surveillance decisions. |
| Great Britain | Personal Protective Equipment at Work Regulations 1992, as amended by the 2022 Regulations | Requires suitable residual-risk PPE that is compatible, maintained, stored and supported by information and training; specific noise and hazardous-substance regimes govern hearing protection and RPE. | Selection rationale, compatibility and issue records, training, maintenance, storage, replacement and worker-status coverage. |
| Northern Ireland | Personal Protective Equipment at Work Regulations (Northern Ireland) 1993 | NI route for suitable, compatible and maintained residual-risk PPE, with information, instruction and training; specific regimes govern hearing protection and RPE. | NI PPE assessment, compatibility and issue records, training, maintenance, storage and replacement. |
| Great Britain | Control of Noise at Work Regulations 2005 | Requires noise exposure assessment and reduction at source, with hearing protection, information and health surveillance where indicated. | Exposure assessment, purchasing and engineering controls, zones, protection, training and surveillance decisions. |
| Northern Ireland | Control of Noise at Work Regulations (Northern Ireland) 2006 | NI route for noise exposure assessment, reduction at source, hearing protection, information and health surveillance. | NI exposure assessment, source controls, zones, protection, training and surveillance decisions. |
| Great Britain | Control of Vibration at Work Regulations 2005 | Requires assessment and control of hand-arm vibration from grinders, saws and other powered tools. | Realistic vibration data, daily trigger time, exposure calculation, maintenance, purchasing, information and surveillance decisions. |
| Northern Ireland | Control of Vibration at Work Regulations (Northern Ireland) 2005 | NI route for assessing and controlling hand-arm vibration exposure. | NI vibration data, trigger-time and exposure calculations, maintenance, purchasing, information and surveillance decisions. |
| Great Britain | Dangerous Substances and Explosive Atmospheres Regulations 2002 | Applies where sparks, heat or cutting could ignite flammable vapour, gas, dust or combustible material. | DSEAR and hot-work assessment, permit, area and atmosphere checks, fire watch and emergency arrangements. |
| Northern Ireland | Dangerous Substances and Explosive Atmospheres Regulations (Northern Ireland) 2003 | NI route for eliminating or controlling ignition and explosion risk from dangerous substances. | NI DSEAR and hot-work assessment, permit, area and atmosphere checks, fire watch and emergency arrangements. |
| Great Britain | Construction (Design and Management) Regulations 2015 | Applies to construction work and requires planning, coordination, contractor capability and suitable supervision. | Construction phase plan, design-risk decisions, RAMS acceptance, induction, coordination and supervisor checks. |
| Northern Ireland | Construction (Design and Management) Regulations (Northern Ireland) 2016 | NI construction route for planning, coordination, contractor capability and suitable supervision. | NI construction phase plan, design-risk decisions, RAMS acceptance, induction, coordination and supervisor checks. |
Authority boundary: The table above identifies workplace law. HSE and HSENI publications explain recognised ways to comply but are not legislation. BS, EN and ISO standards support product design, procurement and management systems; a standard or conformity mark does not prove that a wheel is compatible with a particular machine, task, material or environment.
PPE law boundary: in Great Britain, the Personal Protective Equipment at Work (Amendment) Regulations 2022 extend the 1992 duties to qualifying limb (b) workers. PPER covers suitable residual-risk protection such as eye, face, hand, foot and body protection. Hearing protection is regulated under noise law, while RPE for hazardous dust or fume is regulated through COSHH or the relevant substance-specific regime. Every item must still be compatible with the others.
Northern Ireland route: use HSENI's PUWER (NI) 1999 guidance and the applicable NI legislation. The technical controls may be similar, but legal citations and regulator routes must not be silently copied from Great Britain.
What should a risk register for abrasive wheels include?
A useful abrasive wheels risk register should separate the major harm routes and list the controls, owners and evidence for each one.
A single line that says "abrasive wheels - cuts and sparks" is too weak. It misses the different control systems needed for wheel burst, kickback, respirable dust, fire, noise, vibration, electricity, petrol saw use and contractor work. A better register helps supervisors and managers see whether each hazard has live controls that can be checked.
The register should also connect to action tracking. If inspections find guards missing, dry cutting or wrong discs, the issue should not sit only as a local finding. It should update training, procurement, supervision, stores or contractor management where the same failure could happen again.
| Risk register item | Possible event or exposure | Controls and evidence to record |
|---|---|---|
| Wheel burst | Wheel disintegrates because it is damaged, oversped, side-loaded, incorrectly mounted or used for the wrong task. | Approved wheel types, speed compatibility checks, mounting competence, guards, test run, storage inspection, defect quarantine and investigation of breakage or near misses. |
| Kickback | Disc binds in the cut and throws the tool towards the user or nearby person. | Cut planning, workpiece support, correct stance, two-handed grip, wheel depth control, training, supervision and exclusion zones. |
| Respirable dust | Dry cutting or grinding releases respirable crystalline silica, cement dust, plaster dust, wood dust or metal particulate. | Avoidance of cutting, wet suppression, on-tool extraction, M or H class vacuums, respiratory protective equipment (RPE), face-fit testing, cleaning standards and health surveillance review. |
| Fire and hot work | Sparks or hot particles ignite combustible materials, flammable vapours, waste, insulation or hidden materials. | Hot-work planning, combustible removal, screens, fire watch, extinguishers, permit-to-work where appropriate and post-work checks. |
| Noise and vibration | Repeated tool use damages hearing or contributes to hand-arm vibration syndrome (HAVS). | Low-noise and low-vibration procurement, maintenance, exposure planning, hearing protection, trigger-time controls, health surveillance and worker reporting. |
| Contractor activity | Contractors bring uncontrolled discs, remove guards, dry cut materials or expose other trades. | Pre-start competence checks, RAMS review, approved equipment rules, inductions, active supervision, stop-work authority and close-out of non-conformances. |
How could BuildOut Ltd manage abrasive wheels?

BuildOut Ltd would choose the cutting method and equipment for the material and setting, then control both immediate injury risks and harmful exposures.
BuildOut Ltd · practical example
Replace an improvised cut with a planned cutting method
The key lesson The correct wheel is only one part of safe cutting; the machine, guard, material, work position and environment must also fit.
The situation: A worker is asked to trim paving beside a doorway using the grinder already in the van. The task involves a new material and people passing through the area. Availability of a tool would not decide its suitability.
Why this matters: A poor equipment match can create ejection or contact risks while the same task exposes people to silica, noise and vibration.
How BuildOut Ltd would manage it
- Decide whether to cut here — Project Manager. Consider ordering the correct size, off-site cutting or a suitable alternative method. Choose a work location that avoids exposing building users and other trades.
- Specify compatible equipment — Plant and Procurement Coordinator. Confirm the machine, wheel and accessories against the task and manufacturer's requirements. Arrange competent selection, mounting and maintenance rather than accepting a wheel because it fits the spindle.
- Set the task controls — Health and Safety Manager. Address the workpiece, guard, access boundary, ignition hazards and applicable dust, noise and vibration controls. Select compatible PPE and necessary RPE from the assessment.
- Check the operator and setup — Trade Supervisor. Confirm task-relevant training and competence, instructions and equipment condition. Let workers raise unsuitable access or support conditions without pressure to make a quick cut.
- Stop on a mismatch — Site Manager. Keep defective or unsuitable equipment out of use. Have the relevant competent person resolve damage, control failure or changed material before authorising the revised task.
When the conditions change
- Recognise the trigger
- The wheel, machine, material, guard or control arrangement does not match.
- Make the immediate decision
- Do not cut where the wheel or machine is incompatible, protection is defective or the doorway cannot be controlled.
- Verify the next step
- The competent supervisor confirms the specified machine-wheel-material match, intact guarding, suitable workpiece arrangement and assessed dust and access controls before releasing the cut.
What good looks like
The operator has a suitable, intact and compatible setup and a clear work boundary. Cutting does not proceed simply because the task appears short or somebody has used a similar tool before.
Evidence to look for: Method selection, equipment and wheel specification, competence records, pre-use findings and task-control verification.
Common mistake to avoid: Treating a brief task as too small to need a planned cutting method.
Apply this to your work: What would make the tool in your van unsuitable for this particular cut?
Guidance behind the management approach: HSE HSG17: safety in the use of abrasive wheels. Use the topic's legal and technical guidance for the applicable work and location.
Illustrative company system: BuildOut Ltd is the established SHARE example company. The authorisations, review frequencies and records below are examples of local arrangements, not universal legal duties. Set inspection and review intervals from the risk, deterioration, operating experience and manufacturer information.
BuildOut Ltd carries out refurbishment, fit-out and small construction projects where abrasive wheels are used for cutting blocks, trimming metalwork, dressing welds, cutting tiles and adapting installed materials. The company does not treat abrasive wheels as a simple toolbox talk topic. It treats them as a high-energy work equipment risk with occupational health and fire consequences.
The practical control system starts before site work. During planning, supervisors identify likely cutting and grinding tasks, check whether pre-cut or alternative methods can be used, and decide whether a permit, hot-work control, dust plan or contractor review is needed. During work, supervisors check that the method described in the risk assessment and method statement (RAMS) is the method actually being used.
| Management area | How BuildOut Ltd manages it | Evidence and improvement loop |
|---|---|---|
| Assessment and task planning | BuildOut Ltd starts with the task, not the tool. Supervisors check whether cutting can be avoided through pre-cut materials, design coordination or alternative fixing methods before approving abrasive wheel use. | Task risk assessments, pre-start planning notes, design change records and supervisor sign-off are reviewed when dust, sparks or wheel defects are repeatedly raised. |
| Risk register and standards | The company risk register separates wheel burst, kickback, dust, sparks, vibration, noise and contractor exposure so each risk has named controls and a responsible owner. | Risk register reviews compare site inspection findings, near misses, training gaps and maintenance records, then update the abrasive wheels standard and toolbox talk pack. |
| Procurement and stores | Only approved tools, guards, discs, blades, extraction attachments and water-fed systems are purchased. Stores keep cutting discs flat and dry, segregate wheel types and remove expired, damaged or unlabelled wheels. | Approved supplier lists, delivery checks, quarantine tags, stock rotation records and stores inspections at a justified local interval show whether the procurement rule is working. |
| Training and authorisation | Operators receive practical abrasive wheel training matched to the tool they use. People who mount wheels are separately authorised, and supervisors are trained to challenge unsafe wheel selection, removed guards and dry cutting. | Authorised-user registers, practical assessment records, refresher dates and supervisor observations are checked during project audits and after near misses. |
| Control implementation | Site teams use water suppression or on-tool extraction for dusty cutting, hot-work controls for sparks, exclusion zones for cutting lines, and suitable respiratory protective equipment (RPE), eye and face protection, hearing protection and gloves. | Permit records, RAMS briefings, RPE face-fit records, inspection photos and daily supervisor checks confirm whether controls are present and being used properly. |
| Contractor management | Subcontractors must declare abrasive wheel activities before arrival, provide evidence of competence and use BuildOut-approved dust and spark controls when their work can affect other trades or occupied areas. | RAMS reviews, induction records, coordination meeting notes, non-conformance reports and stop-work interventions are used to improve contractor selection and supervision. |
| Maintenance and inspection | Tools are checked before use, formally inspected where required at intervals justified by risk and deterioration and removed from service if guards, cables, handles, switches, bearings or discs are defective. Extraction units and water systems are checked as part of the task set-up. | Inspection tags, maintenance logs, defect reports, repair records and repeat-defect trend reviews show whether equipment condition is being controlled. |
| Learning and continual improvement | A cracked disc, dry-cutting observation, dust complaint, guard removal or spark near miss is treated as a system signal, not simply a worker fault. | Investigations look at planning, procurement, time pressure, supervision and training. Corrective actions are verified on site before being closed. |
Which ISO standards can strengthen abrasive wheel management?
ISO 45001 provides the main occupational health and safety framework, while related ISO standards can strengthen procurement, environmental control, machinery safety, vibration assessment, signage, risk management and auditing.
ISO alignment is useful where a business wants consistent standards across projects, depots or workshops. It helps define who owns the abrasive wheels procedure, how procurement controls unsafe discs, how contractor work is checked, how training is recorded, how equipment defects are reported and how recurring findings are reviewed by management.
Standards support competent decisions; they do not replace UK legal duties, the equipment and wheel manufacturers' instructions or task-specific assessment. Some standards below apply mainly to designers, manufacturers or specialist assessors. An employer should use their outputs when specifying and procuring equipment, then manage workplace use under PUWER, COSHH and the other duties described above.
Applying the management system: assign ownership for wheel selection, competence, procurement and contractor control; involve operators in identifying failures; keep useful records; and check corrective actions at the workface. These are SHARE applications of the standard’s management principles. Use the current licensed standard for a formal conformity or clause-level audit.
Related ISO standards and their operational use
| Standard | Relevant scope | How a business can use it | Important boundary |
|---|---|---|---|
| ISO 45001:2018/Amd 1:2024 — Edition and scope require an authorised current copy. | Occupational health and safety management systems. | Set ownership, worker participation, hazard assessment, competence, procurement, contractor control, monitoring, incident learning and continual improvement. | A management-system framework; it does not specify how a particular wheel is mounted. |
| ISO 9001:2026 — Edition and scope require an authorised current copy. | Quality management systems and controlled processes. | Control approved suppliers, product specifications, incoming checks, traceability, nonconforming wheels, calibration, repairs and corrective action. | Quality controls support safety but do not replace PUWER assessment or operator competence. |
| ISO 14001:2026 — Edition and scope require an authorised current copy. | Environmental management systems. | Manage abrasive waste, spent wheels, captured dust, metal residues, noise, water-suppression runoff, energy use and contamination from the task. | Environmental controls must be designed so they do not weaken worker exposure or equipment controls. |
| ISO 31000:2018 — Edition and scope require an authorised current copy. | Risk management guidelines. | Connect abrasive-wheel risks to governance, decision-making, change management, risk criteria and review of critical controls. | Guidance rather than a certifiable standard and not a substitute for a suitable and sufficient workplace risk assessment. |
| ISO 19011:2026 — Edition and scope require an authorised current copy. | Guidelines for auditing management systems. | Build audits that sample stores, wheel selection, operator practice, maintenance, contractors, defects and whether corrective action is effective. | Audit guidance; a checklist alone is not proof that controls work at the point of use. |
| ISO 12100:2010 — Edition and scope require an authorised current copy. | Machinery design risk assessment and risk reduction. | Inform equipment specifications, design reviews, guarding decisions and evaluation of reasonably foreseeable misuse when buying or modifying machinery. | Primarily for machinery design and currently under revision; users should verify the current edition and applicable product standard. |
| ISO 11148-7:2012 — Edition and scope require an authorised current copy. | Safety requirements for hand-held non-electric grinders. | Support specifications and checks for pneumatic or hydraulic grinders, including rated speed, guards, controls, flanges and information for use. | It does not cover electric grinders; use the applicable machine and product standards for the actual tool. |
| ISO 19432-1:2020 — Edition and scope require an authorised current copy. | Internal-combustion, hand-held abrasive cut-off machines for construction materials. | Specify compliant petrol cut-off machines and review safety features, guarding, intended use and information supplied by the manufacturer. | Applies to the machine design, not the cut-off wheel specification or the employer's site controls. |
| ISO 5349-1:2001 — Edition and scope require an authorised current copy. | Measurement and evaluation of exposure to hand-transmitted vibration. | Support competent HAV exposure assessment, measurement strategy and interpretation alongside UK vibration requirements. | A specialist measurement standard; manufacturer emission data alone may not represent real workplace exposure. |
| ISO 7010:2019 and amendments — Edition and scope require an authorised current copy. | Registered safety signs and symbols. | Use recognised mandatory, prohibition and warning signs on equipment, wheels, stores and controlled cutting areas, supported by training where meaning may be unclear. | Signs communicate controls; they do not make an unsuitable wheel, missing guard or uncontrolled task safe. |
Product standards that may appear in specifications and markings
UK suppliers and manufacturers may refer to BS EN product standards as well as ISO standards. Procurement teams should verify the current adopted edition, the product declaration and the manufacturer's restrictions rather than relying on a standard number printed in isolation.
| Standard, edition and status | Product type | Operational procurement and use | Verification needed |
|---|---|---|---|
| BS EN 12413:2019 (edition to verify against an authorised current copy) | Bonded abrasive products, including many grinding wheels and resin-bonded cutting-off wheels. | Use for procurement and manufacturer product information. Confirm exact product, traceability, dimensions, maximum operating speed, restrictions, marking, storage and shelf-life controls; still prove machine and task compatibility. | Confirm the current licensed edition, product scope and manufacturer instructions before procurement or use. |
| BS EN 13236:2019 (edition to verify against an authorised current copy) | Superabrasive products, including many diamond cutting blades. | Use for procurement and product information. Confirm intended material and machine, direction of rotation, wet or dry limitation, segment condition, bore fit, speed and traceability; do not infer task suitability from the standard alone. | Confirm the current licensed edition, product scope and manufacturer instructions before procurement or use. |
| BS EN 13743:2017 (edition to verify against an authorised current copy) | Coated abrasive products, including many flap discs, flap wheels, fibre discs and their backing pads. | Use for procurement and product information. Confirm backing pad or support, maximum tool speed, permitted operation and contact angle, condition, marking and maker restrictions; still assess the actual task and exposure controls. | Confirm the current licensed edition, product scope and manufacturer instructions before procurement or use. |
These are standard-level applications. For a formal clause audit or product specification, use the current licensed edition and competent specialist interpretation.
What are the warning signs that abrasive wheel safety is failing?
The strongest warning signs are unsafe wheel selection, removed guards, dry cutting, damaged storage, weak mounting competence and poor spark control.
These signs need prompt action because the consequences can be immediate and severe. A burst disc can injure someone in seconds, while dust and vibration may cause harm gradually and silently. Supervisors should treat visible dust clouds, repeated tool defects, missing records and poor contractor control as management system failures, not isolated behaviour problems.
| Warning sign | How it can cause harm | How it may show up at work |
|---|---|---|
| Cutting discs used for grinding | Thin cutting discs are not designed for side loading and can shatter under lateral pressure. | Workers dress welds with thin discs, discs show side wear, or supervisors cannot explain the difference between cutting and grinding wheels. |
| Guards or side handles removed | The user is less protected from fragments, sparks and contact, and the tool is harder to control during kickback. | Tools stored without guards, guards cable-tied back, users saying they need more visibility, or spare handles missing from kits. |
| Dry cutting dusty materials | Respirable dust can enter deep into the lungs and contribute to silicosis, chronic obstructive pulmonary disease (COPD), asthma or lung cancer depending on the material. | Visible dust clouds, dusty clothing, no water supply, no extraction, disposable masks used as the main control, or dry sweeping after cutting. |
| Damaged, damp or expired wheels in use | Wheel strength can be reduced, increasing the chance of burst at operating speed. | Wheels stored loose in vans, labels missing, resin discs beyond shelf life, cracked edges, damp storage or no quarantine area. |
| No authorisation for mounting wheels | Incorrect flanges, over-tightening, missing blotters or poor speed checks can create failure before work starts. | Anyone changes discs, no practical assessment records, no test-run routine, or people cannot explain markings and speed ratings. |
| Poor spark and hot-work control | Sparks can ignite combustibles, waste, flammable vapours, insulation, cladding cavities or materials behind the work area. | No fire watch, no combustible clearance, cutting near fuel or solvents, hot particles falling to lower levels, or extinguishers not available. |
What should happen when an abrasive-wheel incident or control failure occurs?
Stop the equipment, protect people, summon the right emergency response and preserve the evidence; do not restart or discard failed components until an authorised review says it is safe.
What happens after a defect or incident
Two linked parts · 6 questions. Open Part 2 to complete the route.

Continue to questions 4–6 · Part 2 of 2

Read this visual as text
- Start: A wheel is dropped, runs abnormally, bursts or causes injury or exposure.
- Question 1: Stop and isolate when safe Decision owner: Competent wheel mounter / task supervisor.
- ACTION: Keep people clear, raise the alarm and assess immediate danger. CONTINUE → QUESTION 2.
- Question 2: Is anyone injured, is there fire, or is harmful exposure suspected? Decision owner: First aider / emergency services.
- YES — STOP / REFER: Activate the emergency or clinical route. Do not delay care to collect evidence. STOP / REFER → APPROPRIATE RESPONSE.
- NO: No such warning is identified; continue the remaining checks. CONTINUE → QUESTION 3.
- UNKNOWN — PROTECT FIRST: Protect people and hold the affected work. Obtain the responsible specialist’s assessment; do not assume the warning is absent. HOLD → OWNER RESOLVES BEFORE RESUMING.
- Question 3: Are the tool, fragments, packaging and scene secured without added risk? Decision owner: Competent wheel mounter / task supervisor.
- YES: The required evidence or condition is confirmed. CONTINUE → QUESTION 4.
- NO / UNKNOWN — HOLD: Preserve evidence safely; do not destroy failed parts or trial the suspect wheel. HOLD → REPEAT QUESTION 3 AFTER CORRECTION.
- Question 4: Have competent people checked the cause and related stock? Decision owner: Competent wheel mounter / task supervisor.
- YES: The required evidence or condition is confirmed. CONTINUE → QUESTION 5.
- NO / UNKNOWN — HOLD: Keep equipment and affected stock in quarantine while investigation and reporting are reviewed. HOLD → REPEAT QUESTION 4 AFTER CORRECTION.
- Question 5: Have corrective controls and replacement equipment been verified? Decision owner: Competent wheel mounter / task supervisor.
- YES: The required evidence or condition is confirmed. CONTINUE → QUESTION 6.
- NO / UNKNOWN — HOLD: A replacement alone does not resolve the cause. Correct and recheck the system. HOLD → REPEAT QUESTION 5 AFTER CORRECTION.
- Question 6: Has the authorised local lead accepted hand-back? Decision owner: Competent wheel mounter / task supervisor.
- YES: The required evidence or condition is confirmed. OUTCOME → RECORD AND HAND OVER.
- NO / UNKNOWN — HOLD: No restart until the evidence and operational conditions are accepted. HOLD → REPEAT QUESTION 6 AFTER CORRECTION.
- Outcome: Record the decision, evidence, responsible person and review trigger.
- Stop and escalation boundary: Do not instruct destruction of failed evidence or retesting a suspect wheel. A replacement alone does not close the cause. Local release roles are illustrative. HSG17; Eye injury; CO care; NI CO care.
| Event | Immediate actions | Escalation and evidence | Restart condition |
|---|---|---|---|
| Wheel burst, contact injury or ejected fragment | Release the control and isolate when safe. Get first-aid help and call 999 for serious injury. A high-speed eye strike, penetrating object, sight change or severe eye pain requires immediate emergency assessment: go to A&E or call 999. Do not drive yourself or remove an embedded object. See NHS eye-injury guidance. | Notify the supervisor, preserve the tool, guard, wheel pieces, packaging, batch and scene, and assess reporting duties under the applicable incident regime. | No restart until competent investigation closes equipment, wheel selection, mounting, guarding, training and wider stock concerns. |
| Headache, dizziness, nausea, breathlessness or suspected carbon monoxide | Leave for fresh air and stop the source only if safe; do not enter a contaminated area to rescue someone without the planned rescue capability. Suspected carbon-monoxide symptoms need prompt medical advice even if they improve outdoors. Call 999 for breathing difficulty, sudden confusion, collapse, weakness or chest pain. See NHS advice and the Northern Ireland care route. | Treat multiple similar symptoms as an urgent exposure warning. Secure equipment and record location, ventilation, fuel source, detector readings and people exposed. | Only after competent assessment confirms a safe method, ventilation and any monitoring; prefer non-combustion equipment. |
| Water, extraction or containment failure with visible dust escape | Stop cutting, keep people out of the contaminated area and avoid dry sweeping or compressed-air cleaning. | Report the exposure-control failure, identify affected people and materials, and review whether health advice, exposure assessment or surveillance follow-up is needed. | Source control is repaired and tested, cleaning is completed by a suitable method, RPE remains suitable and the supervisor releases the area. |
| Fire, smouldering material or sparks entering a void | Raise the alarm, stop work, follow the site emergency plan and call 999 where required. Fight only a small fire if trained, equipped and able to escape. | Check hidden spaces only under the emergency plan, account for people, preserve permit and fire-watch information, and investigate the spark path and combustible load. | Fire risk is reassessed, affected areas are confirmed safe, controls and permit conditions are revised, and the authorised person releases work. |
| Dropped, cracked, unmarked or abnormal-running wheel or tool | Stop, isolate, tag and physically quarantine the item. Do not test it again to see whether the fault repeats. | Record asset, wheel and batch details; inspect related stock and equipment; notify supplier or manufacturer where a product defect may extend beyond one item. | A competent person authorises repaired equipment or a verified replacement, and any batch or storage issue is closed. |
| Electrical damage, battery event, fuel leak or hose failure | Stop and isolate by the safe method, remove ignition sources where this can be done safely, segregate the area and use the relevant spill, battery or electrical emergency procedure. | Report the defect and any exposure, fire or environmental release; retain maintenance history and failed parts for investigation. | Repair, inspection and functional checks are completed by a competent person and the energy or fuel system is confirmed safe. |
Do not improvise the reporting decision: the employer or person in control should assess notification and recordkeeping duties for the actual outcome and jurisdiction. A near miss still needs investigation when the same failure could have caused serious harm.
Chemical hazard symbols: what do they mean?
Exploding bomb
Explosive, self-reactive or organic peroxide hazards.
Flame
Flammable, self-heating or pyrophoric substances.
Flame over circle
Oxidising substances that can intensify fire.

Gas cylinder
Gas under pressure.
Corrosion
Skin burns, eye damage or corrosive to metals.

Skull and crossbones
Acute toxicity.

Exclamation mark
Irritation, harmful effects or skin sensitisation; some classifications cover drowsiness, dizziness or ozone-layer hazard. Read the actual hazard statements. Skin sensitisation differs from respiratory sensitisation.
Health hazard
Serious health hazards, including organ damage, aspiration hazard, respiratory sensitisation, cancer and reproductive effects; some can follow a single exposure.
Environment
Hazardous to the aquatic environment.
Standards named on this page are background context. Confirm the current edition, scope and exact requirements from an authorised copy before applying them. The open official sources below support the specific public-law and regulator guidance claims they are cited for.
What do the main abrasive-wheel safety acronyms and terms mean?
The abrasive-wheel terms below explain the legal, equipment and exposure-control abbreviations used in this guide.
Acronyms should be clear because abrasive wheel safety often sits across work equipment, hazardous substances, personal protection, noise, vibration and fire controls.
| Acronym or term | What it means | Why it matters |
|---|---|---|
| PUWER | Provision and Use of Work Equipment Regulations. | The main legal framework for abrasive wheel equipment suitability, maintenance, inspection, guarding, information and training. |
| COSHH | Control of Substances Hazardous to Health. | Applies where cutting, grinding or sanding creates hazardous dust or fume. |
| RCS | Respirable crystalline silica. | Fine silica dust from materials such as concrete, brick, stone and mortar can reach deep into the lungs. |
| RPE | Respiratory protective equipment. | Masks and respirators may be required where dust or fume exposure remains after source controls. |
| PPE | Personal protective equipment. | Includes eye, face, hand, foot and body protection; hearing protection and RPE sit under specific legal regimes. |
| LEV | Local exhaust ventilation. | Captures dust or fume close to where it is produced, before it reaches the breathing zone. |
| RPM | Revolutions per minute. | The machine speed must not exceed the wheel maximum operating speed. |
| HAVS | Hand-arm vibration syndrome. | A potentially disabling condition linked to repeated use of vibrating hand-held tools. |
| DSEAR | Dangerous Substances and Explosive Atmospheres Regulations. | Relevant where sparks or hot work could ignite flammable substances or explosive atmospheres. |
| ERICPD | Eliminate, Reduce, Isolate, Control, PPE, Discipline. | A practical hierarchy for choosing stronger controls before relying on behaviour or protective equipment. |