SHARE Knowledge Hub
Hand-Held Tools
Hand-held tools are manual, electric, pneumatic, hydraulic, cartridge, battery or fuel-powered tools held or guided by a worker during a task. They are ordinary enough to be underestimated, yet they can cause serious injury through cuts, punctures, amputation, eye injury, electric shock, burns, noise, vibration, dust, ejected fragments, fire, explosion, poor ergonomics and uncontrolled energy. Good management is practical: choose the right tool for the job and environment, keep it in safe condition, check it before use, train people properly, control attachments and consumables, maintain and store it well, and stop work when the tool, user, material or location is not suitable.
Understanding Hand-Held Tools
An effective organisation first questions whether the hand-held operation is necessary, then chooses a suitable tool and method, controls the workpiece and surrounding area, protects exposed people from the moving part and ejection, manages power and stored energy, trains the operator, checks condition before use and maintains equipment according to risk.
Why this matters at work
Assess noise and daily hand-arm vibration using representative equipment and exposure information. Maintain tools and correct consumables, support the workpiece and organise tasks so controls remain usable. Select suitable respiratory, hearing or other protection for assessed residual risk, including necessary fit and use arrangements where applicable. Verify engineering performance and review defects, symptoms and task changes. Keep exposure assessment separate from the immediate cutting, electrical, fire and pressure hazards. Record important findings and actions and obtain competent advice when data or control performance are uncertain. A quieter or lower-vibration purchase claim does not prove reduced workplace exposure under every use condition.
A pre-use check helps the user identify obvious damage or unsafe condition before work. Formal inspection, where required by the applicable work-equipment provisions, addresses relevant installation or deterioration risks with suitable competence and scope. Maintenance keeps equipment safe through appropriate servicing and repair. Their purposes overlap but a quick visual check, electrical test label and detailed mechanical inspection are not interchangeable.
How organisations manage this in practice
In GB, PUWER applies to work equipment, including equipment not owned by the employer, with NI's separate route retained in the guide. Check instructions, accessories, guards, workpiece support, power supply and environment. Provide suitable information, training and supervision, and establish pre-use, defect and maintenance arrangements based on risk. Plan safe changeover and emergency response. PPE should address assessed residual hazards after stronger controls, not become a generic instruction replacing safe setup. Record important restrictions and unresolved issues; this answer cannot approve an unexamined tool, accessory combination or hazardous work location.
Check that the defect is corrected by a suitable competent person and that relevant guards, controls, isolation and accessories are safe and compatible. Confirm that repair evidence matches the tool identity and the reported fault. An invoice or a successful unloaded start may not demonstrate all relevant safety functions. Do not return equipment to use while critical questions remain unresolved.
Start with the task, material, location and people exposed, then choose a suitable method and tool. Consider whether a fixed, mechanised or otherwise safer process can avoid the hand-held operation. Cutting, ejection, entanglement, electricity, stored pressure, dust, noise, vibration, fire and strain differ by tool and task. A conformity mark, hire certificate or familiar brand does not demonstrate suitability for the actual use.
What are the key facts about hand-held tools?
The key facts are that tool safety depends on suitability, condition, user competence, environment and control of attachments.
What are the key facts about hand-held tools? — part 1 of 2


Read the complete visual as text
- The key facts are that tool safety depends on…: The key facts are that tool safety depends on suitability, condition, user competence, environment and control of attachments.
- The right tool prevents improvisation: Poor tool choice leads to excessive force, slips, kickback, broken consumables and unsafe workarounds.
- Condition matters every day: Small defects such as cracked handles, damaged leads, blunt blades or missing guards can quickly become serious incidents.
What are the key facts about hand-held tools? — part 2 of 2


Read the complete visual as text
- Attachments are part of the tool: Wrong discs, blades, bits, sockets, batteries or accessories can fail, eject fragments or overload the tool.
- Environment changes the risk: Wet areas, flammable atmospheres, confined spaces, height work, dust and public areas all affect tool selection.
- Health hazards are part of tool safety: Noise, vibration, dust, fumes, posture and repetitive force can cause long-term harm even when no accident occurs.
Best-practice guide: Hand-Held Tools
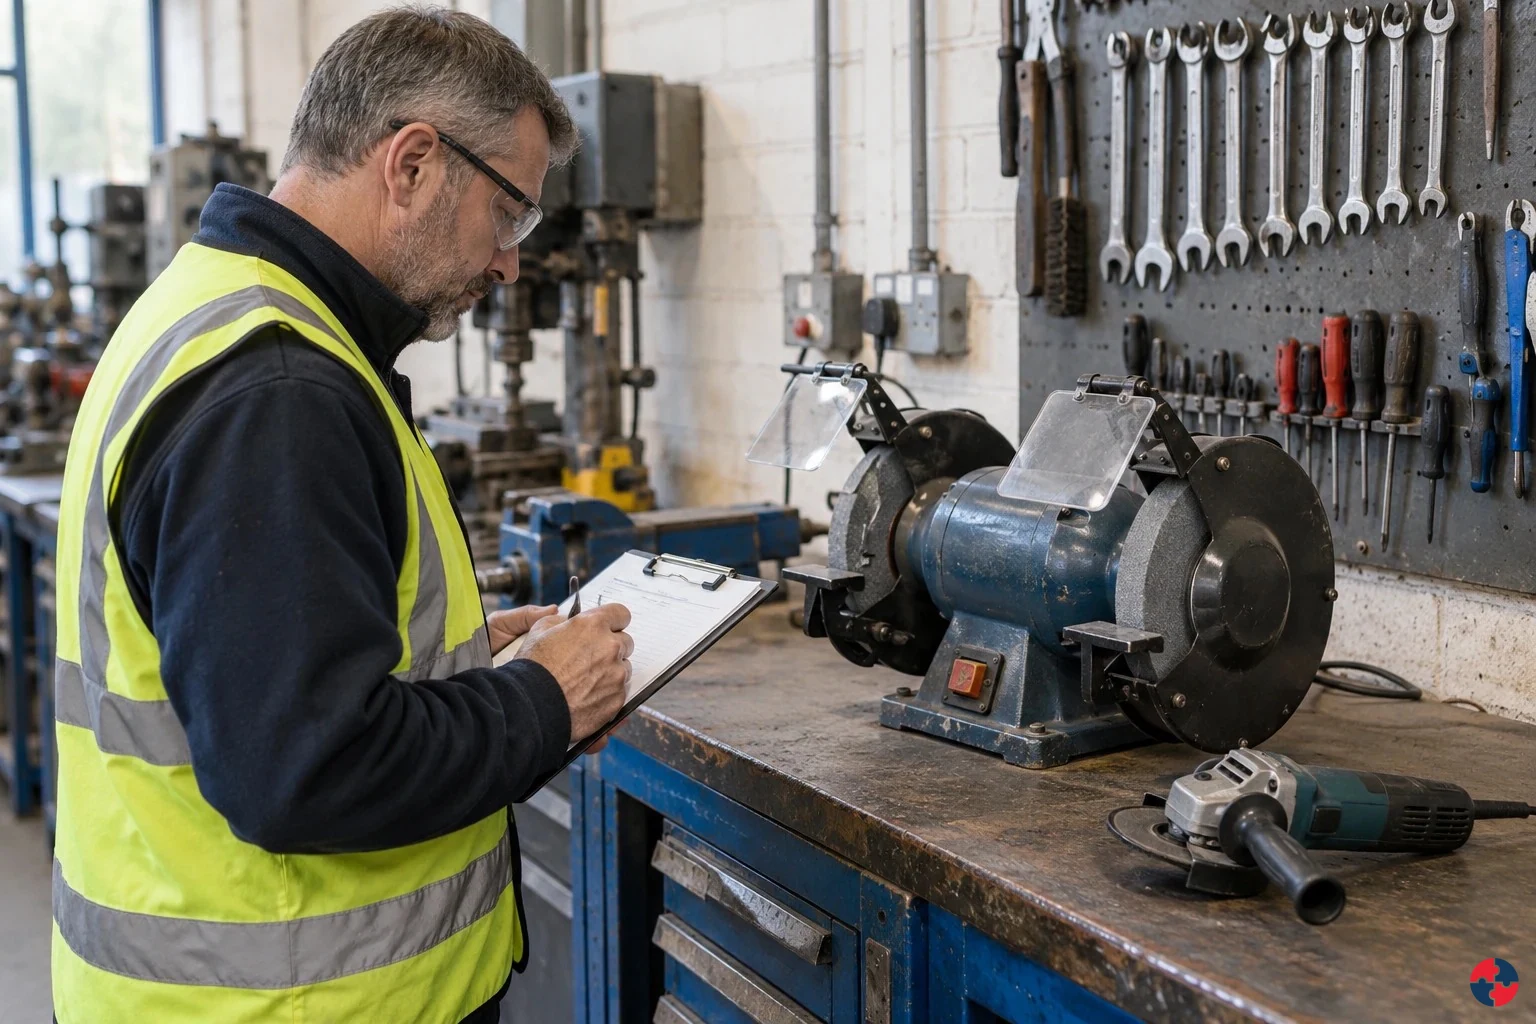
What are the key facts about hand-held tools?
The key facts are that tool safety depends on suitability, condition, user competence, environment and control of attachments. Hand-held tools are manual, electric, pneumatic, hydraulic, cartridge, battery or fuel-powered tools held or guided by a worker during a task.
Turn hand-held tools knowledge into a decision
Hand-held tools are manual, electric, pneumatic, hydraulic, cartridge, battery or fuel-powered tools held or guided by a worker during a task. They are ordinary enough to be underestimated, yet they can cause serious injury through cuts, punctures, amputation, eye injury, electric shock, burns, noise, vibration, dust, ejected fragments, fire, explosion, poor ergonomics and uncontrolled energy. Tool risk register and task assessments.
the site team worked example
Assessing: Identify high-risk tools and tasks by injury, vibration, noise, dust, electricity, fire and ergonomic risk. Evidence / response: Tool risk register and task assessments. Analysing: Challenge whether tasks can be prefabricated, mechanised, completed with lower-energy tools or moved away from public/interface areas. Evidence / response: Method review and procurement decision log.
Harm Chain
Grinding metal: Disc shatters or kicks back; fragments strike face or nearby person. Drilling in a damp area: Damaged lead or unsuitable tool makes live contact possible. Repeated breaking or dry cutting: Vibration, noise and dust reach hands, hearing and lungs.
Choose controls for hand-held tools
Eliminate: Improve fabrication or buy a finished component so the manual grinding stage is unnecessary. Reduce, including substitution: Choose a suitable lower-vibration finishing method or tool after checking finish, accessory compatibility and other hazards. Isolate: Clamp and support the component and segregate other people from sparks and fragments. Control: Use a maintained compatible tool/accessory and effective dust control; avoid unnecessary force and worn consumables. Control: Plan actual trigger time from representative vibration data and the required work, alongside wheel, dust and noise controls. Read the full control table for qualifications, ownership and verification. Use the actual task and applicable jurisdiction; existing technical approval remains unchanged.
Use the full hand-held tools lesson
Use the full topic for the decision points, practical examples, detailed control tables and source scope. HSE guidance applies to Great Britain; use HSENI for the Northern Ireland route and the source’s stated jurisdiction. A simplified guide does not change the page’s technical-review or approval status.

Read all six steps as text
1. What are the key facts about hand-held tools?
The key facts are that tool safety depends on suitability, condition, user competence, environment and control of attachments.
- Avoid / redesign: Improve fabrication or buy a finished component so the manual grinding stage is unnecessary.
- Control the task: Clamp and support the component and segregate other people from sparks and fragments.
- Verify before release: If the hazardous step remains, retain a task assessment and select the stronger feasible remaining controls.
The key facts are that tool safety depends on suitability, condition, user competence, environment and control of attachments. Hand-held tools are manual, electric, pneumatic, hydraulic, cartridge, battery or fuel-powered tools held or guided by a worker during a task.
Apply it: Which part of this plan would you check at the workface before authorising the task?
2. Turn hand-held tools knowledge into a decision
Use the evidence to improve the actual work arrangement.
- Change at source: Improve fabrication or buy a finished component so the manual grinding stage is unnecessary.
- Make it observable: If the hazardous step remains, retain a task assessment and select the stronger feasible remaining controls.
- Keep useful evidence: Tool risk register and task assessments.
Hand-held tools are manual, electric, pneumatic, hydraulic, cartridge, battery or fuel-powered tools held or guided by a worker during a task. They are ordinary enough to be underestimated, yet they can cause serious injury through cuts, punctures, amputation, eye injury, electric shock, burns, noise, vibration, dust, ejected fragments, fire, explosion, poor ergonomics and uncontrolled energy. Tool risk register and task assessments.
Apply it: What evidence would show that the change improves this task, rather than only completing a record?
3. the site team worked example
Example: a practical application of the existing topic lesson.
- Assessing: Identify high-risk tools and tasks by injury, vibration, noise, dust, electricity, fire and ergonomic risk.
- Analysing: Challenge whether tasks can be prefabricated, mechanised, completed with lower-energy tools or moved away from public/interface areas.
- Implementing: Use approved tools, correct accessories, pre-use checks, defect quarantine, storage, permits and PPE matched to task.
Assessing: Identify high-risk tools and tasks by injury, vibration, noise, dust, electricity, fire and ergonomic risk. Evidence / response: Tool risk register and task assessments. Analysing: Challenge whether tasks can be prefabricated, mechanised, completed with lower-energy tools or moved away from public/interface areas. Evidence / response: Method review and procurement decision log.
Apply it: At which point would you hold this example, and what evidence would allow it to proceed?
4. Harm Chain
Connect the task, the route to the person and the control that can fail.
- Grinding metal: Disc shatters or kicks back; fragments strike face or nearby person.
- Drilling in a damp area: Damaged lead or unsuitable tool makes live contact possible.
- Repeated breaking or dry cutting: Vibration, noise and dust reach hands, hearing and lungs.
Grinding metal: Disc shatters or kicks back; fragments strike face or nearby person. Drilling in a damp area: Damaged lead or unsuitable tool makes live contact possible. Repeated breaking or dry cutting: Vibration, noise and dust reach hands, hearing and lungs.
Apply it: Who could be exposed, including other trades, cleaners, maintainers and people nearby?
5. Choose controls for hand-held tools
Start with the stronger practicable options and verify their effect.
- Eliminate: Improve fabrication or buy a finished component so the manual grinding stage is unnecessary.
- Reduce, including substitution: Choose a suitable lower-vibration finishing method or tool after checking finish, accessory compatibility and other hazards.
- Isolate: Clamp and support the component and segregate other people from sparks and fragments.
- Control: Use a maintained compatible tool/accessory and effective dust control; avoid unnecessary force and worn consumables.
- Control: Plan actual trigger time from representative vibration data and the required work, alongside wheel, dust and noise controls.
Eliminate: Improve fabrication or buy a finished component so the manual grinding stage is unnecessary. Reduce, including substitution: Choose a suitable lower-vibration finishing method or tool after checking finish, accessory compatibility and other hazards. Isolate: Clamp and support the component and segregate other people from sparks and fragments. Control: Use a maintained compatible tool/accessory and effective dust control; avoid unnecessary force and worn consumables. Control: Plan actual trigger time from representative vibration data and the required work, alongside wheel, dust and noise controls. Read the full control table for qualifications, ownership and verification. Use the actual task and applicable jurisdiction; existing technical approval remains unchanged.
Apply it: Which stronger option can be used here, and who will verify it before accepting the remaining risk?
6. Use the full hand-held tools lesson
Follow the official sources below and retain the task-specific evidence.
- Official guidance: HSE PUWER overview
- Official guidance: HSENI PUWER NI
- Task decision: Tool risk register and task assessments.
Use the full topic for the decision points, practical examples, detailed control tables and source scope. HSE guidance applies to Great Britain; use HSENI for the Northern Ireland route and the source’s stated jurisdiction. A simplified guide does not change the page’s technical-review or approval status.
Apply it: Which official source and full-topic section will you use to resolve the next decision?
The right tool prevents improvisation
Poor tool choice leads to excessive force, slips, kickback, broken consumables and unsafe workarounds.
Condition matters every day
Small defects such as cracked handles, damaged leads, blunt blades or missing guards can quickly become serious incidents.
Attachments are part of the tool
Wrong discs, blades, bits, sockets, batteries or accessories can fail, eject fragments or overload the tool.
Environment changes the risk
Wet areas, flammable atmospheres, confined spaces, height work, dust and public areas all affect tool selection.
Health hazards are part of tool safety
Noise, vibration, dust, fumes, posture and repetitive force can cause long-term harm even when no accident occurs.
What are hand-held tools in workplace safety?
Hand-held tools are portable tools controlled by a person during work, including manual and powered tools.
The safety question is not whether a tool is small. A hand-held grinder, nail gun, cut-off saw, hammer drill or electrical tester can create fatal or life-changing harm if selected badly, maintained poorly or used in the wrong environment.
Good tool management follows the whole lifecycle: specification, purchase, issue, pre-use checks, use, supervision, maintenance, repair, storage, quarantine and disposal. Every stage can either reduce risk or quietly introduce failure.
| Stage | Control question | Evidence |
|---|---|---|
| Specify | Is the tool suitable for the task, material and environment? | Procurement standard and risk assessment. |
| Purchase or hire | Does it meet safety, vibration, noise and performance needs? | Supplier information and approval record. |
| Issue | Is the user trained and is the tool complete? | Issue register and competence check. |
| Use | Are guards, attachments, PPE and controls in place? | Pre-use check and supervisor observation. |
| Maintain | Is the tool kept safe and defects removed? | Maintenance log and quarantine record. |
| Review | Are incidents, defects and user feedback acted on? | Action tracker and management review. |
What types of hand-held tools are commonly used?
Hand-held tools range from simple manual tools to high-energy powered equipment and specialist test instruments.
Manual tools such as knives, chisels and hammers can cause serious injury because they rely on human force and sharp edges. Powered tools introduce additional energy: rotating parts, reciprocating blades, percussion, compressed air, electricity, batteries, heat, cartridges or hydraulic pressure.
The type of tool should drive the control standard. A cordless drill needs battery and bit control; a grinder needs disc, guard and eye/face protection; a knife needs blade control and cut-resistant handling; a tester needs electrical rating and probe design.
| Tool type | Examples | Main risk focus |
|---|---|---|
| Manual cutting tools | Knives, saws, snips, chisels and scrapers. | Cuts, punctures, slips and blade storage. |
| Manual striking tools | Hammers, mallets, punches and cold chisels. | Flying fragments, damaged heads and hand injury. |
| Rotating powered tools | Drills, grinders, sanders and polishers. | Entanglement, ejection, vibration, dust and noise. |
| Percussive tools | Breakers, hammer drills, chisels and riveters. | HAVS, noise, fatigue and flying debris. |
| Cartridge or nail tools | Nail guns and fixing tools. | Penetrating injury and unintended discharge. |
| Electrical test tools | Meters, probes and testers. | Electric shock, arc flash and wrong rating. |
| Heat tools | Hot air guns, soldering irons and torches. | Burns, ignition and fumes. |
| Battery tools | Cordless tools and chargers. | Battery fire, wrong charger, damaged cells and storage. |
What hazards do hand-held tools create?
Hand-held tools can create injury, ill-health and fire risks through stored energy, motion, sharpness, heat, electricity and generated substances.
A good tool risk assessment does not stop at the obvious cutting edge. It considers what the tool can eject, what it can produce, how the user holds it, what happens if it jams, what energy remains after switching off and what happens when the workpiece moves.
Health hazards need equal attention. A task may have no immediate accident but still expose the user to HAVS, noise-induced hearing loss, silica dust, wood dust, metal fume or awkward-force musculoskeletal injury.
| Hazard | How harm occurs | Example |
|---|---|---|
| Mechanical contact | Blade, disc, bit or moving part contacts the body. | Cut-off saw contacts hand after kickback. |
| Ejection | Fragments, swarf, nails, discs or workpiece eject. | Grinding disc shatters due to wrong rating. |
| Electricity | Damaged lead, unsuitable voltage or live testing error. | Shock from damaged portable tool. |
| Vibration | Repeated exposure damages hands and arms. | Breaker used for long trigger time. |
| Noise | Powered cutting or impact tools exceed safe levels. | Impact wrench in enclosed workshop. |
| Dust and fume | Cutting, sanding or heating generates harmful airborne substances. | Dry cutting masonry creates respirable crystalline silica. |
| Fire and explosion | Heat, sparks or batteries ignite vapour or dust. | Grinder used near flammable solvent vapour. |
| Ergonomics | Grip force, awkward posture or repetition causes strain. | Heavy drill used overhead for repeated fixings. |
How does a hand-held tool cause injury or ill health?
Tool energy, attachments and generated exposures create different routes to immediate injury and long-term harm.
A rotating disc, blade or bit can catch the material and kick back into the user; fragments can strike a bystander. A live cable or damaged battery can deliver shock, fire or burns. Repeated dust, noise and vibration can cause disease even when no single dramatic incident occurs. The workpiece, attachment, energy source, people nearby and environment must be considered together.
| Source and task | Route to harm | Warning or change | Stop and owner |
|---|---|---|---|
| Grinding metal | Disc shatters or kicks back; fragments strike face or nearby person. | Wrong disc, missing guard, vibration or jamming. | Stop and quarantine; supervisor checks suitability and accessory. |
| Drilling in a damp area | Damaged lead or unsuitable tool makes live contact possible. | Damaged insulation, wet connection or nuisance trip. | Isolate; competent electrical check and safer method. |
| Repeated breaking or dry cutting | Vibration, noise and dust reach hands, hearing and lungs. | Longer trigger time, visible dust or symptoms. | Pause task; redesign method and verify exposure control. |
Which hand-held tool incidents should supervisors learn from?
Common tool incidents usually start with a small decision that defeats suitability, guarding, inspection, environment or competence.
Hand-held tool incident-style learning — part 1 of 3


Read the complete visual as text
- Wrong abrasive disc fitted to a grinder: Likely failure route: The disc is not rated for the tool speed or task and may burst or kick back. Supervisor learning point: Control stores, check disc markings, train users and link to the abrasive wheels page.
- Guard removed to make a cut easier: Likely failure route: The user gains access but loses protection from ejection and contact. Supervisor learning point: Stop work, challenge the method and provide the correct tool or access arrangement.
- Battery pack overheats during charging: Likely failure route: Damaged cells, wrong charger or poor storage can create fire risk. Supervisor learning point: Use approved chargers, inspect batteries, quarantine damaged packs and control charging locations.
Hand-held tool incident-style learning — part 2 of 3


Read the complete visual as text
- Damaged cable wrapped in tape: Likely failure route: Temporary repair hides electric shock or fire risk. Supervisor learning point: Remove from use, quarantine, repair competently or replace.
- Circular saw kicks back: Likely failure route: Wrong blade, poor support, jammed material or poor body position releases stored energy. Supervisor learning point: Secure the workpiece, select the correct blade and train on kickback controls.
- Dry cutting creates visible dust: Likely failure route: The tool turns a cutting task into inhalation exposure, often including silica or wood dust. Supervisor learning point: Use wet methods, extraction, RPE where needed and task-specific dust assessment.
Hand-held tool incident-style learning — part 3 of 3


Read the complete visual as text
- Breaker used for long periods: Likely failure route: The immediate job is completed but HAVS exposure is uncontrolled. Supervisor learning point: Assess trigger time, alternative methods, tool condition and health surveillance.
- Grinder used in a flammable store: Likely failure route: Sparks or hot surfaces may ignite vapour, gas or combustible dust. Supervisor learning point: Apply DSEAR assessment, hot-work permits and suitable tool selection.
- Nail gun used by an untrained worker: Likely failure route: Penetrating injury can occur through incorrect contact, rebound or line-of-fire exposure. Supervisor learning point: Authorise competent users only and set exclusion/handling rules.
Memorable tool safety comes from understanding failure patterns. A wrong disc, a missing guard, a taped cable or a hot battery is not a minor housekeeping issue; it is a sign that the tool-control system is weak. Supervisors should use these examples in briefings because they help workers see why pre-use checks, stores control and stop-use rules matter.
The same incident pattern can apply across many sectors. A grinder on a construction site, a sander in a bodyshop, a drill in a school maintenance team or a cordless tool in a warehouse all need the same basic question answered: is this tool, accessory, user and environment suitable today?
| Scenario | Likely failure route | Supervisor learning point |
|---|---|---|
| Wrong abrasive disc fitted to a grinder | The disc is not rated for the tool speed or task and may burst or kick back. | Control stores, check disc markings, train users and link to the abrasive wheels page. |
| Guard removed to make a cut easier | The user gains access but loses protection from ejection and contact. | Stop work, challenge the method and provide the correct tool or access arrangement. |
| Battery pack overheats during charging | Damaged cells, wrong charger or poor storage can create fire risk. | Use approved chargers, inspect batteries, quarantine damaged packs and control charging locations. |
| Damaged cable wrapped in tape | Temporary repair hides electric shock or fire risk. | Remove from use, quarantine, repair competently or replace. |
| Circular saw kicks back | Wrong blade, poor support, jammed material or poor body position releases stored energy. | Secure the workpiece, select the correct blade and train on kickback controls. |
| Dry cutting creates visible dust | The tool turns a cutting task into inhalation exposure, often including silica or wood dust. | Use wet methods, extraction, RPE where needed and task-specific dust assessment. |
| Breaker used for long periods | The immediate job is completed but HAVS exposure is uncontrolled. | Assess trigger time, alternative methods, tool condition and health surveillance. |
| Grinder used in a flammable store | Sparks or hot surfaces may ignite vapour, gas or combustible dust. | Apply DSEAR assessment, hot-work permits and suitable tool selection. |
| Nail gun used by an untrained worker | Penetrating injury can occur through incorrect contact, rebound or line-of-fire exposure. | Authorise competent users only and set exclusion/handling rules. |
How does tool selection change between sectors?
The tool must match the material, people, environment and exposure pattern in the actual sector task.
The same selection questions transfer across sectors, but accessory, isolation, dust, public access and environment change the answer. A supervisor should verify the method at the place of use, not accept a generic tool label.
| Sector and example | Hazard route | Preferred control | Residual stop point |
|---|---|---|---|
| Manufacturing: deburring | Wrong grinder disc can burst or eject fragments. | Redesign finish or use a guarded, suitable lower-energy method. | Stop on wrong rating, damaged disc or guard defect. |
| Construction: drilling fixings | Dust, HAV and hidden service strike can affect trades and occupants. | Design in fixings; locate services; use suitable extraction and low-vibration method. | Stop on unknown service or failed extraction. |
| Hospitality: maintenance knife or drill | Cut or shock during short ad-hoc repairs near guests. | Use suitable maintained tool and segregate public access. | Stop if guests enter zone or tool is damaged. |
| Logistics: fleet maintenance | Impact tool and grinding can create ejection, HAV and noise. | Use matched sockets, clamps and assessed exposure plan. | Stop on accessory mismatch or unexpected duration. |
How should the right hand-held tool be selected?
The right tool should match the task, material, user, environment, energy source, control needs and health hazards.
Selection is one of the strongest controls because it prevents people fighting the job. A tool that is underpowered, too heavy, too aggressive, not rated for the disc, unsuitable for wet areas or too noisy for the environment will push workers into unsafe adaptations.
Procurement should ask for safety information before price is finalised: vibration data, noise data, guard design, dust extraction compatibility, battery safety, maintenance needs, training requirements and whether a safer method exists.
| Decision | Question to ask | Good answer |
|---|---|---|
| Task | What job must the tool actually do? | Tool is designed for the task, material and duration. |
| Material | What will it cut, drill, fasten, heat or strike? | Correct bit, blade, disc or accessory is specified. |
| User | Who will use it and what competence is needed? | Training and authorisation match risk. |
| Environment | Is it wet, confined, dusty, public, at height or flammable? | Tool and controls suit location. |
| Health | Will it create vibration, noise, dust, fume or strain? | Lower-harm method and exposure controls chosen. |
| Emergency | What happens if it jams, fails, overheats or injures someone? | Isolation, stop and first-aid arrangements are clear. |
HSE confirms tool suitability must reflect the work conditions. HSE PUWER overview.
What pre-use checks should be made before using hand-held tools?
Pre-use checks should confirm the tool, accessory, guard, power source, controls and work area are safe before the task starts.
Pre-use checks need to be practical and visible. A worker should not be expected to dismantle a tool, but they should be able to spot damage, missing guards, wrong discs, blunt blades, loose handles, damaged leads, swollen batteries, overheating, strange noise, poor trigger return and insecure workpieces.
The key rule is simple: if the tool is defective, incomplete or unsuitable, it is taken out of use and labelled or quarantined. Defect reporting must be easier than carrying on.
| Check | What to look for | Stop-use trigger |
|---|---|---|
| Body and handles | Cracks, missing parts, loose handles or poor grip. | Any structural damage or loose control point. |
| Guard or shield | Present, adjusted and suitable. | Missing, tied back or wrong guard. |
| Power source | Lead, plug, battery, air hose or hydraulic hose in good condition. | Damage, exposed conductor, leak, swelling or wrong charger. |
| Trigger and controls | Operate correctly and return safely. | Sticking trigger or bypassed control. |
| Accessory | Correct type, size, speed rating and condition. | Cracked disc, wrong blade, blunt bit or insecure fitting. |
| Work area | Stable workpiece, clear bystanders and suitable lighting. | Unsecured material or uncontrolled public interface. |
HSE distinguishes quick user checks from formal risk-based inspection. HSE work equipment inspection.
Why do discs, blades, bits and accessories matter?
Accessories matter because the wrong or damaged accessory can fail, eject, overload the tool or create uncontrolled exposure.
Many tool incidents are accessory incidents. A grinder disc used above its rated speed, a wood blade fitted to the wrong saw, a blunt drill bit, an impact socket replaced with a chrome socket, or a damaged abrasive wheel can turn an ordinary task into a serious event.
The accessory should be treated as safety-critical for the task. Stores should control what is issued, supervisors should check compatibility and users should know what markings, ratings and defects matter.
| Accessory | Risk if wrong | Control |
|---|---|---|
| Abrasive discs | Bursting, kickback, wrong cutting/grinding use. | Check speed rating, size, expiry/condition and guard. |
| Drill bits | Snapping, jamming or excessive force. | Use correct bit for material and replace blunt bits. |
| Saw blades | Kickback, tooth loss and wrong material cut. | Match blade to tool, material and guard. |
| Sockets | Shattering under impact load. | Use impact-rated sockets for impact tools. |
| Batteries | Fire, overheating or poor fit. | Use approved batteries and chargers only. |
| Electrical probes | Shock or arc risk if wrongly rated. | Use suitable GS38-style probes and ratings. |
PUWER selection and guarding principles also apply to accessories. HSE PUWER overview.
How does the work environment change hand-held tool risk?
The environment can make an otherwise suitable tool unsafe through moisture, dust, flammable atmospheres, access, height, confined space or public exposure.
Tool selection should change when the location changes. A mains electric tool may be unsuitable in wet outdoor conditions. A grinder may be unacceptable near flammable vapour. A petrol tool may create carbon monoxide risk in a poorly ventilated area. A dusty room may need extraction and respiratory protection. A public area may need exclusion and timing controls.
In process, fuel, chemical or dusty sites, the DSEAR assessment should decide whether a tool could ignite a dangerous atmosphere and whether hot work or permit controls are needed.
| Environment | Added risk | Control |
|---|---|---|
| Wet or outdoors | Electric shock and slipping. | Suitable voltage, RCD, tool rating and weather planning. |
| Flammable vapour or dust | Ignition from sparks, heat, batteries or static. | DSEAR assessment, permits and suitable equipment. |
| Confined space | Fume, oxygen depletion, rescue difficulty and restricted movement. | Confined-space assessment and rescue plan. |
| Work at height | Dropped tools and unstable posture. | Tool tethering, platforms and exclusion zones. |
| Dusty work | Respirable dust, poor visibility and contamination. | Wet methods, extraction and RPE where needed. |
| Public area | Bystander injury and noise/dust nuisance. | Segregation, timing, signage and supervision. |
HSENI gives the separate Northern Ireland electrical-safety route. HSENI electrical safety.HSE DSEAR guidance
How should hand-held tools be maintained and stored?
Tools should be maintained, repaired, cleaned, stored and quarantined through a controlled system proportionate to risk.
Maintenance is not just annual servicing. It includes keeping tools clean, checking guards, replacing worn brushes or bearings, inspecting batteries, testing electrical equipment, sharpening or replacing blades, checking hoses and making sure safety devices have not been defeated.
Storage protects the next user. Tools left loose in vans, wet containers, dusty corners or mixed with damaged accessories deteriorate quickly and make pre-use checks harder.
| Control | Why it matters | Evidence |
|---|---|---|
| Planned maintenance | Prevents deterioration and dangerous failure. | Maintenance schedule and completed records. |
| Defect quarantine | Stops damaged tools returning to use. | Tagged quarantine area and repair log. |
| Electrical checks | Controls shock and fire risk. | Inspection/testing regime based on risk. |
| Battery management | Controls fire and reliability issues. | Approved chargers, storage and damaged battery procedure. |
| Cleaning | Prevents dust, swarf and chemical residue build-up. | Cleaning standard and supervisor checks. |
| Secure storage | Prevents damage, theft and uncontrolled use. | Stores procedure and issue records. |
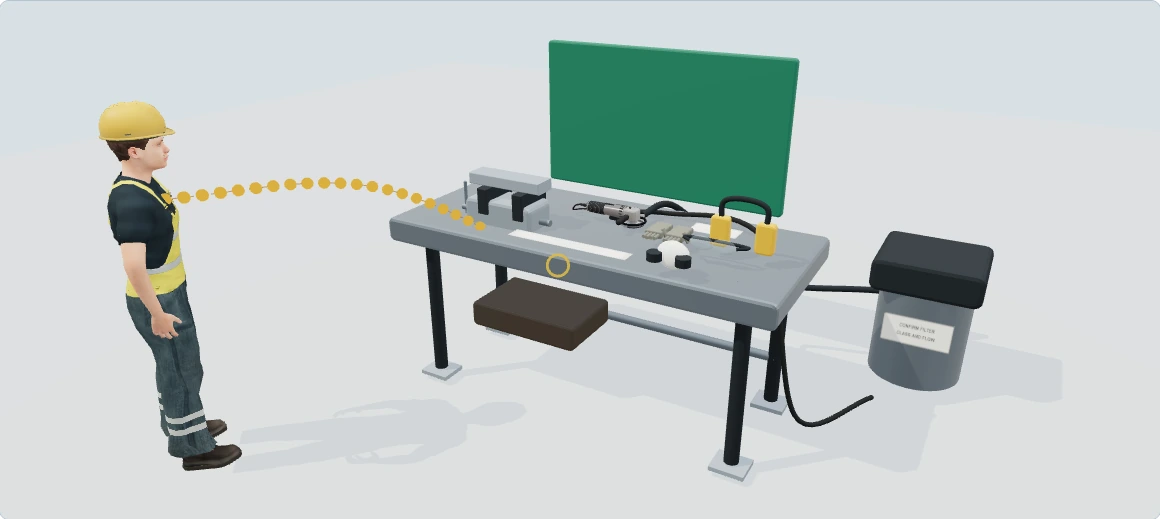

Abrasive wheels: energy, kickback and the line of fire
Explore how this equipment can harm its users and other people, then follow the practical measures that interrupt each pathway. This is a hazards and good-practice lesson; the separate checklist remains the pre-use/safety-check activity.
Hazards and good practice: learn what can hurt people during use, change and maintenance. Pre-use and safety checks stay in the separate checklist.
Checksheets and risk assessments
Equipment checksheets
Risk assessment forms
Risk assessment examples
Full written walkthrough — all 8 steps
1. Choose a safer process first
What is happening: The grinder acts on a secured workpiece; the stored rotational energy is the starting point for the lesson.
How harm can occur: Contact, a failed wheel or a displaced workpiece can cause severe cuts and impact injuries.
Best practice to apply: Consider a process that removes grinding or cutting, then choose the machine, wheel and support for the actual task.
Why this works: Removing the operation removes its wheel-contact and fragment pathways; training alone leaves them present.
Abrasive Wheels · What is the scope and authority of this abrasive-wheels guide?2. Match the wheel to the operation
What is happening: A grinding disc and a thin cutting disc have different intended uses; the pictured grinding setup does not approve a cutting task.
How harm can occur: Wrong speed, size, material, side loading or damage can cause wheel failure and fragments.
Best practice to apply: Use the actual machine and wheel information; match type, dimensions, maximum speed, material and permitted contact.
Why this works: Compatibility controls the energy-bearing component before the operator is exposed to it.
Abrasive Wheels · Which tools and abrasive-wheel types are commonly used?3. Understand kickback and pinch
What is happening: The work support determines what happens as material separates or the wheel encounters an edge.
How harm can occur: A snag or closing cut can throw the tool towards the user or eject the workpiece.
Best practice to apply: Secure and support the work without closing the cut; plan the offcut, tool direction and people in the line of fire.
Why this works: Stable support reduces unexpected relative movement that can pinch or deflect the wheel.
Abrasive Wheels · How should you match an abrasive wheel to the task before work starts?4. Keep guarding effective during use
What is happening: The disc guard and side handle are part of the working arrangement, not optional accessories.
How harm can occur: Reach to the rotating wheel, fragments and loss of tool control can injure the operator or an assistant.
Best practice to apply: Retain the correct guard and required handle; position the work so the task can be completed without removing protection.
Why this works: Protection must work in the actual operating position, rather than only while the tool is parked.
Abrasive Wheels · How can the hierarchy of controls reduce abrasive-wheel risks during cutting and grinding?5. Follow sparks and combustible material
What is happening: Particles leave the contact point and can travel to material beyond the operator's immediate view.
How harm can occur: Hot particles can ignite residues, packaging or material on the other side of an opening.
Best practice to apply: Assess the hot-work implications; remove or protect combustibles and control adjacent work, openings and exposed people.
Why this works: Controlling the full spark route prevents an apparently small task creating a remote fire.
Abrasive Wheels · When does abrasive wheel work become hot work?6. Control dust, noise and vibration
What is happening: The operation creates health exposures as well as an immediate wheel hazard.
How harm can occur: Inhaled dust, excessive noise and hand-transmitted vibration can cause lasting harm.
Best practice to apply: Reduce the source; use task-suitable extraction or suppression and the assessed residual protection and exposure arrangements.
Why this works: Source controls protect the operator and nearby people; PPE alone leaves release into the workplace.
Abrasive Wheels · Cut a concrete kerb while controlling silica dust7. Manage abnormal behaviour and run-down
What is happening: The wheel may still move after a stop command and defects can appear during use.
How harm can occur: Trying to catch a moving tool, touching a running-down disc or continuing with abnormal vibration can cause contact or failure.
Best practice to apply: Stop the affected task, keep clear during run-down and follow isolation arrangements before intervention; report defects.
Why this works: A control stop and a verified isolation have different functions; neither should be assumed from appearance.
Abrasive Wheels · Cut a steel bracket and leave the area safe8. Plan clearing, changing and hand-back
What is happening: Changing a disc, clearing a jam and cleaning create a different exposure from normal grinding.
How harm can occur: Unexpected start, sharp residue or unsafe refitting can injure the maintainer or next user.
Best practice to apply: Use competent, machine-specific isolated maintenance and mounting arrangements; verify the repaired configuration before return.
Why this works: Safe hand-back prevents a defect being transferred to the next person or shift.
Abrasive Wheels · What is the scope and authority of this abrasive-wheels guide?
Illustrative awareness learning. Geometry, colours and movement do not establish safe distances, capacity, exposure, isolation or work permission. Use the actual assessment, equipment information and competent arrangements.
The wider workplace has its own account and subscription access. Exploring this lesson does not grant access, record course completion or authorise work.
UK guidance for further reading
HSE: Abrasive wheels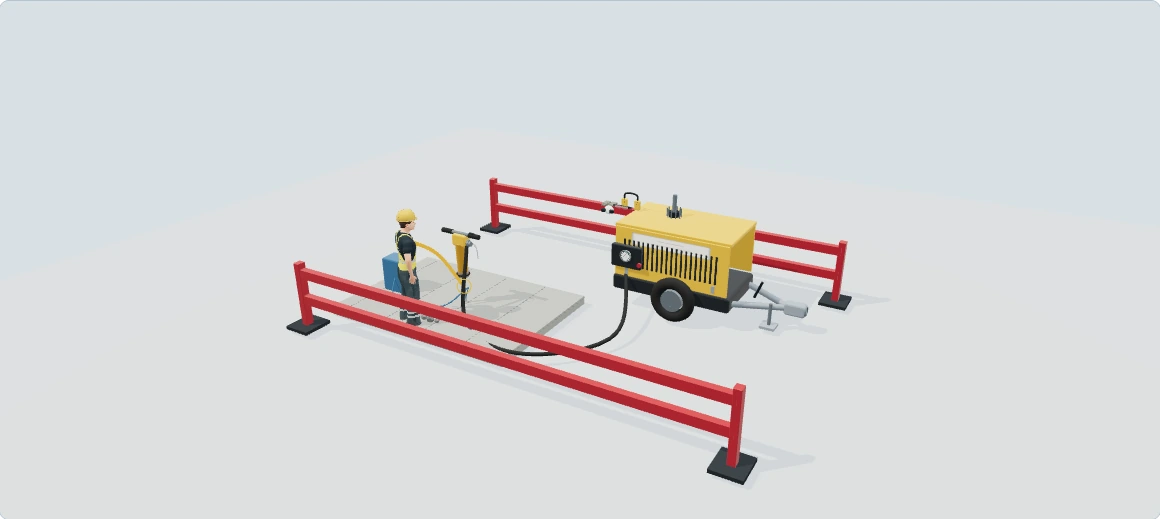
Pneumatic breaking: vibration, stored air and the people nearby
Explore how this equipment can harm its users and other people, then follow the practical measures that interrupt each pathway. This is a hazards and good-practice lesson; the separate checklist remains the pre-use/safety-check activity.
Hazards and good practice: learn what can hurt people during use, change and maintenance. Pre-use and safety checks stay in the separate checklist.
Checksheets and risk assessments
Equipment checksheets
Risk assessment forms
- Hand-arm vibration task/exposure assessment · Word
- Task and personal noise-exposure assessment · Word
Risk assessment examples
Forms and tools
Full written walkthrough — all 8 steps
1. Remove or redesign the breaking task
What is happening: The breaker, hose and compressor form one work system; the tool is shown stationary.
How harm can occur: Breaking can expose the operator to vibration, flying material, dust and high effort.
Best practice to apply: Consider design changes, prefabrication or a suitable mechanised/remote method before selecting a hand-held tool.
Why this works: Removing hand-held breaking can prevent transmission through the hands instead of only rationing exposure.
Vibration at Work · What is hand-arm vibration and whole-body vibration?2. Trace vibration into the hands
What is happening: The handle is the interface where mechanical vibration reaches the user during contact.
How harm can occur: Repeated exposure can damage blood vessels, nerves, muscles and joints; early symptoms may be overlooked.
Best practice to apply: Select a suitable productive lower-vibration method and tool, then assess the actual hand-contact exposure.
Why this works: Lower transmission and shorter productive contact reduce the exposure pathway; the animation is not a vibration measurement.
Vibration at Work · How can hand-arm vibration affect blood flow, sensation and everyday hand function?3. Understand trigger time and the full day
What is happening: Actual contact with a vibrating tool differs from the length of the booking or shift.
How harm can occur: Under-counted bursts and other tools can leave cumulative exposure unmanaged.
Best practice to apply: Observe representative work, include every relevant tool and task, and use suitable data and work-pattern information.
Why this works: A whole-day picture prevents a short-looking individual job concealing a larger combined exposure.
Vibration at Work · How do HAV trigger time and points work?4. Keep the tool working efficiently
What is happening: Bit condition, lubrication, handle isolation and the material affect the effort and time required.
How harm can occur: A blunt bit or defective mounting can increase vibration, force and duration.
Best practice to apply: Maintain the tool and consumables for the material; stop for abnormal vibration and verify repairs before return.
Why this works: An efficient maintained tool avoids prolonged contact and avoids treating job rotation as the main control.
Vibration at Work · What is hand-arm vibration and whole-body vibration?5. Control compressed-air release
What is happening: The hose and coupling contain energy independently of the operator's trigger position.
How harm can occur: A failed connection or released hose can whip, strike or inject material; trapped air may remain after shutdown.
Best practice to apply: Use the specified hose, connections and restraint arrangements; isolate and release stored pressure by the actual procedure before disconnection.
Why this works: Removing the energy before opening the connection addresses the release mechanism directly.
Vibration at Work · How is a defensible vibration assessment made?6. Protect the surrounding work area
What is happening: The compressor and breaking point also affect people who are not holding the tool.
How harm can occur: Noise, exhaust, dust, flying fragments and trailing hoses can harm nearby trades and passers-by.
Best practice to apply: Provide suitable ventilation, source controls, separation, route management and substance-specific precautions.
Why this works: The task boundary must include bystanders and the compressor, not only the tool user's hands.
Vibration at Work · What is hand-arm vibration and whole-body vibration?7. Act on symptoms and changed work
What is happening: Changes in grip, difficulty, numbness or tingling need a response rather than normalisation.
How harm can occur: Continued exposure can worsen injury and make a worker less able to control the task.
Best practice to apply: Report symptoms promptly and use occupational-health and exposure-review arrangements; do not diagnose HAVS from this model.
Why this works: Early reporting can trigger preventive changes before more harm occurs; gloves are not a substitute for vibration control.
Vibration at Work · When is health surveillance needed?8. Separate servicing from production
What is happening: Maintenance can expose stored air, hot parts and components held under load.
How harm can occur: Unexpected operation or energy release can injure the fitter and the next user.
Best practice to apply: Use competent task-specific shutdown, isolation and maintenance; update the equipment/exposure information after material changes.
Why this works: A repair needs a verified return to work, not only a closed defect record.
Vibration at Work · What evidence should management sample?
Illustrative awareness learning. Geometry, colours and movement do not establish safe distances, capacity, exposure, isolation or work permission. Use the actual assessment, equipment information and competent arrangements.
The wider workplace has its own account and subscription access. Exploring this lesson does not grant access, record course completion or authorise work.
UK guidance for further reading
HSE: Pneumatic breakingHow can the hierarchy of controls reduce injury and exposure risks from hand-held tools?
Stop and isolate before intervention
Before changing a blade, bit or disc, clearing a jam, cleaning or adjusting: stop the tool; disconnect, remove or secure its energy supply by the manufacturer’s method; control pressure, run-down and other stored energy; prevent restart; then intervene. Reassemble and check competently before use. An unplugging rule alone cannot cover battery, pneumatic, hydraulic, fuel or cartridge tools.
Gloves chosen for handling sharp material while isolated may create entanglement at exposed rotating parts during operation. Follow the manufacturer and task assessment; keep hands clear of moving parts. Expected cutting/grinding sparks still need assessed shielding, combustibles control and an approved location. Never introduce an ignition source into an unsuitable atmosphere.
Pressure tools need secure compatible hoses and a verified depressurised state before disconnection. Suspected high-pressure fluid injection needs immediate professional medical treatment even if the wound looks minor; tell clinicians the mechanism and fluid if known. Cartridge/nail tools need controlled firing direction, exclusion and the manufacturer’s misfire procedure.
HSE: Maintenance of work equipment · HSE: Hydraulic injection injury safety alert
Tool risks should be controlled through elimination, safer methods, suitable tools, guarding, maintenance, training, supervision and PPE.
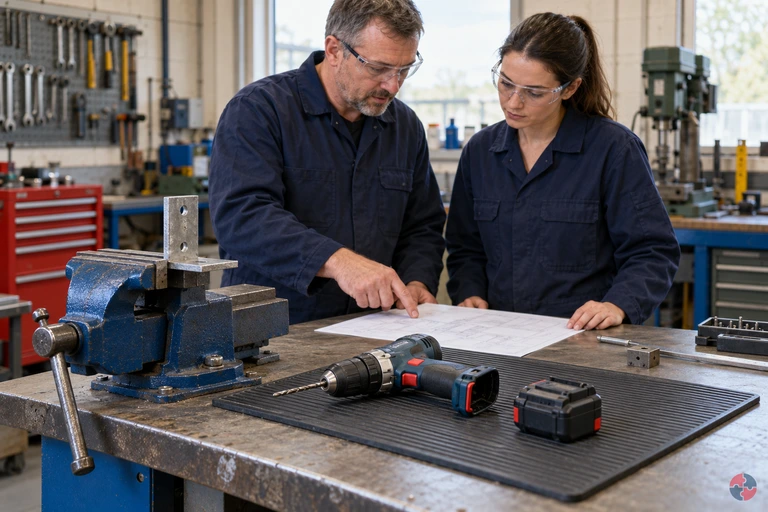
Check the drill, bracket and workholding as one task
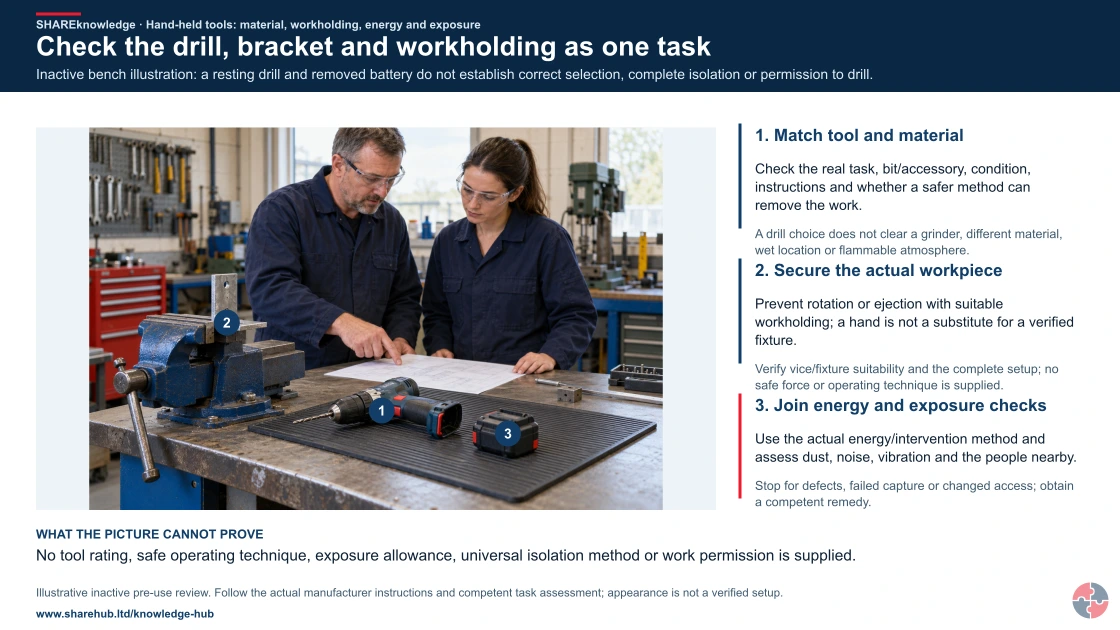
Full written explanation
A new realistic UK metalworking-bench illustration shows a stationary cordless hand drill resting on a mat, its battery removed and lying separately, and a steel bracket held in a bolted bench vice. Two colleagues review inert papers with hands clear of the bit and workpiece. Three numbered prompts connect tool/material/accessory suitability, actual workholding and foreseeable rotation/ejection, and the specific energy/exposure/task controls. The tool is not running; no drilling, swarf, sparks, change of bit or intervention is depicted. A removed battery is context rather than proof of a complete machine-specific isolation or verified safe setup. Existing abrasive-tool imagery remains a different accessory/guarding context, without a claim that its pictured arrangement is ready. The second native refurbishment map links unknown material/services or atmosphere to a hold and reviews dust, noise and vibration alongside tool and guard suitability.
Inactive bench illustration: a resting drill and removed battery do not establish correct selection, complete isolation or permission to drill.
- Match tool and material. Check the real task, bit/accessory, condition, instructions and whether a safer method can remove the work.
- Secure the actual workpiece. Prevent rotation or ejection with suitable workholding; a hand is not a substitute for a verified fixture.
- Join energy and exposure checks. Use the actual energy/intervention method and assess dust, noise, vibration and the people nearby.
Change the pathway
- One tool is not every setting. A drill choice does not clear a grinder, different material, wet location or flammable atmosphere.
- An image is not a proof test. Verify vice/fixture suitability and the complete setup; no safe force or operating technique is supplied.
- Changes require a new decision. Stop for defects, failed capture or changed access; obtain a competent remedy.
Evidence check: No tool rating, safe operating technique, exposure allowance, universal isolation method or work permission is supplied.
Use the full tool, accessory, workholding and intervention assessment
Primary references: HSE suitable work equipment · HSE competent maintenance and energy · HSE HAV controls and selection
Open the complete HD image (new tab)Download image

Use the full tool, accessory, workholding and intervention assessment
Primary references: HSE suitable work equipment · HSE competent maintenance and energy · HSE HAV controls and selection
Verify controls: Drilling a metal bracket


Read the complete visual as text
- Actual task: A worker drills an identified metal bracket at a workshop bench; prevent workpiece rotation, entanglement and swarf contact.
- Evidence to check: material, bit/tool compatibility, workholding and guarding
- Stop or hold condition: loose workpiece, binding, damaged bit or an entanglement exposure
- Release evidence and owner: supervisor verifies the safe setup and correct tool
Verify controls: Grinding welds on steel components


Read the complete visual as text
- Actual task: A fabricator removes excess weld material with a hand-held grinder; assess vibration alongside wheel, dust, noise and fire hazards.
- Evidence to check: tool/accessory condition, representative vibration, trigger time and workholding
- Stop or hold condition: abnormal vibration, defective consumable, uncontrolled exposure or reported symptoms requiring review
- Release evidence and owner: supervisor accepts a maintained tool and achievable exposure controls
The hierarchy matters because many tool injuries are the result of accepting a poor method too early. If a hole can be cast in, a component pre-cut, a task mechanised or a lower-energy tool used, the risk can be removed or reduced before a worker is exposed.
Controls should be specific. 'Use PPE' is not enough. The assessment should identify eye/face protection, hearing protection, respiratory protection, gloves, footwear, clothing and exclusion controls that match the tool and task.
Choose the activity
How can the ERICPD hierarchy of controls reduce risks while drilling a metal bracket?

| Control level | Control for this activity | Owner and verification | Stop / restart decision |
|---|---|---|---|
| Eliminate | Order a suitably predrilled bracket or alter the fixing arrangement so local drilling is unnecessary. | Process owner verifies that the revised workflow achieves the required output and the hazardous step is genuinely removed. | If the hazardous step remains, retain a task assessment and select the stronger feasible remaining controls. |
| Reduce, including substitution | Use a suitable safer hole-making process or fixture after checking material, thickness, tool capacity and finish. | Process/technical owner validates the alternative, its compatibility and any new risks before adoption. | Reject the alternative if suitability is unproved or its new hazards are unresolved. |
| Isolate | Secure the bracket in suitable workholding and keep hands, clothing and other people away from the rotating tool. | Supervisor verifies the task boundaries and that the separation or isolation protects affected people and connected work. | Hold or stop for loose workpiece, binding, damaged bit or an entanglement exposure. |
| Control: physical safeguards | Use a compatible maintained drill, bit and guarding; provide stable support and safe swarf collection. | Competent equipment/process owner checks material, bit/tool compatibility, workholding and guarding. | Hold or stop for loose workpiece, binding, damaged bit or an entanglement exposure. |
| Control: work method and response | Confirm material and hidden contamination, follow tool instructions and stop/isolate before adjustments or clearing swarf. | Supervisor confirms the limits, response, communication and restart authority with the people doing this activity. | Stop if the agreed method, communication, competent cover or task limits cannot be maintained. |
| PPE | Use suitable eye protection and other assessed PPE; avoid gloves or loose items that can be caught by rotating parts. | Assessor confirms whether PPE is needed and checks selection, condition, compatibility and any required face-fit evidence. | Do not rely on unsuitable or defective protection, or use PPE to continue after an essential source control fails. |
| Discipline | Check bits, chuck, power supply and workholding; quarantine defective equipment and verify repairs before reuse. | Release only after supervisor verifies the safe setup and correct tool. Retain the checks and unresolved restrictions at handover. | Keep the activity on hold while defects or required reinstatement evidence remain unresolved. |
How can the ISO 45001 hierarchy of controls reduce risks while drilling a metal bracket?

| Control level | Control for this activity | Owner and verification | Stop / restart decision |
|---|---|---|---|
| Elimination | Order a suitably predrilled bracket or alter the fixing arrangement so local drilling is unnecessary. | Process owner verifies that the revised workflow achieves the required output and the hazardous step is genuinely removed. | If the hazardous step remains, retain a task assessment and select the stronger feasible remaining controls. |
| Engineering controls | Use a suitable safer hole-making process or fixture after checking material, thickness, tool capacity and finish. | Process/technical owner validates the alternative, its compatibility and any new risks before adoption. | Reject the alternative if suitability is unproved or its new hazards are unresolved. |
| Engineering controls | Secure the bracket in suitable workholding and keep hands, clothing and other people away from the rotating tool. | Supervisor verifies the task boundaries and that the separation or isolation protects affected people and connected work. | Hold or stop for loose workpiece, binding, damaged bit or an entanglement exposure. |
| Engineering controls | Use a compatible maintained drill, bit and guarding; provide stable support and safe swarf collection. | Competent equipment/process owner checks material, bit/tool compatibility, workholding and guarding. | Hold or stop for loose workpiece, binding, damaged bit or an entanglement exposure. |
| Administrative controls | Confirm material and hidden contamination, follow tool instructions and stop/isolate before adjustments or clearing swarf. | Supervisor confirms the limits, response, communication and restart authority with the people doing this activity. | Stop if the agreed method, communication, competent cover or task limits cannot be maintained. |
| PPE | Use suitable eye protection and other assessed PPE; avoid gloves or loose items that can be caught by rotating parts. | Assessor confirms whether PPE is needed and checks selection, condition, compatibility and any required face-fit evidence. | Do not rely on unsuitable or defective protection, or use PPE to continue after an essential source control fails. |
| Administrative controls | Check bits, chuck, power supply and workholding; quarantine defective equipment and verify repairs before reuse. | Release only after supervisor verifies the safe setup and correct tool. Retain the checks and unresolved restrictions at handover. | Keep the activity on hold while defects or required reinstatement evidence remain unresolved. |
How can the ERICPD hierarchy of controls reduce risks while grinding welds on steel components?

| Control level | Control for this activity | Owner and verification | Stop / restart decision |
|---|---|---|---|
| Eliminate | Improve fabrication or buy a finished component so the manual grinding stage is unnecessary. | Process owner verifies that the revised workflow achieves the required output and the hazardous step is genuinely removed. | If the hazardous step remains, retain a task assessment and select the stronger feasible remaining controls. |
| Reduce, including substitution | Choose a suitable lower-vibration finishing method or tool after checking finish, accessory compatibility and other hazards. | Process/technical owner validates the alternative, its compatibility and any new risks before adoption. | Reject the alternative if suitability is unproved or its new hazards are unresolved. |
| Isolate | Clamp and support the component and segregate other people from sparks and fragments. | Supervisor verifies the task boundaries and that the separation or isolation protects affected people and connected work. | Hold or stop for abnormal vibration, defective consumable, uncontrolled exposure or reported symptoms requiring review. |
| Control: physical safeguards | Use a maintained compatible tool/accessory and effective dust control; avoid unnecessary force and worn consumables. | Competent equipment/process owner checks tool/accessory condition, representative vibration, trigger time and workholding. | Hold or stop for abnormal vibration, defective consumable, uncontrolled exposure or reported symptoms requiring review. |
| Control: work method and response | Plan actual trigger time from representative vibration data and the required work, alongside wheel, dust and noise controls. Task rotation only reduces individual exposure if total trigger time falls; arrange symptom reporting and required health surveillance. | Supervisor confirms the limits, response, communication and restart authority with the people doing this activity. | Stop if the agreed method, communication, competent cover or task limits cannot be maintained. |
| PPE | Use assessed eye, hearing and other protection. Anti-vibration gloves are not a substitute for exposure reduction. | Assessor confirms whether PPE is needed and checks selection, condition, compatibility and any required face-fit evidence. | Do not rely on unsuitable or defective protection, or use PPE to continue after an essential source control fails. |
| Discipline | Check tool condition and exposure plans when throughput changes; remove equipment with abnormal vibration from service. | Release only after supervisor accepts a maintained tool and achievable exposure controls. Retain the checks and unresolved restrictions at handover. | Keep the activity on hold while defects or required reinstatement evidence remain unresolved. |
How can the ISO 45001 hierarchy of controls reduce risks while grinding welds on steel components?

| Control level | Control for this activity | Owner and verification | Stop / restart decision |
|---|---|---|---|
| Elimination | Improve fabrication or buy a finished component so the manual grinding stage is unnecessary. | Process owner verifies that the revised workflow achieves the required output and the hazardous step is genuinely removed. | If the hazardous step remains, retain a task assessment and select the stronger feasible remaining controls. |
| Substitution | Choose a suitable lower-vibration finishing method or tool after checking finish, accessory compatibility and other hazards. | Process/technical owner validates the alternative, its compatibility and any new risks before adoption. | Reject the alternative if suitability is unproved or its new hazards are unresolved. |
| Engineering controls | Clamp and support the component and segregate other people from sparks and fragments. | Supervisor verifies the task boundaries and that the separation or isolation protects affected people and connected work. | Hold or stop for abnormal vibration, defective consumable, uncontrolled exposure or reported symptoms requiring review. |
| Engineering controls | Use a maintained compatible tool/accessory and effective dust control; avoid unnecessary force and worn consumables. | Competent equipment/process owner checks tool/accessory condition, representative vibration, trigger time and workholding. | Hold or stop for abnormal vibration, defective consumable, uncontrolled exposure or reported symptoms requiring review. |
| Administrative controls | Plan actual trigger time from representative vibration data and the required work, alongside wheel, dust and noise controls. Task rotation only reduces individual exposure if total trigger time falls; arrange symptom reporting and required health surveillance. | Supervisor confirms the limits, response, communication and restart authority with the people doing this activity. | Stop if the agreed method, communication, competent cover or task limits cannot be maintained. |
| PPE | Use assessed eye, hearing and other protection. Anti-vibration gloves are not a substitute for exposure reduction. | Assessor confirms whether PPE is needed and checks selection, condition, compatibility and any required face-fit evidence. | Do not rely on unsuitable or defective protection, or use PPE to continue after an essential source control fails. |
| Administrative controls | Check tool condition and exposure plans when throughput changes; remove equipment with abnormal vibration from service. | Release only after supervisor accepts a maintained tool and achievable exposure controls. Retain the checks and unresolved restrictions at handover. | Keep the activity on hold while defects or required reinstatement evidence remain unresolved. |
HSE places removal and engineering ahead of PPE. HSE hierarchy of control.
How should the selected controls be checked in practice?
ERICPD is used here as a planning mnemonic. The linked HSE five-level hierarchy is the official source for the order and relative reliability of controls; the two labels are not identical.
Start with task redesign and substitution, then engineered separation before procedures and personal protection; verify each control under real conditions.
For a steel bracket cut with a hand-held grinder, the credible harms are fragment strike, dust and noise exposure, and ignition where flammable vapour may be present. First ask whether the bracket can arrive pre-cut. If site cutting remains necessary, a competent supervisor checks the location, material and tool before selecting a guarded, captured method. A flammable atmosphere is a hold point for a separate dangerous-substances decision, not a reason to rely on goggles. HSE hierarchy of control; HSE hierarchy of control.
ERICPD is a six-stage planning aid; the HSE five-level order separates substitution, engineering and administration. Isolate is usually engineered separation, while ERICPD Control may contain both physical and administrative measures. Discipline sustains the chosen controls and is not an additional permission to expose people.
How should management verify controls for this task?
For steel cutting with grinder, the management check should start with a real control decision: Order pre-drilled brackets or pre-cut materials. Name the person who will test it, keep evidence from the actual work, and reopen the assessment when the failure condition in the hierarchy table occurs. HSE management-system guidance.
A review should compare the planned control with what workers and supervisors can use in practice. Record the defect, owner, interim protection, verification and next review trigger so that a policy statement or certificate does not stand in for a working control.
What records show hand-held tools are managed well?
Records should prove that tools are suitable, maintained, inspected, issued to competent users and improved after defects or incidents.
The level of record should match the risk. A simple low-risk screwdriver may need little more than visual checks and replacement when damaged. A grinder, nail gun, electrical tester, breaker or cartridge tool needs stronger evidence because the consequence of failure is much higher.
The most useful records help supervisors act: which tools are approved, who can use them, what checks are required, what defects repeat and which tools or accessories are causing incidents.
| Record | What it can evidence | Review trigger |
|---|---|---|
| Approved tool list | Only suitable tools are purchased or issued. | New task, supplier or incident. |
| Pre-use checklist | Users check condition before work. | Defect trend or audit finding. |
| Maintenance log | Tools are kept safe and repaired. | Overdue service or recurring failure. |
| Issue register | Tools are controlled and traceable. | Loss, damage or untrained use. |
| Training matrix | Users and supervisors are competent. | New tool, new starter or incident. |
| Accessory control record | Discs, blades and bits are suitable. | Accessory failure or wrong selection. |
| Defect/action tracker | Learning leads to improvement. | Repeated defects or overdue actions. |
Which hand-held tool duties apply in Great Britain and Northern Ireland?
Both jurisdictions require real control of hand-held tool risks, but they use different work-equipment instruments and regulator routes.
A pre-use visual check is valuable; not every hand tool needs a formal periodic inspection. Where PUWER inspection is required, its scope and interval follow risk, deterioration and manufacturer information. HSE work equipment inspection. A marking or PAT sticker alone cannot establish the tool is safe for the task. The statutory texts are PUWER 1998 statutory text and PUWER NI 1999 statutory text; check amendments and regulator guidance for the exact duty.
| Decision | Great Britain | Northern Ireland |
|---|---|---|
| Work equipment | HSE PUWER overview; PUWER 1998. | HSENI PUWER NI; PUWER (NI) 1999. |
| Inspection | Risk-based checks and formal inspection where specified conditions make deterioration dangerous.HSE inspection guidance | HSENI requires competent inspection in relevant circumstances; no universal annual tag rule.HSENI PUWER guidance |
| Electrical or vibration hazards | Apply the relevant GB electrical and HAV rules alongside PUWER.HSE vibration control | Use separate NI electrical and HAV instruments and HSENI advice for NI work.HSENI electrical safetyHSENI HAV guidance |
How could BuildOut Ltd manage this in practice?

BuildOut Ltd would select hand-held tools for the actual work and environment, then support users with suitable controls, instructions and a reliable defect response.
BuildOut Ltd · practical example
Choose a drill for the material, location and people using it
The key lesson A hand-held tool assessment covers how it is used and maintained, not only whether it switches on.
The situation: A crew needs to drill fixings in an occupied building. A powerful hired drill is available, but its weight, dust control and suitability for the work position have not been checked. Using the available tool could create several avoidable risks.
Why this matters: Poor tool choice can expose workers to loss of control, awkward force, vibration and dust while affecting people nearby.
How BuildOut Ltd would manage it
- Specify the task — Trade Supervisor. Identify the material, fixing requirement, work position and surrounding access. Resolve concealed-service information before drilling and consider a method needing less force, dust or overhead work.
- Select the combination — Plant and Procurement Coordinator. Choose suitable equipment, accessories and source controls using manufacturer and task guidance. Consider handling, vibration and maintenance needs; compare options beyond purchase or hire price.
- Prepare the user — Trade Supervisor. Confirm relevant ability and familiarisation. Explain operating limits, pre-use checks, accessory changes and the defect route using the manufacturer's instructions and assessed method.
- Observe the real use — Site Manager. Check posture, control effectiveness and separation from others. Ask workers whether the tool binds, causes excessive force or cannot be used as intended in the available space.
- Deal with defects — Plant and Procurement Coordinator. Remove unsuitable or defective tools from service and arrange competent repair or replacement. Investigate repeat failures and feed the findings into tool selection and work planning.
When the conditions change
- Recognise the trigger
- The tool, accessory or work position is unsuitable or a defect appears.
- Make the immediate decision
- Stop drilling where the tool, accessory or position cannot be used as assessed, or concealed-service information is unresolved.
- Verify the next step
- The Trade Supervisor confirms the service-information boundary, suitable tool and accessory, usable work position and functioning source controls before allocating the drilling task.
What good looks like
The worker can control the tool and use its protective arrangements in the actual space. Defects lead to replacement or repair, not a shared expectation to work around them.
Evidence to look for: Task brief, equipment selection, instructions, user familiarisation, inspection findings and repair or replacement record.
Common mistake to avoid: Assuming a familiar brand or a working motor establishes task suitability.
Apply this to your work: Could your chosen tool be used properly from the position the task requires?
Guidance behind the management approach: HSE: inspection of work equipment. Use the topic's legal and technical guidance for the applicable work and location.
In this worked example, BuildOut Ltd uses hand-held tools for refurbishment, demolition, fixing, cutting, grinding, drilling and snagging. The company treats tools as controlled work equipment rather than personal odds and ends kept in vans.
| Management element | How the business would manage it | Evidence to review |
|---|---|---|
| Assessing | Identify high-risk tools and tasks by injury, vibration, noise, dust, electricity, fire and ergonomic risk. | Tool risk register and task assessments. |
| Analysing | Challenge whether tasks can be prefabricated, mechanised, completed with lower-energy tools or moved away from public/interface areas. | Method review and procurement decision log. |
| Implementing | Use approved tools, correct accessories, pre-use checks, defect quarantine, storage, permits and PPE matched to task. | Tool issue register, pre-use checks and permit records. |
| Training | Authorise users for grinders, nail guns, breakers, test equipment and other higher-risk tools. | Competence matrix and practical assessment records. |
| Checking | Supervisors inspect tools on site, challenge wrong discs/bits, verify dust/vibration controls and remove defective equipment. | Inspection reports and action tracker. |
| Learning | Trend cut injuries, eye injuries, vibration exposure, damaged leads, accessory failures and near misses to improve purchasing and training. | Incident review, toolbox update and supplier feedback. |
What does a safe cutting decision look like before, during and after use?
Release the task only after the location, tool, accessory and exposure controls are proved; stop on a change and close the hand-back.
A refurbishment change needs a fresh tool and exposure decision
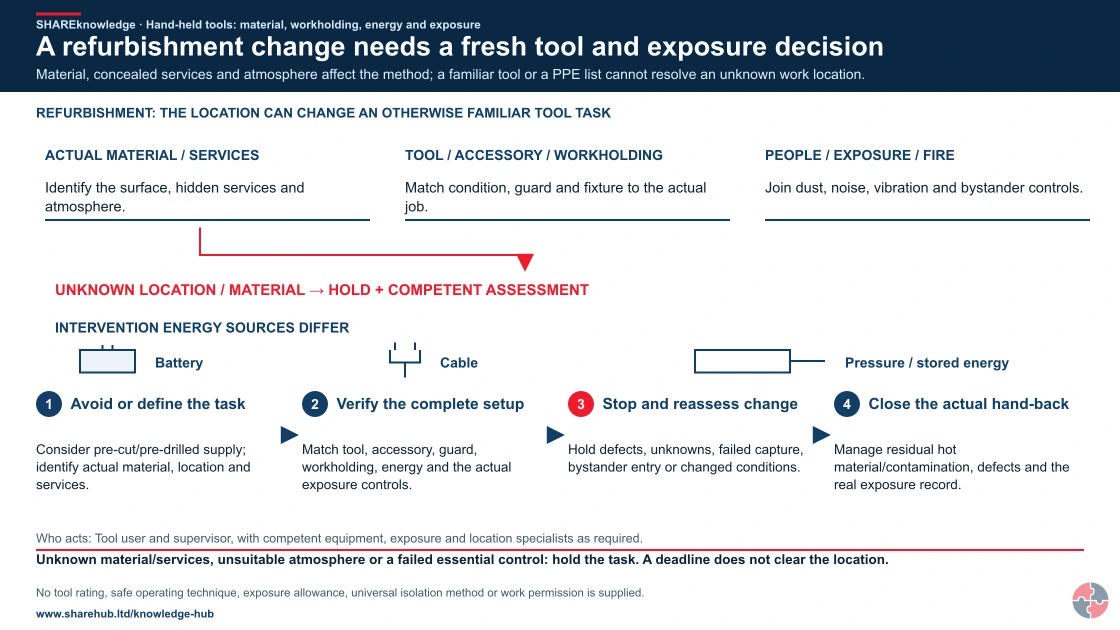
Full written explanation
A complete native refurbishment map connects three separate pre-use questions: actual material and concealed services; suitable tool/accessory/guarding and workholding; and location-specific dust, noise, vibration, fire and bystander controls. An unknown-material/services branch terminates in a hold and competent assessment rather than authorising a cut. A lower energy-source comparison shows battery, cable and pressure sources as alternatives whose intervention methods differ, not a single universal unplug rule. Four review stages progress from avoiding the cut where feasible, through verifying the actual setup, to stopping on change and closing the hand-back. No disc rating, safe working distance, exposure time, trigger-time allowance, injection-treatment recipe or generic isolation test is assigned.
Material, concealed services and atmosphere affect the method; a familiar tool or a PPE list cannot resolve an unknown work location.
- Avoid or define the task. Consider pre-cut/pre-drilled supply; identify actual material, location and services.
- Verify the complete setup. Match tool, accessory, guard, workholding, energy and the actual exposure controls.
- Stop and reassess change. Hold defects, unknowns, failed capture, bystander entry or changed conditions.
- Close the actual hand-back. Manage residual hot material/contamination, defects and the real exposure record.
When the evidence does not fit: Unknown material/services, unsuitable atmosphere or a failed essential control: hold the task. A deadline does not clear the location.
Who acts: Tool user and supervisor, with competent equipment, exposure and location specialists as required.
Changed workplace
Workshop drilling: Match drill/accessory and actual vice-held bracket; verify the inactive setup before any use.
Building refurbishment: Resolve location/material changes and the complete guarding, dust, noise, vibration and fire controls.
Evidence check: No tool rating, safe operating technique, exposure allowance, universal isolation method or work permission is supplied.
Use the full tool, accessory, workholding and intervention assessment
Primary references: HSE suitable work equipment · HSE competent maintenance and energy · HSE HAV controls and selection
Open the complete HD image (new tab)Download image

Use the full tool, accessory, workholding and intervention assessment
Primary references: HSE suitable work equipment · HSE competent maintenance and energy · HSE HAV controls and selection
Before cutting a steel bracket, the supervisor asks whether a pre-cut item can be supplied and checks the material, location, nearby people, concealed services and flammable-vapour possibility. The user presents the specified guarded tool, rated disc, secure workholding and any needed extraction; the supervisor sees the setup and records the release. A flammable atmosphere or unknown service is a separate hold point for a competent assessment of the location and method.
During the first cut, the user watches for kickback, disc damage, visible dust and changed access. Any guard defect, new vapour indication, failed capture or bystander entry stops work; the tool is isolated and quarantined where defective. After cutting, the user checks for hot material and ignition risk, cleans without resuspending dust, returns the tool, and records defects and actual trigger time for the exposure review. The supervisor signs the hand-back only when barriers and area are restored. HSE PUWER overview; HSE HAV control and tool selection; HSENI PUWER NI.HSE DSEAR guidance
How does hand-held tools support NEBOSH and professional learning?
Hand-held tools is a practical learning topic because it connects PUWER, tool selection, safe use, inspection, health hazards and workplace conditions.
Learners should be able to explain how powered and manual tools are selected, why condition and suitability matter, how the work location affects risk, and what controls apply where tools may create vibration, noise, dust, electricity or ignition risk.
Good exam and professional answers should avoid generic statements. Instead of saying 'train staff and wear PPE', describe the tool, the task, the material, the hazard mechanism, the pre-use check, the supervision standard and the evidence that shows the system is working.
| Prompt | Strong answer includes | Common weak answer |
|---|---|---|
| A worker dry-cuts masonry with a grinder. | Silica dust, disc suitability, guard, extraction/wet method, RPE and exclusion. | Wear goggles. |
| A tool is used in a fuel store. | DSEAR assessment, ignition risk, permits and suitable equipment. | Use carefully. |
| A drill lead is taped. | Electrical defect, quarantine and replacement. | Tape it again. |
| A breaker is used all day. | HAVS assessment, trigger time, alternatives and health surveillance. | Rotate workers without exposure calculation. |
| A subcontractor uses own tools. | Site standards, competence, inspection, maintenance and issue control. | Contractor is responsible. |
What competence is needed for hand-held tools?
Training must be demonstrated at the actual tool and task, with different decisions for users, supervisors, maintainers and buyers.
A course attendance record cannot prove that a user has selected the correct disc, tested the stop control or recognised a failing cable. Supervision should observe the task and refresh competence after change or a weak signal.
| Role | Practical demonstration | Assessor and evidence | Reassess when |
|---|---|---|---|
| Tool user | Select correct tool and accessory, check guard and energy, show stop/quarantine. | Supervisor observes real task and records authorisation. | Tool, accessory, task or defect changes. |
| Supervisor | Challenge method, check public interface and release only after defects close. | Manager samples task release and action records. | Method drift or repeated defect. |
| Maintainer and stores | Identify safety-critical wear, isolate energy, repair or quarantine. | Competent maintenance lead checks records and hand-back. | Repair, modification or failure. |
| Buyer and specialist | Compare safer methods, tool performance and secondary noise/dust/HAV. | Competent adviser reviews specification and user trial. | New tool model or changed material. |
What warning signs show hand-held tool controls are weak?
Weak tool control is visible through defects, improvisation, wrong accessories, missing guards, poor storage and repeated minor injuries.
| Warning sign | How harm can develop | Action |
|---|---|---|
| Tools are modified or guards removed | Contact, ejection and entanglement risk increases. | Stop use, investigate why and reset controls. |
| Wrong discs or blades are available | Accessory failure or kickback can occur. | Control stores and train users. |
| Damaged leads or batteries remain in use | Shock, fire or failure risk increases. | Quarantine and repair/replace. |
| Workers bring unapproved personal tools | Maintenance and suitability are unknown. | Set contractor and employee tool rules. |
| Repeated hand cuts or eye near misses | Controls and supervision are not working. | Review task method, PPE, tooling and training. |
| Dust/noise/vibration ignored | Long-term ill health may develop. | Assess exposure and improve engineering controls. |
What do the acronyms and key terms mean?
Acronyms should be explained so tool inspections, risk assessments and training records are clear.
| Acronym | Meaning | Plain-English use |
|---|---|---|
| PUWER | Provision and Use of Work Equipment Regulations | Separate GB and Northern Ireland work-equipment regulations for work equipment suitability, maintenance, inspection and training. |
| HAVS | Hand-Arm Vibration Syndrome | Health condition caused by repeated hand-arm vibration exposure. |
| RPE | Respiratory Protective Equipment | Respiratory protection for dust, fume or vapour where needed. |
| PPE | Personal Protective Equipment | Equipment worn to protect against residual risks. |
| DSEAR | Dangerous Substances and Explosive Atmospheres Regulations | Regulations relevant where tools could ignite vapour, gas or dust. |
| RCD | Residual Current Device | Electrical safety device that can reduce electric shock risk. |
| LEV | Local Exhaust Ventilation | Engineering control used to capture dust or fume at source. |
How can I practise the checks in 3D?
Follow the highlighted check, compare a sound part with a fault, and see how a missed fault can cause harm. Then use the matching blank checksheet to record what you actually find.
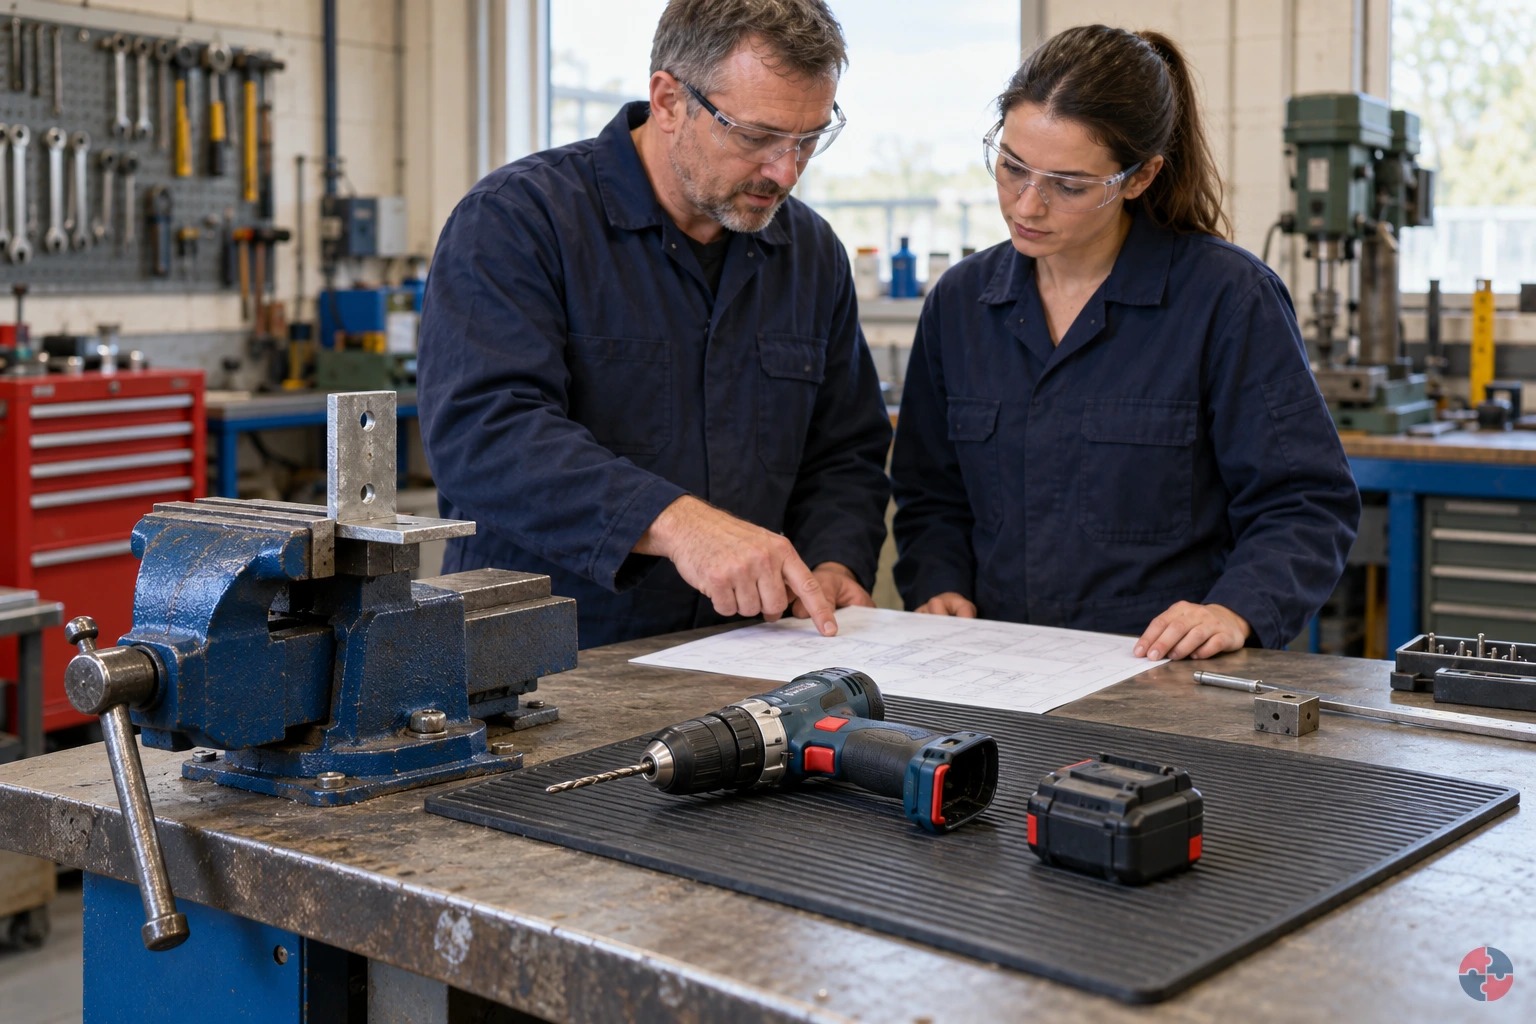
Hand tools and portable power tools
24 checks · sound and fault examples
Follow tool, attachment, guard, supply, workholding and safe-use checks. Use the actual equipment, task instructions and required inspection arrangements.
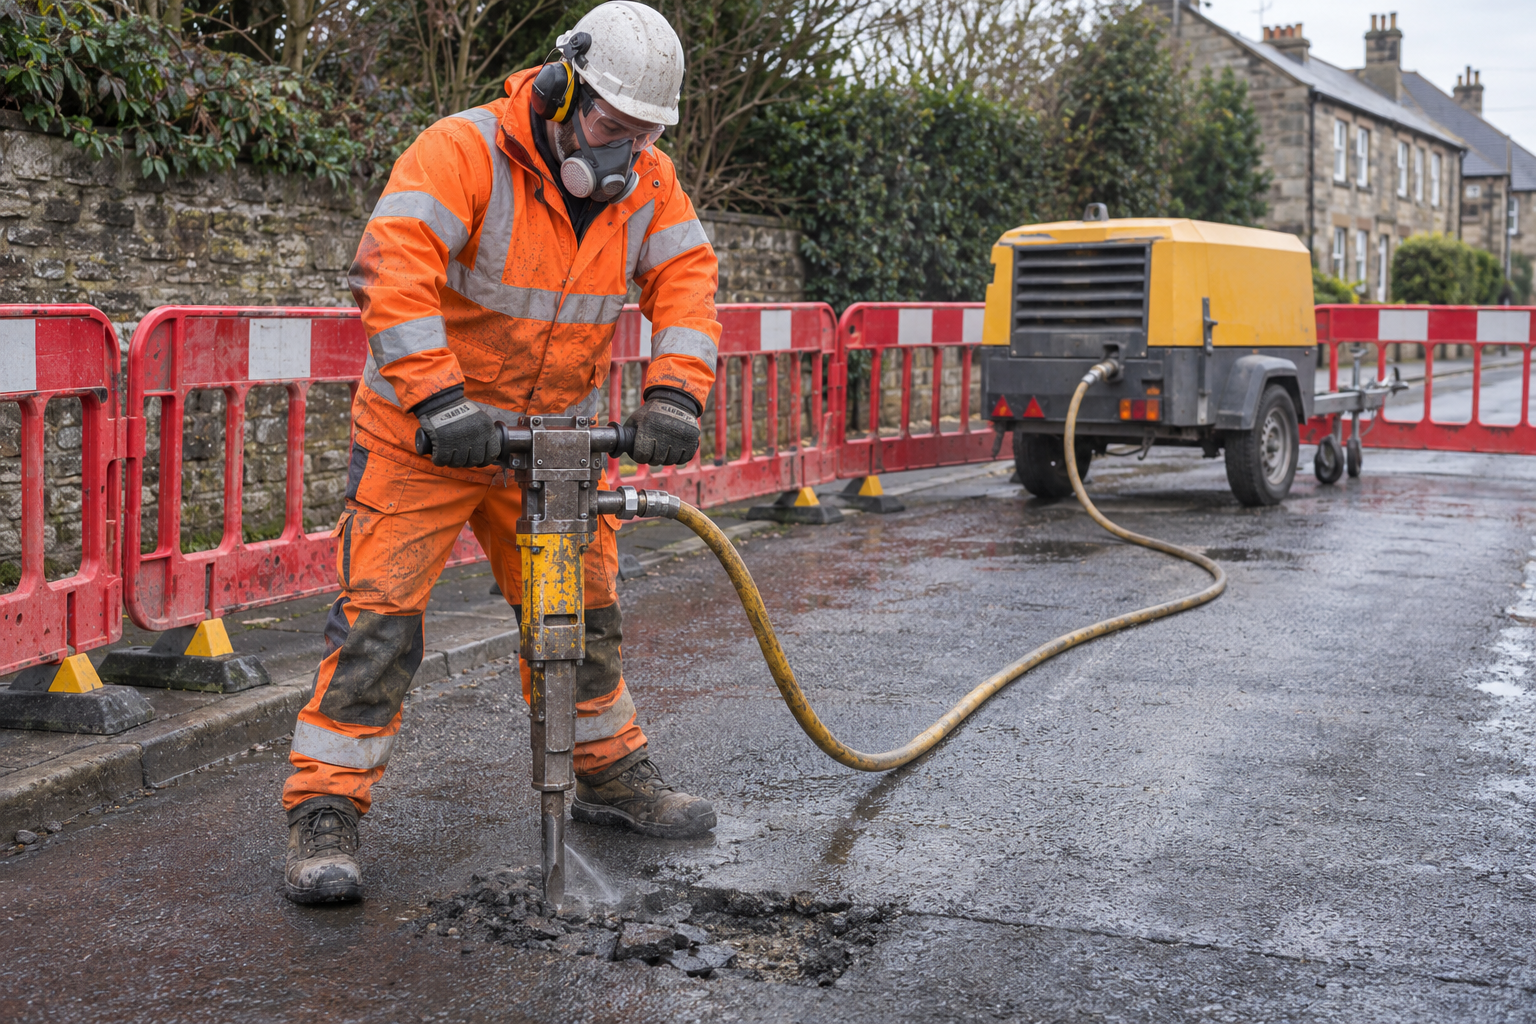
Pneumatic road breakers and diesel compressors
25 checks · sound and fault examples
Follow the pneumatic breaker, air hose, couplings and separate diesel-compressor checks. The hand tool is air-powered; its separate compressor has the diesel engine. Other breaker types need their own instructions.
Unlock another resource
You have used this month’s two free downloads. Publish a post in your own words to unlock one more resource, or choose SHARE Individual for 10 downloads per month.
You decide whether to share. If you do, use the relevant platform disclosure tools and do not make claims you do not genuinely hold.